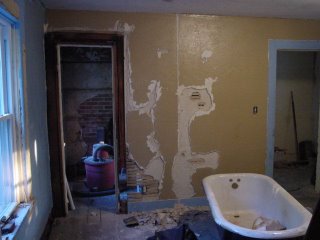
All too often I see people rip out plaster walls because they are cracked or have a bulge and replace them with drywall. Depending on the extent of the damage, it is often easier and cheaper to repair the wall and ceiling. Unfortunately, most folks don't know how to do this and speculate that it is hard work. I am going to be doing alot of plaster repair in the next few weeks and have decided to let you all in on the secrets of how to do this. There will be plaster on brick, plaster on lath and plaster on metal lath happening here as well as some drywalling next to plaster repair. Let me just add that doing all the plaster repair is considered the easy method of wall repair in my case because I plan to smooth out the textured walls as I have done in every other room so far. I need to get some hydrated lime, some sand and some plaster this week so that I can get started but let me show you what is prompting this crash course. I had a bulging wall that I thought would have to be removed and drywalled over. Before knocking all the plaster off, I decided to only remove the loose plaster. What I ended up with is this

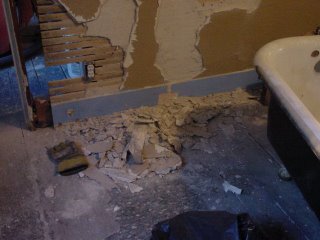
This took me 30 minutes and only created this much mess! I threw in the glove for scale.

The scratch coat is still keyed to the lath in most areas so this patch work will be very easy providing I wet all the underlying plaster down really good.When I am ready to start the repair work later this week it will only take another 30 minutes or so. Now, putting drywall over that door frame and smoothing all the walls and the ceiling with joint compound will take much longer! One of these days I'm going to haul that clawfoot tub up to the third floor, too!
Stay tuned, you will never have to gut your walls again!


Thank you. Thank you. Thank you!
ReplyDeleteI never understand when I visit sites and the homeowner is ripping down all of the old plaster and lath. It's like it's the assumed first step of restoring any old house. Thanks for showing that it's not! And you're right. Repair is much cheaper than replacing with drywall.
I turned a friend on to plaster washers recently. He's been like a kid in a candy store ever since, tightening everything up in his old house!
Keep up the great work, Gary!
Bill
So what do you do when the plaster keys are no longer holding on to the lathe?
ReplyDeleteA perfect example was the wall in our bathroom that I took back down to lathe. The plaster was in bad shape and once uncovered started coming off in huge sheets.
Thanks Gary! Our walls are in bad shape upstairs and were shoddily repaired by the PO (or is that PI?). We don't want the mess of ripping them out so we'll definitely be tuning in to this lesson! Thanks!
ReplyDeleteif the plaster is "dead plaster" and crumbly, it can't be saved. We had some cases like this where a huge portion would have to be replastered. Case in point the 2nd floor apt., which took alot of abuse. But then we have the hallway staircase, our living room, etc... and the plaster is solid and we repaired it.
ReplyDeleteThe other thing is if you are running all new electrical- it's "easier" to gut in some cases.
I am certainly one of the guilty parties. Guilty, that is, of quickly jumping to the "sheetrock solution." I can reform. I will be very interested in following this.
ReplyDeleteI'm with you - when we first moved in, I naively thought "Oh geez, we're gonna have to gut every room!". After some very successful patching, we realized that cracks and bulges are no big deal and, for the most part, easy to repair.
ReplyDeleteThe only place we've removed entire walls from has been our stairwell and upstairs hallway - half of which was poorly installed gypsum, half totally crumbling plaster, plus a plaster ceiling that had let go of the lathe and was being held on by the tin ceiling. And after seeing what a giant mess that made, we'll be patching just about anything we can!
Good luck with the patching, I'm sure it will make a world of difference in there!
i look at example in the bath and i have to say i think your pushing your product, how long would it take to strip the rest of the wall maybe add an outlet put up some nice green board and your starting out with a nice flat wall without trying to straighten out your repair,
ReplyDeletethis is a great blog, i find it very interesting and very informative..i am looking for a great ideas on how would i repair my cracked walls..
ReplyDeleteYou shared such a really wonderful information about repairing plaster walls. Thanks
ReplyDeleteIt is very difficult task to repair plastering. Repair is much cheaper than replacing whole wall..Very useful.!!
ReplyDeleteThis comment has been removed by a blog administrator.
ReplyDelete