Wednesday, August 30, 2006

Getting more Plastered!

More about plaster repair.

I never did have to buy any plaster of paris. My lime putty and sand mixture did the job just fine and since we are never in a hurry at crackhouse central the extended curing time was not a problem. In most cases the patching in was quite dry in 24 hours but there were shrinkage cracks. I'm sure that using fibers in the mix would have reduced this cracking which could be filled with more lime putty and less sand or finer sand by the way.
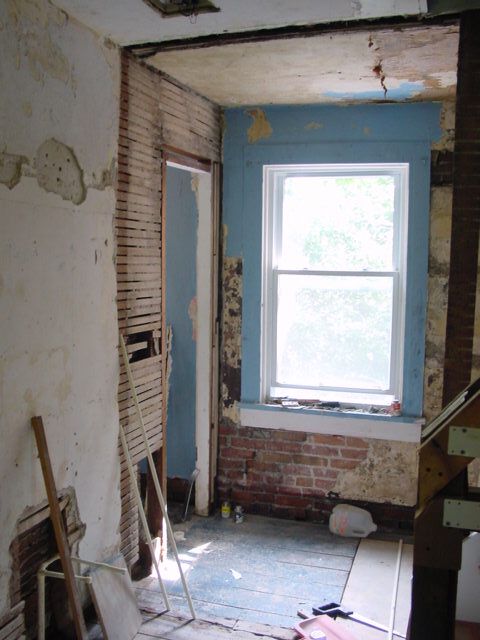
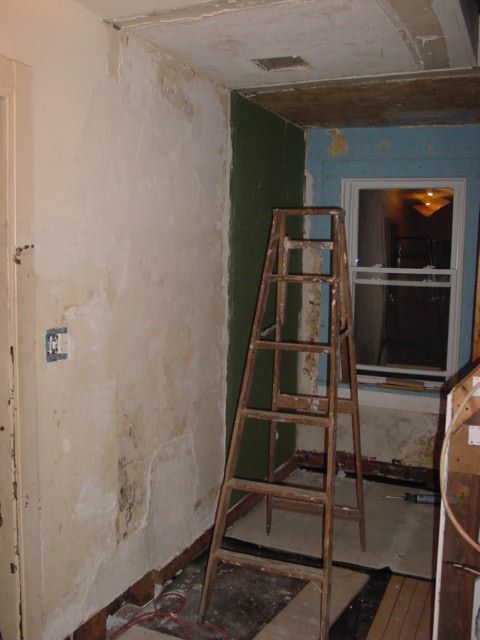
This wall is all plaster repair except those "fingers" at the top. They are hairline cracks that have been taped with mesh drywall tape and a fine coat of joint compound applied to get the tape to stay on the wall.


I haven't drywalled over the door yet because I need to establish where the wall mounting faucet will go and do a little jimmy rigging to hold it in place or establish some kind of access panel so that I can deal with the burst pipes after the winter freeze! (Since plumbing is truely my greatest constant with this place.)
This wall was my experiment wall with filling shrinkage cracks and smoothing lime plaster. On the other side, where the laundry room is, it looked like this


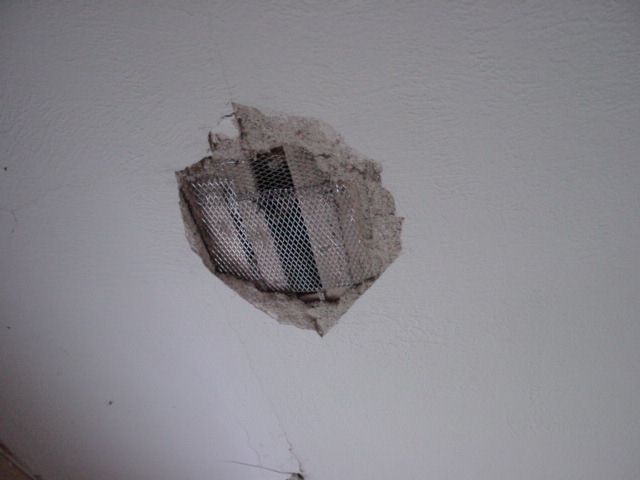
There isn't much room to take a good picture of the patch behind the toilet. It was basically a rectangle of green board. In fact it was almost the right size for the area to be patched and rather than cut the dry wall, it was easier to draw a line on the plaster where the edge of the board would go and chisle a little more plaster away from the brick. I then used my lime plaster to fill around the edges and after it had dried, I taped the edge with joint tape and smoothed the surface with joint compound.


I wasn't so particular about perfect plaster in the laundry room. I left shrinkage cracks to be filled with the joint compound as long as the plaster was firm and holding to the wall. I stated in my first post about plaster work that I wasn't trying to impress anyone with my plastering skills though I am impressing myself with my ability to make the walls smooth without having to sand them!

So, after covering the build out and partition wall with drywall and applying two coats of joint compound to the walls and ceiling in some areas, putting in a second ceiling light, moving the location of the original light, installing a switch and GFCI socket and cutting some old wood to use as baseboards, the laundry/powder room looks like this.


Now all I have to do is strip paint from the molding before applying a few more passes with jount compound in some areas and a final pass over the entire room with "Top Coat", put in some baseboards, install some electrical outlets to service the washer and dryer, tile the floor, finish the plumbing to the sink and this room will be ready to paint! For some people living in Chicago, I would like to say that at 8' X 16' this is the smallest room in the house. No, I'm sorry, Elizabeth's closet room, adjoining her bedroom is the smallest room at 5' X 8'. We'll never be able to live in a small house after this place!

Tuesday, August 29, 2006

Scratch 'n' Sniff Paint Removal

I've been stripping paint in the laundry room. If you have ever used a heat gun to strip paint from wood then you know that there are some odors that reveal themselves to you. The first is that of hot sticky lead based paint. Sometimes, if you work the same area a little longer you will reveal the odor of pine sap. We often get this and then we realize that no one has smelled this particular scent from this wood for 160 years. When I stripped the little built in cabinet in the breakfast room it revealed the smell of soap. It still smells like soap even after being repainted. Then there is always the surprise I get every few years when I strip corner baseboard molding in the house. Ewwww! The smell of wet dog. Some odors are best locked in. Of course if I really wanted to get rid of it I would just set the heat dial on 10 and soon I will smell the odor of burnt wood!

Friday, August 25, 2006

All Quiet on the Western Front

I've been busy this week with more neighborhood stuff. Besides the yard sale (previous post) I have an alley sweep to pull off this weekend and a monthly newsletter to write. I have actually finished the plaster work and have started smoothing the walls in the laundry room. I will finish my post on plaster repair when I come up for air!
In the meantime, here is another history lesson. At one time Ohio was the western frontier, the "Wild West" with all it's colorful characters including Blue Jacket. Enjoy the story!

Tuesday, August 22, 2006

Yard Sale Event

Did you ever want a reason to come to wonderful sunny Dayton, Ohio? Well now you can have one! We have been planning a neighborhood yard sale event for a few months now and it is just three weeks away.
We have never tried anything this bold before. The neighborhood boundries are quite extensive if you were to try a walking tour. Our original plan was to encourage a few people in a portion of the neighborhood to have yard sales but not exclude the other sectors. The concept we came up with was simple.Anyone can have a yard sale but if you want to benefit from the Association's promotion of the event and be listed on the "Official" map that we print and distribute then it will cost you $5.00. The money being used to offset the cost of printing and advertising.
We are still putting things together and there are still a few weeks left for people to decide whether or not to participate but I think we are doing quite well. Take a look for yourself. I update this map every few days as more people commit to the event so you need to check back if you want to make the trip or plan on coming! There are more than 40 locations as of today!

I won't be able to do any shopping though, I will be at the information booth.......

Thursday, August 17, 2006

Don't be a Slacker!

Be a Shellacker!

Ever wanted to test your shellacking skills but were afraid to try? Here is your chance. They have unfinished wooden boxes at the "Dollar Tree." They are cute little things that are perfect for painting or finishing and they only cost...... you guessed it! $1.00 plus tax!

Apply four coats of Shellac with light sanding between coats and finish with some wax polish and super fine steel wool and "voila!"


The perfect little box to put Christmas gifts in. I wonder how many of these I could do with a quart of shellac? Now don't go out and spend $20 on shellac and alcohol to finish a lousy $1 box, go do something useful like refinish a floor or something!

Tuesday, August 15, 2006

Heading Towards the Light.

I picked up our lights from the soon to be demolished building on Sunday. I was wrong about when the place was built. It is on the 1897 Sanborn Fire Insurance maps. The owner said that they found 1895 newspapers when they put in insulation and that it was converted into the family business in the 1920s and has remained much the same way since then. So I expect that the front door is original though it must have been moved and the bay window installed. I expect that the staircase is an original one and the bathroom has remained fairly untouched. Which brings me back to the topic of the wall lights. These were in the bathroom and are original gas and electric combination fixtures.


They were a real bugger to rewire. There is a fine tube soldered inside the looped brass tube that you see. This feeds gas to the tap at the top. Most of the joints are soldered so there is no way to dismantle these fixtures. Getting the old wires out was the hardest part, followed by figuring a way to get new wires installed after my string broke (that I pulled through as I removed the old wires). Everything wants to get trapped at that gas valve where the U-bend is. Anyway, after an hour of phiddle phucking around I figured a way to get new wire installed along with new chain-pull sockets and the actual time taken to rewire each lamp was about ten minutes. Of course it took another hour to get the old wire out of the second lamp and I even had to leave one of the wires in place because it kept breaking as I pulled it with the needle nose pliers! The secret was to use a piece of very thin piano wire as a feed to pull the new wire through.

Remember when I said "All reasonable offers considered?" The offer on these was $75.00 for the pair. Which was fair in my opinion. The material cost to rewire and replace the sockets was under $9.00. Making them $42.00 a piece. Replacement shades like the ones attached to the fixtures would cost about $32.00 plus shipping so I'm happy.

Now I just have to rewire the entire bathroom once again just to accomodate the light fixtures!

Monday, August 14, 2006

Playing Tag with the Dopeboys!

Some idiot tagged our building early last week.


What a wanker!

We have paint left over so I tagged it back!

Saturday, August 12, 2006

Architectural Salvage from the source!

A local reader of this blog contacted me several weeks ago regarding possibly having a door that would fit the 101" X 36" opening that we have between the dining room and parlor. When I finally contacted her I was informed that their family owned a building that they had decided to demolish sometime soon and they would like to sell off the architectural items before they succumb to the wrecking ball. So I went along to see what was there. The doors were big, but the 94" X 33" size was not going to work. Anyway, there were a pair of sconce lights that we are going to be picking up from them. Hopefully they will work in the bathroom. I took a bunch of pictures of some of the items that they would be happy to sell off and set up THIS SITE in case anyone is interested in any of the items. I am guessing that the property was built around 1915. The woodwork is all original and in excellent condition. The claw foot tub is unusual in that it is thinner than any I have seen and the two flushing toilets are definately old, as is the bathroom sink. Don't contact me with any offers! I have no affiliation with the building other than I got to tour it and will be buying a pair of period wall lights that hung in one of the bathrooms! The email address of the contact can be linked to from the site. All reasonable offers will be considered. If you are building a new home then you might want to consider that staircase and the oak fluted column that goes with it or that front door or even those leaded glass windows! All the molding has original shellac finish and the pocket doors work! This is the first time these items have been offered to the general public. If you see something you like the contact the owners, otherwise some salvage dealer could get all of it and you will never see it again!

Monday, August 07, 2006

Playing With Lime Putty

I mixed up a batch of lime putty from my bag of masons lime. Using an empty pail of kitty litter half filled with water, I added lime until the mix became putty like. It sucked up about half the 50 lb. bag and filled the pail to about 3/4 of its volume. I then let it sit for a day. Masons lime (bagged lime) does not produce the best possible quality of lime putty, or so I have read.
Quality lime putty is made when calcium oxide (from heating limestone)is added to water to produce calcium hydroxide also known as slaked lime. It is best when left to mature for at least one month. You can buy lime putty this way if you are trying to have super smooth plaster walls. Bagged lime is dry calcium hyroxide.
When lime putty cures it reacts with carbon dioxide in the air to form calcium carbonate which is limestone. The reason bagged lime is not the best thing to use for lime putty is because an unknown amount of the lime will have already reacted with carbon dioxide before the putty is made.

After a day my putty was more like "Top Coat" in consistency. This is good when adding sand to it but wasn't so good when experimenting with a final coat. Lime putty certainly creates a stickier plaster and held to the ceiling much better than the mix as you go method that I used several days ago.

With 90 degree weather my plaster is drying very quickly and when using my lime putty it is causing shrinkage cracks in the finish coat.

When applying plaster for patching I found the trowel most useful. As the top coat sets a little you can trowel it smooth or even rub it smooth with a wooden block. The key here is that you can get it flat and smooth in one day. Joint compound takes three or four days with drying time. The plaster requires more attention and addition of more putty to smooth out low spots.
Since my putty is somewhat fluid, I am assuming that caused the shrinkage cracks that I viewed on Sunday after a day of curing. The good news is that I used a standard 4" scraper to apply a "slurry" of lime putty to the wall surface and this filled all the cracks nicely. I can report back the results in a day or so.

I have been asked to describe how to make plaster look like subway tile. Since I don't need to do this I can't answer the question but I can say that I did use my scraper to carve a line into the firm but still damp lime putty finish coat and it seemed to work quite well. So I would recommend to that reader that they experiment with their own lime putty until they are comfortable with the result. I am just trying to patch some walls well enough to apply joint compound so that I can smooth out the textured walls. If my walls were smooth plaster, I would say that the patches are done, but since the walls all around the patches are textured, the patches are the currently the smoothest part of the wall!

Considering that I have never used lime putty before, I can't complain. The walls will certainly be patched adequately enough to smooth with joint compound. In a few years when I get around to it I will re-plaster the walls in the basement and whitewash them, so it is good that I start learning this stuff now!

I still have to buy drywall to do the drywall patches and to date I still haven't bought any plaster of paris to add to the lime plaster, I don't think I am going to need it. Speaking of getting plastered, I've run out of beer.....

Friday, August 04, 2006

A Most Unreliable Door Stop!


I have finally found a productive use for Tango. However, she is not dependable and abandons her post frequently. In another 4 years I may find a productive use of the other two cats. Perhaps they will learn to catch mice! I think we should call this picture "Puss n' Boots"!

Wednesday, August 02, 2006

More Plaster Stories.

So you've taken my advice and decided to tackle that bulging wall. Only a huge chunk of plaster has fallen on your foot exposing a large area of wood lath and you are cursing this project before you started.There are such things as plaster washers that you can screw into the plaster, pulling it back up to the lath leaving a small divet where the washer is that needs to be filled. We don't have any of those here at the "Old Crackhouse". We are not so sophisticated. Since I am going to be smoothing all the walls and ceilings they wouldn't do me much good and by the time I ordered some and they arrived I could have the patchwork done. Besides, my problems aren't that large in area that I need to consider the plaster washers though there is this area behind the toilet but plaster washers won't help me now


I have thought about this area for five years and have concluded that the easiest fix will be a piece of green board glued and screwed directly to the wall and the edges filled with plaster. When I get the drywall then I will post about this repair. First I have to be sure the "Beast" will make the return trip from Lowes!

Back to the subject of this post though, and to answer a previous question. If you have nasty previous repair work on your walls and feel that joint compound won't eliminate them then you need to chisle the ridges off the wall. This may cause you to lose much plaster unless you chose to use plaster washers along both sides of the repaired crack, but like I stated, "We don't need no stinkin' washers" here! Why? Because I know how to fix the problem!

What you need to do is staple wire mesh or some kind of metal lath to the wood lath so that your plaster will have something easy to key to! In my case the patches are relatively small. So, since my stiff wire mesh has been commandeered to keep squirrels out of the house and I gave my last piece of galvanized steel lath to a neighbor who never used it to keep squirrels out of his house all I had left was some leaf guard gutter mesh. So, guess what I used? Here is what you do


A wall repair.


A ceiling repair.

Galvanised wire mesh is much stiffer and costs about $5.00 for a 4' X 8' sheet the last time I bought some. I will need to stop at a concrete supplier to get a sheet in order to fix a larger area on the other side of this wall but once again, the "Beast" has to start for the return trip! (OK, I ran the auxilliary tank down to empty several weeks ago coming back from the auction and the carb filled up with the rusty sludge from the bottom of the gas tank so there is some difficulty starting the thing until I run clean gas through the system! If it won't start, the battery loses ooomph and I am stranded.) I really should drive that thing more often.

Next you mix up some plaster. I used a mix that was 2 parts sand, one part lime for the "scratch" coat. The plaster should be mixed with enough water to make it plastic and able to adhere to a metal trowel. When applying to the wall you need to start at the edges with small amounts on the trowel (maybe an inch wide blob at a time) and press firmly and draw the trowel towards you, first into the edges and later over the previously applied section of plaster.The center of the area should be the last part to get covered. You are only trying to get it to key to the mesh. If you apply too much then gravity will take over and your plaster will end up on the floor. To help reduce this problem you can always add animal hair to the plaster or string fibers or even straw! It is certainly more difficult to get the plaster to adhere to the ceiling than the wall. The animal hair would have helped but when I started the electric shears the cats bolted and couldn't be found anywhere.
Once again, the trick is not to try to fill the areas to be patched in one go. The wall looks like this now.


The ceiling isn't as good yet because of the gravity factor.


Hopefully I will get some drywall soon and patch this side of that wall over including that doorway.


Since this powder room is an extension of the laundry room I am probably going to make a farmhouse style sink out of concrete and mount it on a bench made out of the original wood 4 X 4s that made up part of the wall here. You can see the trench in the ceiling where the wall used to be.The doorway is being covered so the sink can rest in this location. There is never a dull moment around here! You are now starting to grasp the extent of our plastering problems in these two rooms though.

Tuesday, August 01, 2006

It's Official! We Are Now Labelled as an Odd Place!

This is just your regular, ordinary houseblog or so I always thought. I will admit that we may have a little more work to do than most people and that even after 5 years I may have more enthusiasm than most. With all this going for us could we get a mention in the Washington Post? No. Could we get a mention in the Chicago Tribune? No. Possibly the New York Times? Hell, no! We did get a mention in the Dayton Daily News once but only after volunteer work on another building.
However, if you are around long enough someone will crawl through the crevasses of the World Wide Web and seek you out! That is what happened. We are now labelled by www.kooksites.com as an odd place! I don't know if I should be boasting or complaining. I guess I could boast until the tabloid reporters show up to do a story about the alien abductions that are occurring on my roof!
For those of you visiting here from the kooksites link, welcome! If you think I have an "Odd" place then you need to go see John at The Devil Queen!