That would be the answer to the question "What is new at the 'Crackhouse'?" That's right. I stopped by to put out the garbage can this evening and since it had been raining, to check the status of one of my roof leaks. Upon entering the third floor I see two bats flying around above me. There were no dead mice in the traps and my system of water collection seems to be working. I turned off the light and proceeded to the second floor. I figure the bats let themselves in, they can find their way out. So upon entering the bathroom on the floor below and checking the wall that my leak has discolored I see a mushroom growing out of the ceiling in the corner where the leak is. This only seems to occur when the wall starts to dry out. I have seen it in the same spot on two previous occassions over the last 5 years. Good job we haven't painted that room yet!
Our lives, it appears are controlled by the forces of nature. Just a few days ago we were awakened by Elizabeth with whom I had the following discussion on Sunday morning;
"Dad? Dad? Daaaaaad!"
"What?"
"There's cat puke under the bed."
"Under the bed?"
"Yeah."
"That's good. At least I won't step in it then."
"Hmmmm. Wait a minute!"
"What is it now, Elizabeth?"
"That's not cat puke! That's my toy!"

From log house to farmhouse. Farmhouse to townhouse. Townhouse to apartment house. Apartment house to crack house. Crack house to our house. Our house to our home.
Wednesday, November 29, 2006
Monday, November 27, 2006
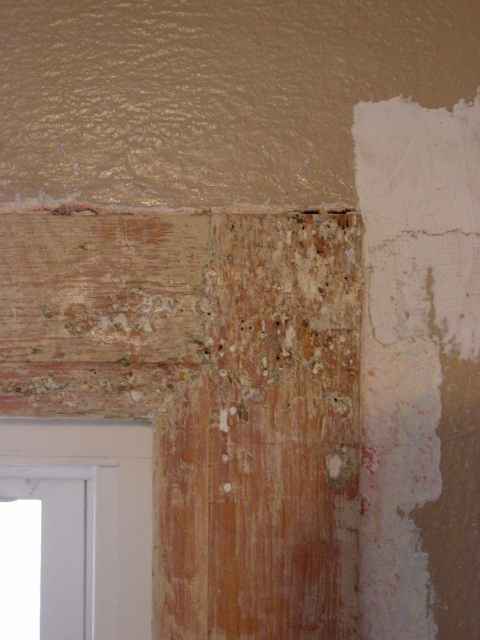
The Butchering of Our Woodwork
Here is one reason why we choose to paint the molding in this room.

This side of the house has been rented out since around 1915. I mean, how many curtain rods have been installed here? You would think that the things would be left between tenants. It's not like these things are made of copper and have a high scrap value if you just happen to be a drug addict or something! When I'm done stripping the floor I will show you why we are painting that too!
This side of the house has been rented out since around 1915. I mean, how many curtain rods have been installed here? You would think that the things would be left between tenants. It's not like these things are made of copper and have a high scrap value if you just happen to be a drug addict or something! When I'm done stripping the floor I will show you why we are painting that too!
I'm Stripping Again
Once again I find myself stripping paint from woodwork and a combination of tar, glue, paint and shellac from the floor. I no longer get frustrated doing this because I know and accept that it will take "forever" to complete. I spent 6 hours Saturday on the floor with heat gun and Silent Paint Remover switching between the two and got maybe 15 square feet of floor done. At this rate it will be a while before the floor and molding is ready for sanding. The good news is that I will be painting the woodwork and the floor in this room so I don't have to do a perfect job at stripping. The other good news is that it is one of only two rooms left in the entire house where I have to strip floors or molding. (There are still at least six doors though.) It seems to me that I always end up stripping paint in the winter Actually, it seems to me that I am stripping all year. It is just that I only remember doing it in the winter! Maybe it's a hot and cold thing. Maybe I've inhaled too many fumes.......
Wednesday, November 22, 2006
Recipes For Milk Paint
I promised this for John over at the Devil Queen who is having an orgy with the stuff this week. If you buy this pre-mixed it is quite expensive but to make yourself would be quite cheap unless you choose to use a cobolt, chromium or cadmium based color pigment! Let me just add that the only reason I know this stuff is because we found that Household Discoveries Book from 1909. It has been most useful in helping me understand exactly what people had available to use and why. Since I was painting my basement walls with slaked lime I have come to realize that this 4000 year old technique has become obsolete in this country in the last 50 years. When I tell people that I have been whitewashing my walls they look at me with a puzzled expression or make a comment like "I didn't think people did that anymore." The truth is that they don't and that is why basements look like crap in old houses. So what does this have to do with milk paint? Here are two recipes from the 1909 book as they are written;
Lime Paint.- A mixture combining the qualities of paint with those of whitewash may be made with slaked lime as a basis by the addition of various materials, as milk, whiting, salt, alum, copperas, potash, ashes, sand and pitch. with or without a small portion of white lead and linseed oil. These mixtures are more durable than whitewash, but have less finish than white lead and oil. The cost is intermediate between the two.
To prepare a lime paint, slake lime with water and let dry to the consistency of paste. Thin with skimmed milk to the proper thickness to lay on with a brush. Add color matter as desired.
Or slake 4 ounces of lime with water to the consistency of cream and stir into it 4 quarts of skimmed milk. Sprinkle the surface through a sieve 5 pounds of whiting. Let this gradually sink, then stir and rub together thouroughly and add coloring matter as desired. The casein or curd of milk, by the action of caustic lime becomes insoluble and produces a paint of great tenacity suitable for farm buildings, cellars, walls, and all rough outdoor purposes. Apply with a paint brush. Two or three coats will be necessary. The above quantity is sufficient for 100 square yards.
There are three more recipes involving such items as white pitch, potash, copperas, ashes, white lead and linseed oil in various amounts. The book also has recipes for fireproof paint, blackboard paint, acid proof paint, barrel paint and glue paint for kitchen floors! You could always go to Home Depot of course but you won't find bags of masons lime there. You will need to find a brick supplier for that and it will cost between $5 and $7 for a 50 lb. bag
While knowing the basic ingredients is useful, this opens oneself up to other questions like "What the phuck is copperas?" So you better have a dictionary handy!
Monday, November 20, 2006
That Southern Style
Has Come to Dayton!
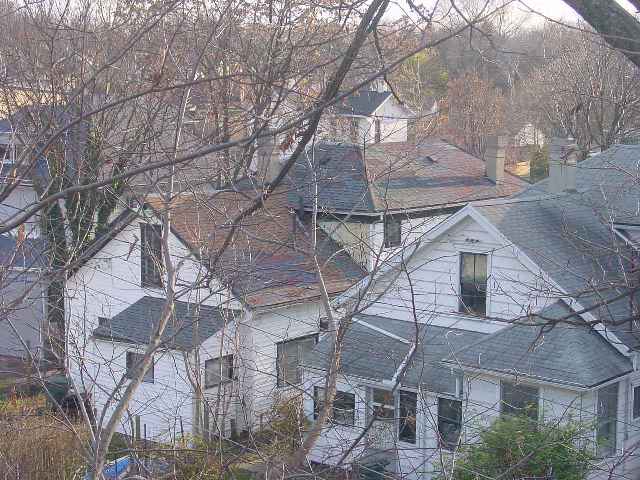
Once again, minding my own business trying to reduce the amount of water that gets to the 2nd floor when it rains, I took a look out of one of our windows on the 3rd floor. One of the nearby houses was in foreclosure recently and has been acquired by someone who has been doing some work to it. I think they have been reading the "Devil Queen" blog about roofing. Either that or they have the same supplier of shingle! I counted 7 colors, Red, blue, green, grey, black, tan and brown. Some ridges are grey, some are black. I'm sure they didn't pay a lot of money for this roof! The multi-colored concept is fine but no thought went into placement of color or pattern. The ridges look really bad and the place looks worse than this picture shows because you can't make out all the variations in color. Unfortunately there are no penalties for having an ugly house here!

Once again, minding my own business trying to reduce the amount of water that gets to the 2nd floor when it rains, I took a look out of one of our windows on the 3rd floor. One of the nearby houses was in foreclosure recently and has been acquired by someone who has been doing some work to it. I think they have been reading the "Devil Queen" blog about roofing. Either that or they have the same supplier of shingle! I counted 7 colors, Red, blue, green, grey, black, tan and brown. Some ridges are grey, some are black. I'm sure they didn't pay a lot of money for this roof! The multi-colored concept is fine but no thought went into placement of color or pattern. The ridges look really bad and the place looks worse than this picture shows because you can't make out all the variations in color. Unfortunately there are no penalties for having an ugly house here!
More Basement Archaeology
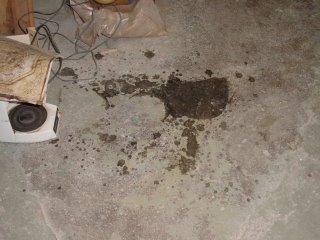
There I was putzing around in the basement of the "Crackhouse" once again. Actually I was doing some more plaster repair work when I got myself distracted as usual. I have a spot where we get water entering in one of the rooms when it rains, I decided to pack mortar into the gaps between some of the stones to see if that would reduce or eliminate the leakage. Some old plaster and flaking whitewash was falling off the wall so I took a scraper and then a brush to it then I had to sweep up the mess it made. Where is all this leading? Well, I'm getting there.
There is a door placed between two of the rooms with a 10 inch wide wooden threshold that had been embedded in concrete. I decided to pull this up to discover that it was rotten and that the wood had converted into soil which in turn had roots and assorted bugs growing in it! So I cut the roots (ripped them out really) and took a brush to the inch of soil and what did I find? Bricks! All nicely packed and laid out as a floor. I suspected that my basement had a brick floor under the concrete and now I have found it. So now I know that I can readily lower my floor down there by several inches should I want to. It's not something I'm chomping at the bit to do....
There is a door placed between two of the rooms with a 10 inch wide wooden threshold that had been embedded in concrete. I decided to pull this up to discover that it was rotten and that the wood had converted into soil which in turn had roots and assorted bugs growing in it! So I cut the roots (ripped them out really) and took a brush to the inch of soil and what did I find? Bricks! All nicely packed and laid out as a floor. I suspected that my basement had a brick floor under the concrete and now I have found it. So now I know that I can readily lower my floor down there by several inches should I want to. It's not something I'm chomping at the bit to do....
Thursday, November 16, 2006
Another One Bites The Dust!

Another one bites the dust
Another one bites the dust
And another one gone, and another one gone
Another one bites the dust
Hey, Im gonna get you too
Another one bites the dust
Wednesday, November 15, 2006
Who Ya Gonna Call?
The scenario this very evening: There I was standing in the basement minding my own business among the cat litter boxes, the aniline dye stains and the boxes full of crapola that have been there for years. I was actually attacking an old gas fire appliance that we have absolutely no use for with a wire brush (coz that's the kind of guy I am. I always have to be doing something worthless!) The wife is giving your favorite little munchkin a bath and world is our oyster!
Then I hear "gurgle, gurgle" and water is rising out of the basement drain. This tells me two things. The obvious one being that Elizabeth is finished with her bath. The second thing it tells me is that I should really lay off the high fiber foods! Within a minute the water subsides and I go back to scraping with my wire brush figuring that I will have to deal with the situation within the hour or else I will be dealing with a worse situation in the morning!
Then one minute goes by and I see water rising out of the drain again only faster and it is pouring all over the floor! This tells me two more things. The obvious one being that the wife is in the shower and that I REALLY need to lay off the high fiber foods. So I run up the stairs shouting "Stop running the water! Turn off the taps and whatever you do, DON'T FLUSH!"
Now anyone with an old house that has an 80 year old maple tree in their front yard knows what the problem is here. In fact, it is one of those recurring ones that comes back every year like clockwork. The bad part is, when it happens at 9 PM you know you are screwed until the morning unless you know the secret to temporarily cleaning your sewer line quickly 95% of the time. This fix won't work forever because mother nature ultimately wins. Tree roots have a thing for real, bonafide, genuine crap and when the two become entwined, the sh*t has really hit the fan! At that point you have only two options and you may as well eat fiber until a bush grows out of your *ss because it doesn't matter one bit any more! The two options are A) Rent a ginormous drain snake and hope you know what you are doing or B) Pay someone else to snake your drain at $100 a pop and hope they know what they are doing! If you elect option A) make sure you wear leather gloves that you can afford to throw away unless like us you have another house where you can stash them until they dry out and the smell won't get to you every day!
So. Who wants to know what the quick fix was that allowed my dear wife to finish her shower within 5 minutes and not have to stand around drip drying until morning? I've divulged this secret in a previous post and it is answered within this post for those of you who absolutely must know this little trick. For a clue, let me add that the trick didn't work for me LAST YEAR.
No, I didn't go out and cut down the tree.......
Saturday, November 11, 2006
The Mice are Scared!

I ventured up to the third floor today and noticed a great reduction in the quantity of mouse poop around the center of the floor near the traps. The traps haven't caught anything in a while. The mice must have been scared off! They must have heard about the mummified remains of their great ancester that I found. Maybe it was the sight of the mummified head mounted on a toothpick and posted near the entrance to their nest as a warning!
Monday, November 06, 2006
The Shellac Chronicles Part 4 (Coloring Shellac)
Shellac can be colored with anything that dissolves in alcohol. Aniline dye is the most likely candidate. These are the dyes that are used to make inks. They are often used in permanent markers and come in all colors. They can be purchased from THESE PEOPLE. You really don't need a lot of dye. I bought an 8 oz. can of Walnut Dye and after using it on my floor, stairs, metal locks and fixtures and sending about 2 oz. to Greg I still have half of it left and a jar full of dark alcohol still to use up.
Before you add it to shellac you are supposed to dissolve some in alcohol. Then you filter it to remove the undissolved bits so they don't end up as specks on your finished wood work. I tried this once. Fortunatly it was in the basement. I had some old PVC plumbing left over from the "Placebo" incedent and made a makeshift funnel and used a coffee filter slapped over the end attached with a rubber band. I poured the walnut colored alcohol/dye solution into the pipe and waited for it to trickle into an old jam jar. I waited and waited and waited and waited as it slowly drip, drip, dripped into the jar. "There has to be a quicker way" I thought! I know what to do, I'll blow down the tube. So, I removed the reducing coupling "funnel" and clasped my hands around the piece of 1 1/2 inch PVC pipe which had the filter attached to it. I stood directly over the jar and I blew slowly and the solution began to flow faster. So I blew harder. The solution flowed a little faster than before. So I blew harder and PLOP! The filter had blown off into the jar with considerable force followed by the remaining solution in the pipe. Well, in that split second I remembered my physics classes about force and how energy is not lost but converted, just as the solution was rising out of the top of the jar heading straight for my face! So I did the only thing I could. I closed my eyes and thought of England.
Now I was covered in dark walnut aniline dye solution. It was all over my hands, face and the floor. I tried to get it off the floor but it wasn't happening. Then I thought "CRAP! I have to filter this stuff AGAIN because now it was all in the same jar" and decided to go upstairs to look in the mirror. Standing in front of the mirror looking at my face I started singing minstrel tunes which alerted Deborah to my plight who's reaction was simply "OH!"
Since this is the stuff they put in permanent markers you may have guessed that the shower taken to remove the stuff was a long one, but I do a lot of thinking in the shower. This time I remembered why we used "funnel filters" in chemistry class and that we folded the filter papers into cones. Afterwards I applied my memory to the task at hand and it seemed to work just fine. Blow jobs are definately not in my future! I mean, look at the mess it made and I can't get rid of the stain......

Friday, November 03, 2006
Remembering That Special Moment
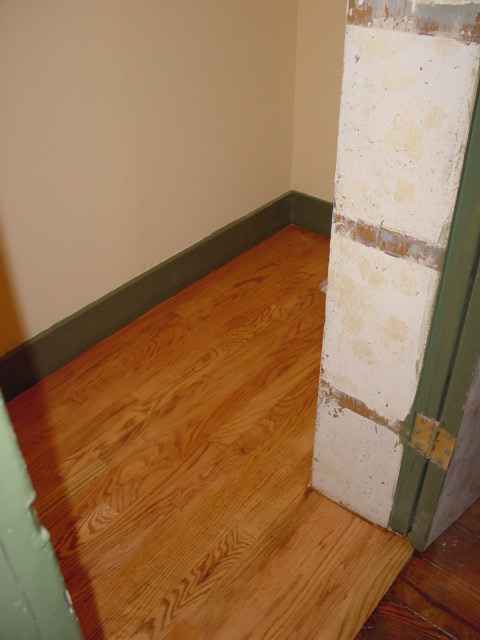
Well folks, I didn't spill the shellac over the floor. I'm sure some of you were hoping that I would so you could enjoy the moment. It's OK. You can admit it. As of tonight the floor has 5 coats of shellac and one very thin one of semi-gloss polyurethane. One more thin coat of poly and I can finish painting the door frame and inside trim. Here is a picture of the floor before the polyurethane went on.

Once done I will wax the floor and after a few months the poly will yellow and it will be incredibly dusty so it will look like it has been there forever.
In case you already forgot, here is how it looked on Monday.


Once done I will wax the floor and after a few months the poly will yellow and it will be incredibly dusty so it will look like it has been there forever.
In case you already forgot, here is how it looked on Monday.
The Shellac Chronicles Part 3 (Experiments with shellac)
I've been struggling with "Blogger" for two days trying to upload pictures! Let's hope these ones post....
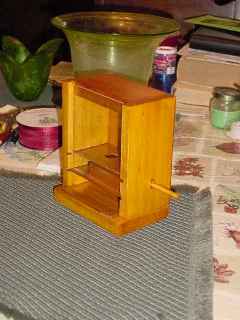
Well, lets see, where was I? Oh, I bought some shellac from Home Depot and was eager to see what it did. So, I applied it to some wood display bases that I had. You all knew I painted these miniatures, right?

Then I dipped some miniatures in the stuff.

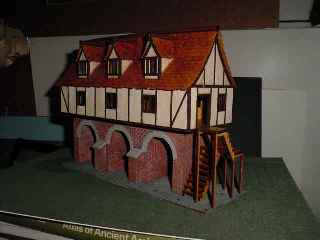
I applied it to some paper and then used it on these two model buildings that I had laying unmade in a drawer.


I used it on this "Gumball Machine".

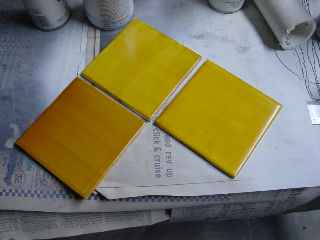
I coated some ceramic tiles with the stuff.

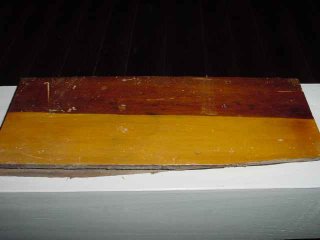
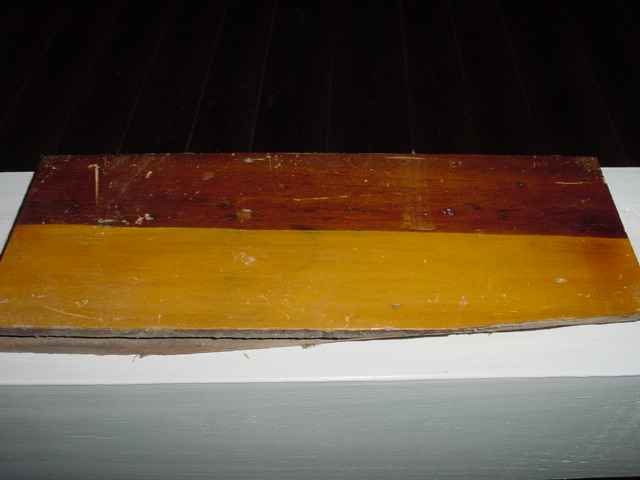
I tried adding alcohol to it to thin it down. I tried some on glass. I even experimented with scraps of wood which had been painted with various colors. Here is one sample I still have laying around the place.
So now I was READY to do some real damage!
I actually recall using it on some window sashes first. I figured that if I didn't like them I could always paint them. Of course they came out fine. I think the next thing I did was restore these stairs.
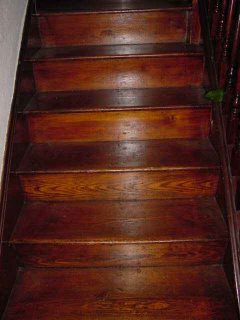
In this case I rubbed down the original finish with coarse steel wool and denatured alcohol. Wiped up the slop and allowed to dry. Sanded with a palm sander and 150 grit paper then applied some new shellac.
The rest folks is history! If you want to see the stuff I have done with shellac at the house then use the search feature from the home page of this blog and type the word shellac. There are some 45 entries that will come up where I have mentioned the word. The search scans 250 of my pages but since I have actually produced nearly 400 between the web page and the blog you won't necessarily find all the shellac posts.
So, unless you folks have more questions that need to be answered, my final post on the subject will cover aniline dye, tinting and why you shouldn't blow down a tube of the stuff in an effort to speed up the filtering process!
Well, lets see, where was I? Oh, I bought some shellac from Home Depot and was eager to see what it did. So, I applied it to some wood display bases that I had. You all knew I painted these miniatures, right?

Then I dipped some miniatures in the stuff.

I applied it to some paper and then used it on these two model buildings that I had laying unmade in a drawer.


I used it on this "Gumball Machine".
I coated some ceramic tiles with the stuff.


I tried adding alcohol to it to thin it down. I tried some on glass. I even experimented with scraps of wood which had been painted with various colors. Here is one sample I still have laying around the place.
So now I was READY to do some real damage!
I actually recall using it on some window sashes first. I figured that if I didn't like them I could always paint them. Of course they came out fine. I think the next thing I did was restore these stairs.

In this case I rubbed down the original finish with coarse steel wool and denatured alcohol. Wiped up the slop and allowed to dry. Sanded with a palm sander and 150 grit paper then applied some new shellac.
The rest folks is history! If you want to see the stuff I have done with shellac at the house then use the search feature from the home page of this blog and type the word shellac. There are some 45 entries that will come up where I have mentioned the word. The search scans 250 of my pages but since I have actually produced nearly 400 between the web page and the blog you won't necessarily find all the shellac posts.
So, unless you folks have more questions that need to be answered, my final post on the subject will cover aniline dye, tinting and why you shouldn't blow down a tube of the stuff in an effort to speed up the filtering process!
Subscribe to:
Posts (Atom)