Monday, October 30, 2006

WARNING: We Interrupt This Blog for an Upcoming Shellac Moment.

On Sunday I got the new oak floor laid in the 1st floor powder room and put the stain on it (Minwax Golden Oak). The stain has been sitting around the place for two years and was quite lumpy. It needed a good stir before putting globs onto the wood and rubbing them around with a cloth. Any lumps of pigment got thrown back into the can in the hope that they will be smaller lumps in another couple of years. There is nothing like recycling! I tell you this because I see some people are very particular about the stain they use. Stain is basically pigment suspended in solution. Some solutions are supposed to penetrate the wood while others rest on the surface for a layer of translucent color. The latter are called topical stains. Most people are happy staining their wood and then putting polyurethane over it. Not me. This house is old. The floors should look like they belong here. Right now, this one doesn't! Take a look for yourself....


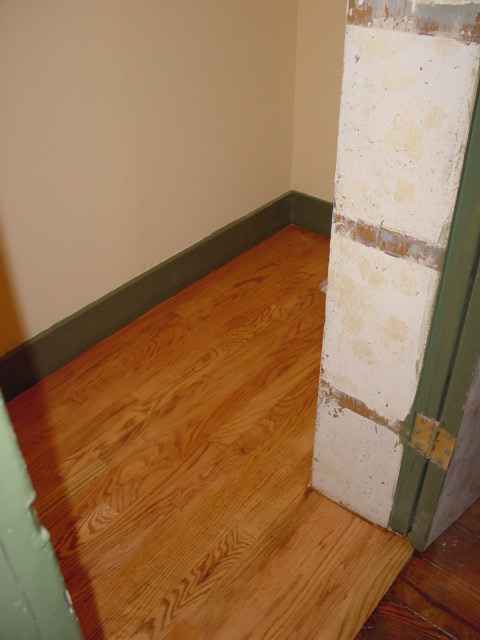
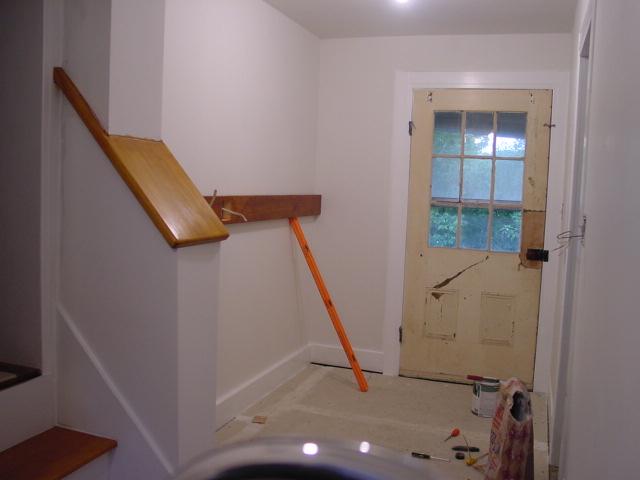
If I put polyurethane over it it will look like this only more glossy. This floor looks good but not in this house. It looks too new. This is the floor you would expect to see in a new home or a rehabbed one in a historic district where they advertise "beautiful" hardwood floors. I could do what many people do, buy another stain color or two and mix it until the wood is the proper color and then cover it with the "plastic" layer of poly. That doesn't solve the problem though. The floor would still look new and I want it to look like it has always been there. How will I do that? Amber shellac! I will still use polyurethane as the final coat because this is a bathroom but I am going to use the poly to protect the shellac. I am using the shellac like it is a topical stain.

I am posting this now because the timing is appropriate and because I haven't done the work yet so there is no "after" picture to show off. I can't tell you how great my floor looks after messing with it a gazillion times until it came out right. You see, I already know how the floor will turn out. I did one just like it last year in the hallway upstairs. I will be applying three or four coats of shellac and two coats of semi-gloss polyurethane. Then I do the super fine steel wool and beeswax treatment. When done, I predict this floor will look like it has been here 50 years, without the dings of course. So, unless I spill the can of shellac, I will post a picture of this floor again within a week when it is done. If I spill the shellac I will post a picture sooner and post about how not to refinish a floor and put in a paragraph about how to remove shellac stains from your clothes!

Friday, October 27, 2006

The Shellac Chronicles Part 2 (What you can do with the stuff)

OK, so you know how I discovered shellac, now I can tell you what it is and where it can be used. It seems that most shellac comes from NE India where lac bugs live. They eat sap from trees and then secrete a resinous substance that is soluble in alcohol. You use denatured alcohol or methylated spirits if you live in Europe though I am sure Vodka or Everclear would work fine. The alcohol is "denatured" so you won't drink it! If you are that interested you can read what Wikepedia has to say about shellac HERE.

I looked in every decorator book that I had and then my 1909 copy of Household Discoveries to see what shellac was used for. Here is what I found.

Besides being used as a varnish for wood, shellac is the main ingredient in sealing wax. Shellac is also used in certain types of paint and as a sealer for wood to prevent discoloration when painted. If you mix it with turmeric it can be used as a gold finish on brass. It can be used as a glue for china and is used to stiffen stencil card. It is edible and used to coat pills and apples. It used to be used to make records before vinyl was invented. You can seal plaster walls with it prior to painting, you can seal the knots in pine boards to prevent them from bleeding.

Shellac ranges in color from clear (which is bleached) through yellow to dark brown and the color is determined by the type of sap coming out of the trees that the bugs feed on. The color determination is seasonal also. The common colors are yellow, orange, garnet and brown. The darker colors are traditionally used on woods like cherry and walnut or for antiques. Shellac can be colored with any type of dye that dissolves in alcohol and the discovery of aniline dyes (coal tar) in the mid 19th century allowed furniture to appear to be made of different wood than it was. It also made colored shellac useful for painting on stained glass windows. (Think church windows here)

Shellac is "cut" with alcohol. A mix of 1 lb. of shellac in 1 gallon of alcohol is a 1# cut and is good for sealing wood. A 2# cut is 2 lbs. of shellac in one gallon of alcohol. This is good for novice shellackers to use on wood floors or trim. The cans of pre-mixed shellac are 3# cut and are easy to use after you know what to expect. You can actually buy cans of 5# cut which can be used on floors but I've never tried it.

Now that I knew all this there was one thing left to do, buy some, but where? I found THESE PEOPLE and ordered some in various colors. I bought a gallon of denatured alcohol at Home Depot and at the same time saw that they sold quarts of Zinsser amber shellac which cost $6.50 at that time (now its $10 in a post Katrina/tsunami/Florida hurricanes world) so I bought a quart and decided to play with it!

In the next post I will show you some of the things I did during my experimental stage. I wasn't prepared to ruin my woodwork unless I knew what I was ruining it with!

Thursday, October 26, 2006

The Shellac Chronicles Part 1 (The Prologue)

I used to be a stain and polyurethane man. Not necessarily by choice, more the result of limited knowledge. Most people and places promote stain and urethane because it is relatively easy to comprehend and polyurethane is the wonder finish of the last 30 years. Durable and long lasting. Now I'm a shellac kind of guy, warm and glowing, not partial to standing water and more vulnerable to daily wear and tear. However, with just a little alcohol I'm easy to restore to my glowing self!

If you asked me about shellac three years ago I couldn't tell you much. I grew interested in the stuff after reading books on decorative finishes. Shellac was mentioned a few times as a wood sealer and was used to give objects an aged plaster look which interested me since we planned on using ceiling medallions in the "Crackhouse". My first encounter with shellac was actually around 1997 when I stripped some woodwork and a floor. I couldn't figure out what the gooey brown stuff was that was clinging to my scraper, why there was so much of it and why it smelled so bad when it burned. After it was all removed and the woodwork and floor refinished with stain and polyurethane I didn't think about it any more. Then we bought the "Crackhouse" which we affectionately refer to as "House II" or "The Mansion".

We had no plans to restore the painted woodwork in the place. There was too much of it and we didn't know what it looked like originally. We did plan on sanding the floors though. Then I was able to acquire a copy of a journal written in 1936 about the family that lived here and it contained some descriptions of the house. As we tore out the masonite panelling and removed partitions that were built to render the building useful as apartments we began to expose woodwork and wallpaper that had been concealed for 50 years.

This is when I started to discover what shellac actually was. My first encounter with the stuff where I knew what I was dealing with was when I cleaned a slate fireplace mantle with alcohol and the red finish came off. Shellac on slate? Hmmm, there something I wouldn't have thought of. Someone gave me a red colored porcelain door knob and I cleaned it with alcohol. The red came off and it was in fact a white door knob. Hmmm, shellac on a door knob? I used alcohol on some original dark woodwork and the dark finish came off leaving unstained wood. Hmmm, the shellac is tinted, not the wood? The real clincher came when I started to strip some wood of paint. In some areas the top layers of paint came off revealing the "original" wood finish. The only problem was the "original" finish was painted on. There was a red colored translucent glossy finish over a pale green paint that was on top of a beige. When rubbed with alcohol the red finish came off. Whodathunkit? Shellac over paint? So now I was intrigued and soaked up every tidbit of information that I could about shellac. I will tell you what I found out in the next exciting episode. Stay tuned to this blog!

Wednesday, October 25, 2006

Alterior motives!

There was a real reason that I started repairing walls in the basement. Actually there are several. One being that I bought 3 bags of lime a few weeks back and need to slake them or use them up within 6 months. I have now used up one bag and slaked another leaving just one bag to occupy space on the kitchen floor. The second reason was to see if the walls were easily repaired because I need to install the tankless water heater and it would be easier to repair the wall BEFORE installing the heater than after. So here are two more basement pictures. The previously repaired long wall section after a coat of whitewash. Drum roll please.........


And the wall that the water heater gets mounted to.


This is a limestone exterior wall and it doesn't suck the moisture out of the plaster like the brick. So drying time is much longer on this wall. Especially with cold temperatures. It has a large opening on the upper left side where a window was inserted to make effective use of a hole made in the wall for the chimney of a coal furnace. This hole is why the water heater will go here, so that it can be readily vented. Ultimately I will have to move the water heater to another location about 15 feet further down the same wall. I can't do this until after the fire escape in the back of the property is removed though and an old window opening becomes accessable for venting. It currently has a slab of concrete in front of it making the ground surface too high for the vent to achieve 12 inches of clearance from the ground. If I leave the water heater in the initial location it won't pass inspection due to the fact that the vent opening is within 4 feet of one of the dining room windows that we will probably never open. If any building inspectors are reading this, my compromise is to put blocks or wedges on the sash channels so the window can't be opened. We also plan to build a deck off the back of the house so the water heater will have to be moved because we can't vent it in that location with a deck. It seems like many things around here, I have to do a job to have the necessities then re-do the job after removing the object that prevents me from doing the job right the first time.

As you can see in the photo there were two holes in this wall. I suspect they were used for hiding the "stash" when druggies lived here. I have kept the holes but tidied them up considerably. The round hole has a piece of pipe in it and I suspect it was a water line to the back yard or the old outdoor laundry. I have kept the opening in case we need to run a new line to the well area outside. The larger hole may have been made to run a water or gas line but no pipe is present. My arm extends about 2 feet into this void. I don't know what to do with it. My thought was to make a lockable door behind which I can stash my jester hats and that very small cask of Amontillado that you readers feel that I should buy!

Sunday, October 22, 2006

I fixed the search feature!

The title says it all. Now you don't have to use Google to find my posts about raccoon poop!

Speaking of little poops....


Saturday, October 21, 2006

Trying Something New

I'm adding a search feature to this site in an effort to assist with the "Great Shellac Narrative" that will be posted soon. At this very moment, it doesn't seem to be working properly but if you click the word HELP and enter your search word(s) it will do its magic for you. I may have to set up its own page to get it to work properly but it is almost 2 AM and I turned into a pumpkin 2 hours ago! I hope I get it to work because it will save me alot of aggravation. I've also corrected my links to Fixer Upper and Old Man and the Street in the side bar and added a new Dayton site for all you folks wanting to visit our great town!

I checked my plaster today and it hasn't cracked. The trick was using the polypropelene fibers in the mix! The fibers are left over from my concrete countertop extravaganza and were bought at a concrete supplier here in Dayton. So you don't HAVE to use animal hair people! I whitewashed that long wall too while I was at it and now all I have to do is install the 100 plus hamster wheels and purchase the hamsters and we can have heat this winter!

Thursday, October 19, 2006

COMING SOON!

Everything you ever wanted to know about shellac and possibly a few things you didn't! How to use it, how not to use it, how to get it off your hands when you spill it, how to get it off the floor when you spill it, why you shouldn't blow down a tube of aniline dye in an effort to filter it faster (now that IS a funny story) so you can add it to your shellac and of course the thing you all want to know, does shellac improve your sex life?

John over at the Devil Queen has requested a post about shellac before he embarks on that journey into the downward spiral of alcohol use. Who am I not to play the role of "Candyman"? Anyway, when I get all my info together and stop rambling about how great my basement is going to look when my daughter is a teenager, I will post a thing or three about something I have come to learn so much about. Despite what they say about denatured alcohol, I'm with Bill Clinton on this one "I did not inhale".

I haven't done this in a while, so if you haven't read my posts from April 2005 and want to know how you keep a houseblog reader in suspense CLICK HERE.

Wednesday, October 18, 2006

The Basement Money Shots!

So far the plaster hasn't cracked much, but it is still drying. I'm sure it will crack, especially if it is anything like my plumbing! Anyway, here is the basement in disarray. You can see my piles of organized chaos everywhere.


Here are the walls that I have been putzing over. The long section of repaired plaster.


The corner that has been repaired and whitewashed.


When the lower section drys out it should be as white as the top section. One day I will repair all the basement walls and whitewash them. It will look like some medieval dungeon or an old wine cellar down there when done. Should be great for Halloween parties for Elizabeth. I'm looking forward to it already!

Tuesday, October 17, 2006

More Plaster Stories

If you Google "Chunk of plaster" then this blog appears as one of the links on page 1 of the search. This knowledge has prompted me to describe a little of what I did this week during a putzing moment at the "Crackhouse". A moment that lasted 8 hours but really has a positive psychological effect in my efforts to obtain plastering nirvana and complete oneness with my basement....

My basement looks like CRAP! It consists of 5 rooms and every single one is full of stuff that needs to be organized or thrown out. It also contains my stockpile of wood dating from present to Pre-Cambrian Era which is stacked in two rooms in over-flowing piles of disarray. The outside walls are limestone blocks and most of the plaster has crumbled into a a line of sand and chalk dust on the floor. The inside walls are brick and the lower 2 feet of plaster is missing around every room as a result of either sewage backup in the past or someones dog rubbing along the walls while exiled to the dark, damp recesses of this house.

I decided to "test" my plastering skills for continued credits for my license in Crackhouse Remodelling which is recognized in 30 different countries (in the southern hemeshpere) and one municipality within Ohio that includes a town called Figmentofmyimagination. I mixed up a batch of plaster from one of my tubs of slaked lime and a bucket of sand. I applied this to a section of wetted down exposed brick and it looked 10 times better. After it dried and cracked I applied a thin coat of lime putty and the wall looked 20 times better. After that dried and cracked I applied lime putty to the entire wall with a paint brush and besides being very white, it looked 50 times better. This was done over the course of a few days.

So I decided to fix another wall, but this time I added polypropelene fibers to the plaster batches (in lieu of animal hair) to see if it reduces cracking and plastered a whole stretch of wall in one room. It was at least 15 feet in length. The plaster is just a thin layer over the brick. In some areas it is maybe an eighth of an inch thick. The wall looks 10 times better. Then I went home and read my 1909 book about whitewashing cellar walls. That was yesterday.

I am about to go over there now to do some work. Now that the plaster has dried a bit, I wonder how much better it will look! If it is badly cracked I can always drink a couple of beers. Things always look better with beer!

Sunday, October 15, 2006

A View From the Toilet.

I can honestly say that the first floor powder room is now officially the SMALLEST room in the house! At 6' X 2.5' totalling a whopping 15 sq. ft of floor space I am limited when it comes to sink space and options. I will probably end up making this sink out of concrete since the painted one we have from Mexico can't be used in this room as originally planned due to limited drainage space and faucet space or lack of.

At some time, probably around 1920, the proper door to this room was wallpapered over and a doorway was knocked out of the brick wall separating this room from the dining room and I'm sure the stairs to the basement were added at the same time because the "cottage" side of the house became a rental. It is this doorway that provides me with any room for a sink. The 8 inch thick brick wall has been framed with wood and recycled Masonite panelling which will all get painted some day. The sink will sit in this alcove and extend a few inches into the room. When I am ready to make it then I will post about the process.

I was going to make a pair of cabinet doors to hide the plumbing under the sink but we came up with another idea. Several years ago we bought an iron fireplace cover with the idea that we would use it to cover a fireplace. When I restored the openings to their original size though, the iron cover was too small and its use became obsolete. It was also designed for a gas fire place and ash cleaning would be awkward if we used it since the bottom panel doesn't come off. We paid around $50 for it so the plan was to utilize somewhere else in the house rather than sell it but exactly what to use it for wasn't certain. One suggestion was as a mirror frame. I was getting tired of moving it around from room to room. At least it doesn't weigh as much as the world's heaviest bathtub!

Well we found a use for it now. It will be the cover for the space under this sink and fits quite nicely in the space. The design on it is quite Gothic so the theme for the room has been determined by its use. The middle panel lifts out gaining access to the plumbing under the sink. Of course I also have to find another light fixture to go with this new theme since the old one was art deco and doesn't go with gothic revival at all! I do believe we actually have more light fixtures now than can be used in the house. So, if you could sit on the toilet with the tank removed and lean into the wall behind with your head sideways on your shoulder so it doesn't hit the angled ceiling and take a photograph, this is what you would see.

Friday, October 13, 2006

Dealing with Rats and Mice - 1909 Style

It has been a while since I looked in my 1909 book of Household Discoveries. I thought I would see how people dealt with rats and mice back then. There are five pages dedicated to the subject! Mostly dealing with rats. Here they are below. Makes for some interesting reading.


Almost makes you want to have rats just so you can get rid of them!

Tuesday, October 10, 2006

Finishing Some Details

Two years ago I got the floor finished in the cottage side living room.


Since then the only change in this room was putting slate tile in the fireplace. In fact the room is currently used for storage and I hope to get it cleaned out in a few days. Well, during a boredom moment while waiting for joint compound to dry in the powder room, I decided it was time to frame in that pass through from the kitchen and the underlying cabinet. As of yesterday it looked like this.


Then today it looks like this.


Hopefully the final coat of green paint will go on by Thursday night and the doors will be attached. If I'm still bored then I'll add some shelves. The idea all along was to make this a place to stash CDs and cassette tapes. In case you wondered, in the 1840s house this was a window looking onto a back porch. Sometime between 1920 and 1954 it was a doorway. The original doorway was boarded up. After 1954 it was boarded up and the original doorway was used as a book case. I'm sure Elizabeth will think it is a great place to store her collection of horse figures! I should get bored more often......

Monday, October 09, 2006

We Can Re-build it!

Remember my story about how we hired a plumber 5 years ago, affectionately known as "Placebo the Useless"? Well, after a visit to Lowes I found that there is a PVC flange made for inserting into metal pipe. It has a rubber seal and could be used as a replacement for my flange. Of course it costs 5 times more than a regular flange at around $15. Fortunately, Placebo used a flange that could have been used on either 3" or 4" pipe and I was smart enough to request 4" DWV pipe for our main stack. What does this mean? Well, after laying on the floor for 30 minutes while exercising my wrist with vigorous strokes while my fingers were tightly gripping the handle of a saw (really, some of you have minds in the gutter!), I was able to decapitate the head of my flange! Ouch!


Upon careful examination I realized that I could insert a 3" flange into the opening if I cut a 1" sleeve out of a piece of 3" PVC pipe. Since I had a spare 3" flange laying around, I saved myself $15.

I had some more 'Placebo" issues while laying in the plumbing for the first floor powder room. Mr. Useless had laid in several feet of 4" pipe for the toilet to connect to but it wouldn't pass through the opening in the brick wall because it was not installed at a steep enough angle. I had to cut it back about 2 feet and put in a 3" section to the toilet. The smaller diameter pipe cleared the wall and lined up perfectly for the toilet to sit in the center of the room. I can honestly say that from this point forward, I will no longer be haunted by Placebo's plumbing. I have corrected all of his errors. Any future corrections will be of errors made by me and I didn't have to pay for those ones!

Friday, October 06, 2006

Planning for the future, already!

I have walled in the downstairs powder room. In the process of doing so a decent amount of dead space is being created under the main stairs and behind where the toilet will go. It seems like such a waste of space and I just couldn't let it go to waste completely, so.......


I gathered up a few phone books, some old mail that was laying on the kitchen counter and some old neighborhood newsletters, put them in a plastic bag with a dated note and left them for some future owner to discover some day! I wish someone had done that for me. Instead, I get mummified mice and flattened paint cans to discover!

Tuesday, October 03, 2006

Old Textured Paint

Ages ago when I pulled up the roll type linoleum flooring in one of the cottage side bedrooms I uncovered a strip of tin that was used to level a floor board that had been cut at some time way back when gas lights were installed during the last Ice Age.


I didn't think much about it and the tin sat on the floor, covered by an old sink and several contractor bags of rock wool for the last three years. I cleaned up the room a bit to make room for all the tools and the worlds heaviest bathtub (which will now be in the same room as a flight of stairs and a little closer to going down them.) I have also managed to rid myself of the fifteen bags of raccoon and pigeon poop encrusted rock wool leaving me the original 9 from the kitchen that I still have to sneek into the garbage at the rate of 3 bags a week.
Well, I found the tin once again and read the instructions on how to apply the paint. I noticed that the color was called "FLAME". Interesting name for a color I thought. I wonder what color it could be? Then I turned the can over


I know exactly what room it was used in and could probably guess what year it was applied based on the pieces of old newspapers that were shoved in all the gaps between the wall and the molding to keep out draughts!

Monday, October 02, 2006

I've Been a Busy Boy!

It is amazing what you can do when you don't have a computer to slow you down! I have painted the laundry room with primer and made a base for the sink that we bought at IKEA out of some of the antique wood that I have lying around. Here is a picture of the thing. Three guesses as to what it is finished with! I even used old nails to make it with because I don't have enough modern nails lying around!


I finished a long 2 X 6 board with the same stuff and still have to mount it on the wall behind where the washer and dryer will go. I have cut a channel in the back of it to run my electrical cables because the wall is made of brick.


Yes, the level IS holding the beam up as it hasn't been attached to the wall yet! So now you have seen the laundry room! It still needs the floor done and the walls painted.

Next I went into the dark hole that we call a basement. First through the door


Then down the stairs


To the abyss.


Which looks like this now!


I removed the stairs and have laid in a joist so that I can put in a floor for a small powder room on the first floor. I have to lay in another joist so the floor doesn't bounce but will do that after I have installed the plumbing. It is easier to hang a joist around the new plumbing than to cut the joist to put new plumbing in. The current space between the joists is 26 inches and the toilet will be in the center where the average Joe would put a joist. Since my plumbing skills are above average but give below average results and my wood working skills are below average but give above average results, I need to follow the lesser path of evil which dictates that plumbing will require more attention and time and should be installed first! The new joist can be installed alongside the DWV for the toilet on the side that would be the best to install it after the floor is in place.
This is my next major project before the winter. Getting the powder room ready for painting..

I also attempted to line a chimney with clay tiles but failed early in the attempt so that I don't have to waste any time or money on that and will resort to stainless steel chimney liners. I even got the one stainless steel liner I had ready for another chimney only to find that it will be too wide to pull up the chimney with the insulation blanket. Now I have to haul the thing up to the third floor again and with all the wrapping it weighs about 40 lbs more than it did when I brought it down the stairs. So here is where it sits until help arrives!


Chimney lining will be delayed another six months now because I may as well line all the ones that I need to line at the same time and I don't have all the lining kits or the wads of cash needed to acquire them at this particular moment. I also need a permit for this project and to install the water heater and furnaces that we don't have yet so the delay may be cost effective at this time. Besides, we all know that my plumbing will burst somewhere this winter and installing the water heater (which we do have) will just increase the number of places where this could happen!