Well, we got our bi-annual drain back up on Monday night so there was NO flushing and NO showers until I could clear the drain. I tried the usual "shove the garden hose as far as it will go and set the nozzle on blast" trick but this didn't help the situation. Time for the "mega snake" from the Home Depot rental department. I hate snaking drains, actually, snaking the drain is the fun part. I hate getting that huge hunk of metal on wheels into my basement and in and out of the car more than anything! Besides the fact that I get sprayed with sewer water on the rewind it isn't too messy. So Tuesday evening we were back to normal and my reflex to flush immediately could once more be satisfied. Being the glutten for punishment that I am, and never wanting to miss out on a real deal and an opportunity, this morning I snaked out the drain at the "Crackhouse" as well. Yay, a real Two-fer. (That's two for the price of one for those who lack retail savvy).
In the meantime I was able to do some more slurry work on my counter so that I can be back to the old grind on Saturday! I can say this, I think I have a winner!

From log house to farmhouse. Farmhouse to townhouse. Townhouse to apartment house. Apartment house to crack house. Crack house to our house. Our house to our home.
Wednesday, August 31, 2005
Old patents
The second owner of our house inherited the property from his father when he was 23 years old. He is the only member of the Edgar family that I have not been able to get a picture or photo of. He died in 1877 from convulsions. A note in the local paper read;
Saturday November 24, 1877
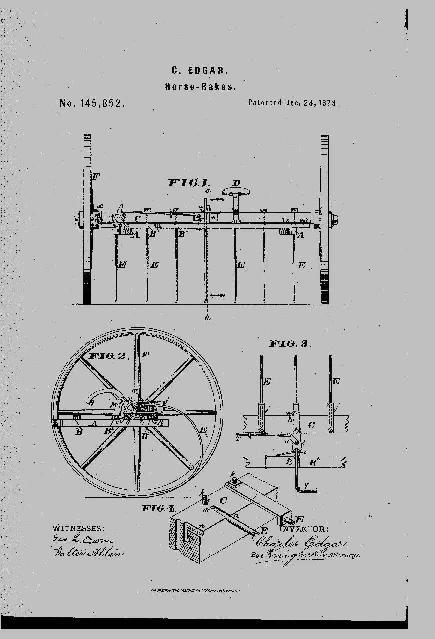
Our readers will be pained to hear of the death of Charles Edgar, the only son of the late Samuel D. Edgar. He was a young man of high character, strict integrety and steady habits, and excellent reputation among his acquaintances and neighbors. While yet a boy he exhibited remarkable inventive talent and succeeded in getting a patent on a self operating gate, which is now in very general use, not only in this State, but also in the Eastern and Western States. He since invented a most useful and important improvement to horse hay rakes which has been patented and issued by several of the leading manufacturers in the West. He also invented a new gas machine and had several other important inventions in course of registration. Had he lived he would have achieved success, for he possessed talent, united with perseverance and industry.Mr. Edgar married the daughter of John Bidleman, a most esteemable woman, who, with three young children is left to mourn his untimely loss.
The death notice reads;
Edgar- Charles Edgar, at a quarter before 9 o'clock a.m. November 23d aged 26 years, 5 months and 25 days.Funeral from the old homestead, South Wayne Street, near the asylum, on Monday afternoon, November 26th, 1877. Friends of the family invited.
Well, this week I was able to locate copies of the first two patents.
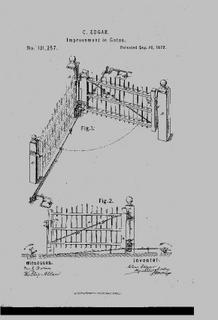

According to probate records, the gas machine patent was sold after his death for $10. These two were valued at $1 each.
I figured these would be interesting to frame and hang on the wall in the house along with all the photos of former occupants that we have accumulated.
Saturday November 24, 1877
Our readers will be pained to hear of the death of Charles Edgar, the only son of the late Samuel D. Edgar. He was a young man of high character, strict integrety and steady habits, and excellent reputation among his acquaintances and neighbors. While yet a boy he exhibited remarkable inventive talent and succeeded in getting a patent on a self operating gate, which is now in very general use, not only in this State, but also in the Eastern and Western States. He since invented a most useful and important improvement to horse hay rakes which has been patented and issued by several of the leading manufacturers in the West. He also invented a new gas machine and had several other important inventions in course of registration. Had he lived he would have achieved success, for he possessed talent, united with perseverance and industry.Mr. Edgar married the daughter of John Bidleman, a most esteemable woman, who, with three young children is left to mourn his untimely loss.
The death notice reads;
Edgar- Charles Edgar, at a quarter before 9 o'clock a.m. November 23d aged 26 years, 5 months and 25 days.Funeral from the old homestead, South Wayne Street, near the asylum, on Monday afternoon, November 26th, 1877. Friends of the family invited.
Well, this week I was able to locate copies of the first two patents.

According to probate records, the gas machine patent was sold after his death for $10. These two were valued at $1 each.
I figured these would be interesting to frame and hang on the wall in the house along with all the photos of former occupants that we have accumulated.
Sunday, August 28, 2005
A Little Teaser!
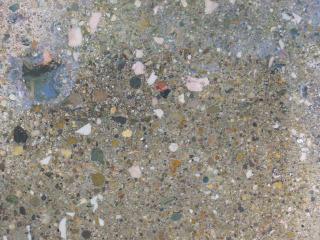
On Saturday I opened my molds! Now, no matter how hard I try to get the air out of the concrete I just don't have the tools needed to vibrate the mold so there were some blow holes. Since I only had about three hours in which to work I quickly applied a slurry to my pieces to fill some of the holes and let the slurry cure over night. Generally the slurry is the last thing to apply, according to THE BOOK. After making the kitchen counter tops though, I have found that the slurry shrinks when it hardens, so applying it before grinding reduces the appearance of shrinkage in the voids.
On Sunday I got to grind my concrete pieces. This creates more holes of course, but holes are good because they actually allow you to alter the appearance of the concrete. You can also fill them with a slurry of a completely different color or even colored epoxy. I am way too traditional to put bright colors in my voids, besides, I am trying to make my pieces look more like polished stone. So today I was able to grind all my pieces to 800 grit with the diamond polishing pads and slurry my pieces to darken the color of the concrete. The fireplace hearth went from this
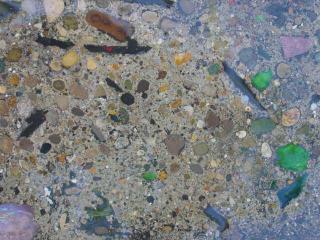
To this with an almost black slurry on all the pieces.

I gave up on the plum color on the central piece and went for black and blue marbleized look but the acrylic paint weakens the bond and integrity of the cement due to how much I had to use to get the color. The book actually states this so it was no surprise. The slurry helped to level the surface and as a result reduced the amount of blue in the piece. That grey streak is the hardest section of this piece. Here are close-ups.
These pieces are wet so that you can see how they should appear when polished and waxed.
After much grinding the counter looked like this.

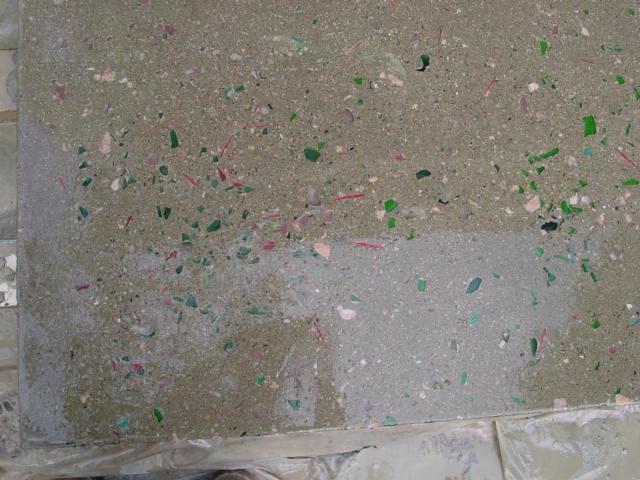
I put a dark grey slurry on this to fill the voids around the glass chips and not make such a drastic color change to the concrete. On Wednesday I will grind again with the 800 grit disk and melt the wax slithers and any polypropylene fibers on the surface of the concrete with the butane torch and then slurry with a black mixture. I also have to grind about 1/8 inch of the front notch of the sink hole so the sink sits flush. I was using a tile saw today to make a series of grooves that I can take a cold chisle to on Wednesday. Here is a close up before the slurry was applied, the final color will be darker though.

Stay tuned, the final finish won't be until next weekend. I wonder if Elizabeth's hair will stay up that long? It might if we don' t wash it!
On Sunday I got to grind my concrete pieces. This creates more holes of course, but holes are good because they actually allow you to alter the appearance of the concrete. You can also fill them with a slurry of a completely different color or even colored epoxy. I am way too traditional to put bright colors in my voids, besides, I am trying to make my pieces look more like polished stone. So today I was able to grind all my pieces to 800 grit with the diamond polishing pads and slurry my pieces to darken the color of the concrete. The fireplace hearth went from this

To this with an almost black slurry on all the pieces.
I gave up on the plum color on the central piece and went for black and blue marbleized look but the acrylic paint weakens the bond and integrity of the cement due to how much I had to use to get the color. The book actually states this so it was no surprise. The slurry helped to level the surface and as a result reduced the amount of blue in the piece. That grey streak is the hardest section of this piece. Here are close-ups.

These pieces are wet so that you can see how they should appear when polished and waxed.
After much grinding the counter looked like this.
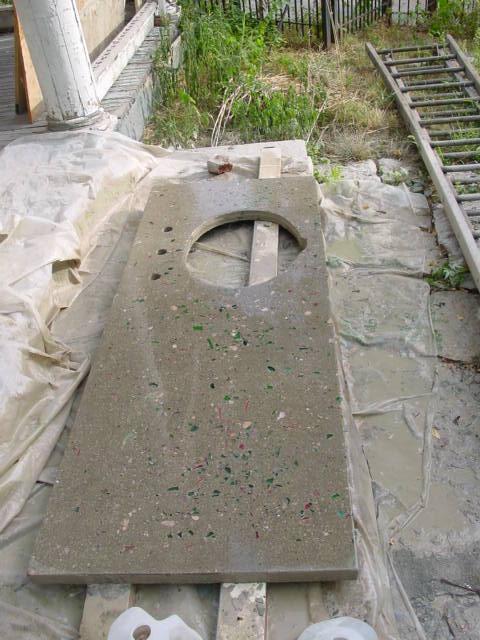
I put a dark grey slurry on this to fill the voids around the glass chips and not make such a drastic color change to the concrete. On Wednesday I will grind again with the 800 grit disk and melt the wax slithers and any polypropylene fibers on the surface of the concrete with the butane torch and then slurry with a black mixture. I also have to grind about 1/8 inch of the front notch of the sink hole so the sink sits flush. I was using a tile saw today to make a series of grooves that I can take a cold chisle to on Wednesday. Here is a close up before the slurry was applied, the final color will be darker though.
Stay tuned, the final finish won't be until next weekend. I wonder if Elizabeth's hair will stay up that long? It might if we don' t wash it!
Saturday, August 27, 2005
Wait for it.....
Things are heating up here at "Crackhouse Central". On Saturday I get to pop the molds for the counter and the hearth and start grinding concrete to see if I have a winner! The air is so full of electricity Elizabeth's hair is standing on end!


AND, just in case you didn't catch it back in April when I posted.
If you want to know how you keep a bunch of houseblog readers in suspense CLICK HERE!
Thursday, August 25, 2005
The die is cast!
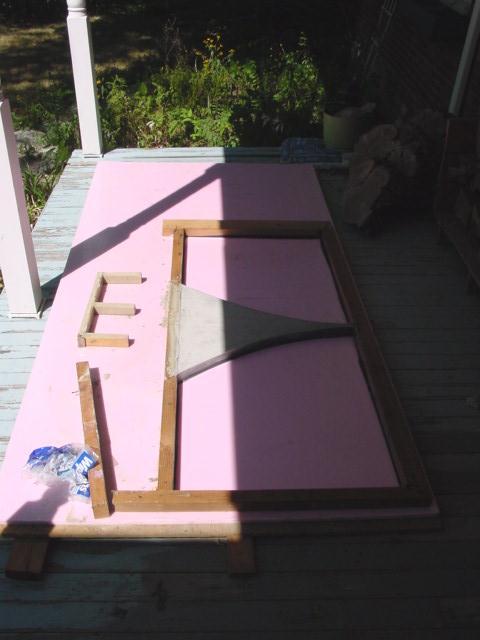
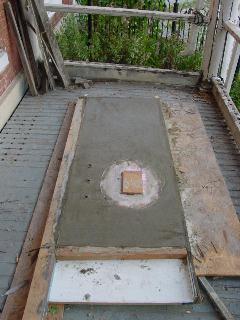
The molds are made
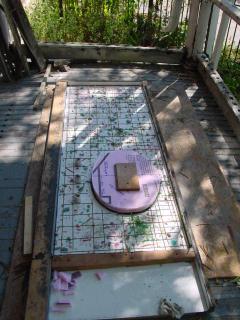
AND the concrete is poured


NOW we wait, and wait, and wait.....
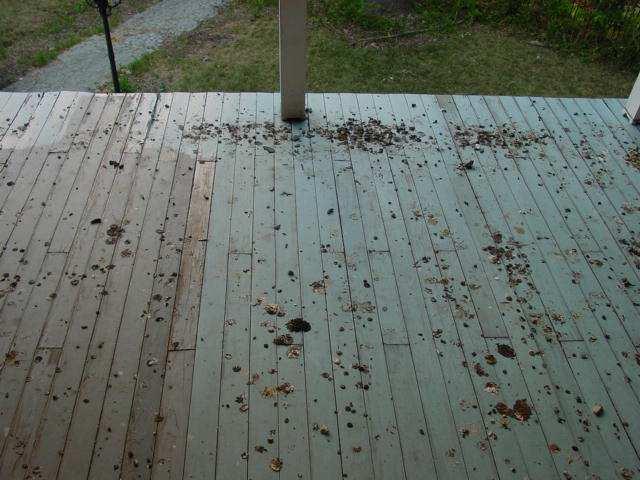
In the meantime, here is my balcony floor. The pigeon count is three adults and two chicks. Bloody squatters!

The good news is, with all the heat, that pigeon poop dries and crumbles so a scraper should do the trick. Do you think I could put it into baggies and give it to the dope boys? I mean, it's not illegal to sell pigeon poop yet, is it?
I can see it now;
Officer: "You have the right to remain silent any.......
Dope Boy: "Man, he told me this stuff was "Guano" and took him some time to scrape this shit together..."

AND the concrete is poured

NOW we wait, and wait, and wait.....
In the meantime, here is my balcony floor. The pigeon count is three adults and two chicks. Bloody squatters!
The good news is, with all the heat, that pigeon poop dries and crumbles so a scraper should do the trick. Do you think I could put it into baggies and give it to the dope boys? I mean, it's not illegal to sell pigeon poop yet, is it?
I can see it now;
Officer: "You have the right to remain silent any.......
Dope Boy: "Man, he told me this stuff was "Guano" and took him some time to scrape this shit together..."
Monday, August 22, 2005
The Test Results are In!
Well, today I cracked open the mold for my test pieces. I slapped my diamond grinding pads on the variable speed grinder and poured water on my test slabs, pulled the trigger and ground away. First with the 60 grit, then the 100 grit and finally the 220 grit. The book says to grind with 400 and 600 grit pads too but I just need to see the pieces wet in order to get an idea if what they will look like finished. I then melted the wax strips and forms with a butane torch. I ground the surface a bit more to remove the wax that cooled on the surface, then mixed up a "slurry" with portland cement and black pigment. This was applied over the surface to fill the voids. After the "slurry" had dried a bit I sanded the excess from the surface and wiped it with a wet paper towel to reveal this!

Here are the close-ups.
The colored part that I did on the back surface of one of the test pieces retained the color but was much softer upon grinding and probably would need to cure for a couple more days. Here is what it currently looks like.
So I will go ahead and make my actual pieces based on what I have learned...... This is going to be fun! Sure beats stripping woodwork.

Here are the close-ups.


The colored part that I did on the back surface of one of the test pieces retained the color but was much softer upon grinding and probably would need to cure for a couple more days. Here is what it currently looks like.

So I will go ahead and make my actual pieces based on what I have learned...... This is going to be fun! Sure beats stripping woodwork.
Thursday, August 18, 2005
The Test Samples are Poured
I did nothing on the house today but did manage to pour my two test samples of concrete. I will show you what I did, but let me start by saying that I have no idea if this is going to work for our purpose and won't know until Sunday or Monday.
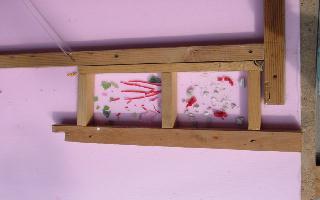
I threw broken colored glass in one mold along with slithers of candle wax cut from a thin piece that I made by pouring melted wax into a shallow tray made from aluminum foil.The other mold contains pieces of broken marble tile with candle wax that was poured into a bowl of water to solidify.The plan is to melt the wax using an iron and a paper towel after the piece is ground but before it is polished. The void will be filled with a grout-like slurry of black pigment and portland cement.
I then mixed up a small amount of "Quickrete 5000" with no color added because I want to see how raw cement looks when polished. I put it in the molds. Now, I did a little experiment.

I tried to buy some red pigment yesterday but would only be able to get a 24 lb. bag for $50+. This would be a silly purchase because I only need a few ounces for the small piece that I want to make for the fireplace hearth. So, I squirted some red and some blue acrylic artist paint into a small amount of mix to produce a plum color and added this to the right mold.

I did this to see if in fact layering colors is possible and to see if there would be any bleed through that might create swirls or stains that could look interesting in a finished piece. These are just test samples to see if certain effects will work and if I can use them in the actual pieces. Now we all have to wait......

I threw broken colored glass in one mold along with slithers of candle wax cut from a thin piece that I made by pouring melted wax into a shallow tray made from aluminum foil.The other mold contains pieces of broken marble tile with candle wax that was poured into a bowl of water to solidify.The plan is to melt the wax using an iron and a paper towel after the piece is ground but before it is polished. The void will be filled with a grout-like slurry of black pigment and portland cement.

I then mixed up a small amount of "Quickrete 5000" with no color added because I want to see how raw cement looks when polished. I put it in the molds. Now, I did a little experiment.

I tried to buy some red pigment yesterday but would only be able to get a 24 lb. bag for $50+. This would be a silly purchase because I only need a few ounces for the small piece that I want to make for the fireplace hearth. So, I squirted some red and some blue acrylic artist paint into a small amount of mix to produce a plum color and added this to the right mold.
I did this to see if in fact layering colors is possible and to see if there would be any bleed through that might create swirls or stains that could look interesting in a finished piece. These are just test samples to see if certain effects will work and if I can use them in the actual pieces. Now we all have to wait......
Tuesday, August 16, 2005
Pink Glass..... well, isn't!
While Elizabeth was taking her nap today I decided to start breaking the glass I have acquired for the countertop project. Not having a hammer handy I placed the glass in an empty kitty litter bucket and started to whack it with the butt of a matchlock musket.
The green glass IS green. However, the pink glass (made in China of course) is actually clear glass with a pink translucent plastic coating designed to fool you. If I can get the pink glass to lay the right way up in the mold this won't be too much of a problem otherwise the pink will get ground off when I polish the concrete. I'll have to run my test before I break the other pink vase unless I get myself too worked up about it and smash it for the thrill. Back to the thrift stores in the morning I guess. I will pour the samples on Thursday so the results won't be in until next week. I have an idea for the black streaks that might work. We shall have to wait and see...
Time for another BEER. Better make it a firkin!
The Master Plan
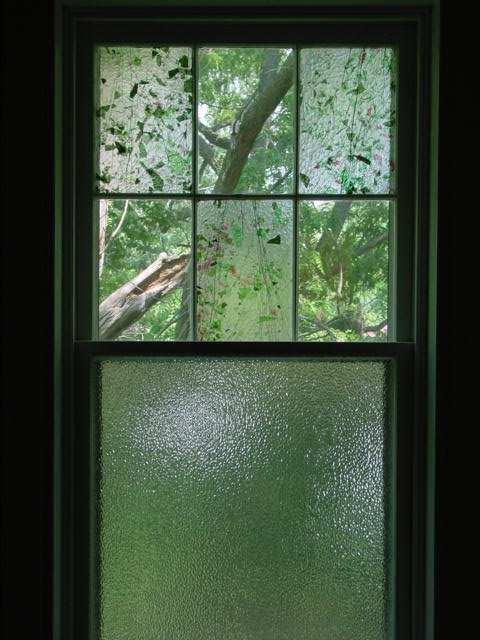
We have two windows in the bathroom. They look like this.

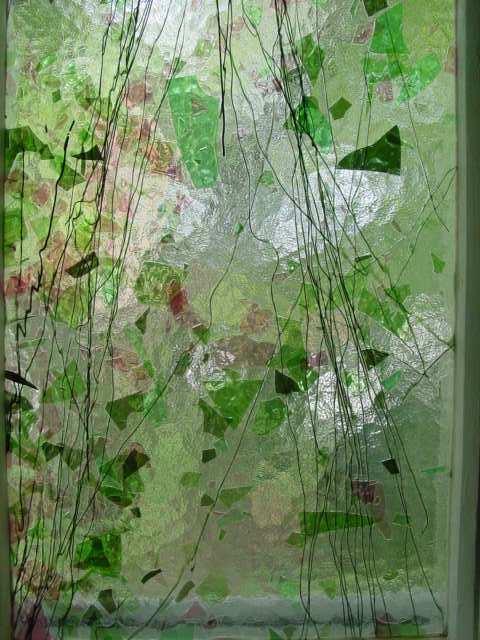
Here is one of the panes of art glass in the 6 paned window frame.

The master plan is to try to replicate something similar to this in our counter top for the sink. This means that I am going to have to put some broken glass into the mold when I pour the concrete. Today was spent looking for pink colored glass. I already have two shades of green (yes one is a beer bottle!) so one more shade of green should do it. I may also throw in some crushed marble from scraps of tile that were used on the shower wall. I was able to buy two vases and a two tumblers giving me three shades of pink and one turquoise for $4.17. Add $1.00 for a bottle of imported beer which I happily drank and I have most of the glass needed. Tomorrow I can search Goodwill and some thrift stores for one piece of pale green glass. Then I get to smash it all! I still have to figure out how to do the black lines though.
I have already got the mold made for the fireplace hearth and the pieces ready for the counter mold. Since I have no clue if the master plan will work I plan to make some test pieces before the main pour. If all fails then I resort to producing pieces that look like our kitchen counter. So the worst case scenario isn't all that bad. I also plan to make the fireplace surround for the bathroom out of polished concrete so today I ordered THIS BOOK.
You know what? I got to mention Beer in a houseblog again!
(to be continued....)
Here is one of the panes of art glass in the 6 paned window frame.
The master plan is to try to replicate something similar to this in our counter top for the sink. This means that I am going to have to put some broken glass into the mold when I pour the concrete. Today was spent looking for pink colored glass. I already have two shades of green (yes one is a beer bottle!) so one more shade of green should do it. I may also throw in some crushed marble from scraps of tile that were used on the shower wall. I was able to buy two vases and a two tumblers giving me three shades of pink and one turquoise for $4.17. Add $1.00 for a bottle of imported beer which I happily drank and I have most of the glass needed. Tomorrow I can search Goodwill and some thrift stores for one piece of pale green glass. Then I get to smash it all! I still have to figure out how to do the black lines though.
I have already got the mold made for the fireplace hearth and the pieces ready for the counter mold. Since I have no clue if the master plan will work I plan to make some test pieces before the main pour. If all fails then I resort to producing pieces that look like our kitchen counter. So the worst case scenario isn't all that bad. I also plan to make the fireplace surround for the bathroom out of polished concrete so today I ordered THIS BOOK.
You know what? I got to mention Beer in a houseblog again!
(to be continued....)
Sunday, August 14, 2005
Something to Blog about
I have received orders from Deborah to make the bathroom sink counter. The process takes a few weeks to complete since this will be made out of concrete and then polished. Last year I made the kitchen counter and was quite pleased with the result considering I had never done anything like it before. You can see pictures of it HERE.
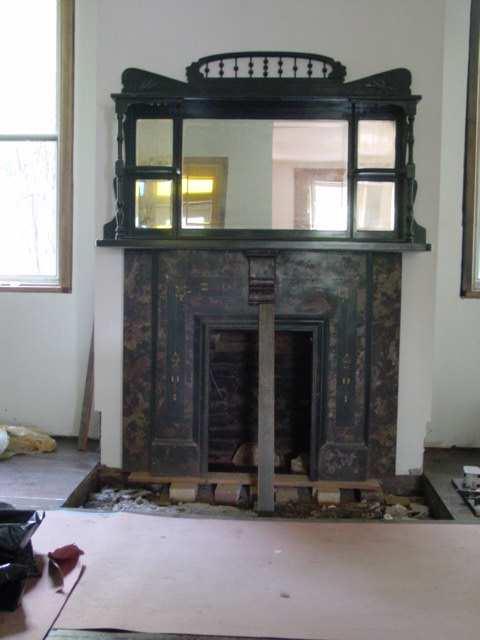
Besides the bathroom countertop I also have to make a hearth for this fireplace

and a piece for the kitchen at the residence to replace the laminate piece that covers the dishwasher that doesn't match the rest of the kitchen counter. (Just something to make the place more attractive to a potential buyer).
Today was spent planning and preparing for the process. All of the pieces will be quite simple to produce since they are all basically rectangles but there are a few challanges. The bathroom sink will be top mounted but is an oval shape. Here it is.

Made in Mexico in case you wondered and we paid $120 for this plus a smaller one for the powder room on the first floor (some day, some day). We bought them at a home show a couple of years ago. This is the piece of furniture we are using for the base.
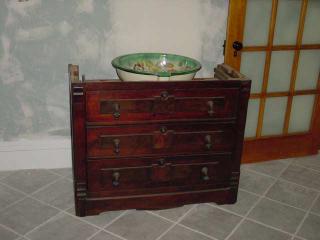
I have already carefully removed the top but I have no Idea what I am going to do with it. I think we got the dresser at an auction for around $100.
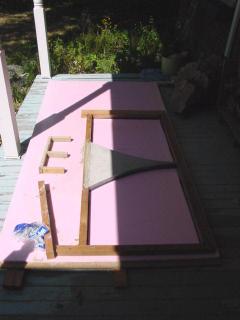
The plan is to make a long counter with the sink in the center of the piece of furniture. It is about one inch off center of the wall because we want the door to open all the way. This means I will have to fiddle with the lighting when all is done but that should be fairly easy to do. I got the counter support cut today and mounted to the base as you can see here.

We can put stacking baskets in the enclosed space below the counter on the left side. I have to screw some 2 X 4s to the wall to add support for the left side and rear of the counter. I'll figure out how I want that to look by tomorrow. That piece of cut out card on top is a template for the sink cut out. I have to transfer this to the mold and build a cut-out for the concrete form.
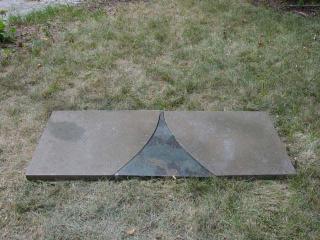
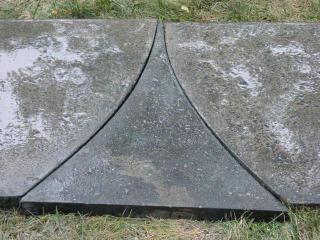
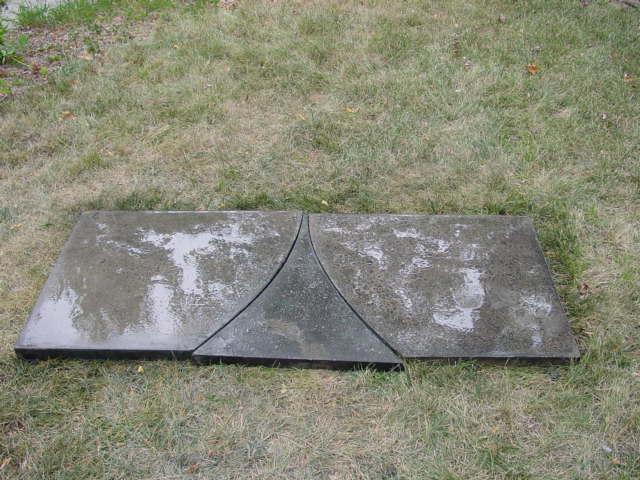
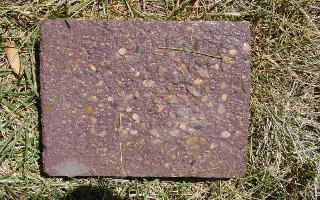
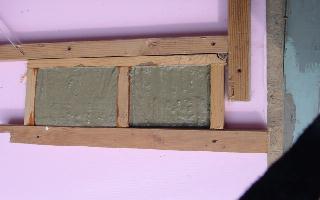
The other challange is to make the hearth in three pieces and two colors so that it looks like this but darker.
 The process will be interesting because I have some ideas on how I would like the pieces to look but the end result could be something far from what I am shooting for. I will elaborate more when I am ready to pour the concrete.
I will track my progress over the next few weeks so you can all see how simple this is to do. In the meantime, if you want to know more, go buy THIS BOOK.
Besides the bathroom countertop I also have to make a hearth for this fireplace
and a piece for the kitchen at the residence to replace the laminate piece that covers the dishwasher that doesn't match the rest of the kitchen counter. (Just something to make the place more attractive to a potential buyer).
Today was spent planning and preparing for the process. All of the pieces will be quite simple to produce since they are all basically rectangles but there are a few challanges. The bathroom sink will be top mounted but is an oval shape. Here it is.

Made in Mexico in case you wondered and we paid $120 for this plus a smaller one for the powder room on the first floor (some day, some day). We bought them at a home show a couple of years ago. This is the piece of furniture we are using for the base.

I have already carefully removed the top but I have no Idea what I am going to do with it. I think we got the dresser at an auction for around $100.
The plan is to make a long counter with the sink in the center of the piece of furniture. It is about one inch off center of the wall because we want the door to open all the way. This means I will have to fiddle with the lighting when all is done but that should be fairly easy to do. I got the counter support cut today and mounted to the base as you can see here.

We can put stacking baskets in the enclosed space below the counter on the left side. I have to screw some 2 X 4s to the wall to add support for the left side and rear of the counter. I'll figure out how I want that to look by tomorrow. That piece of cut out card on top is a template for the sink cut out. I have to transfer this to the mold and build a cut-out for the concrete form.
The other challange is to make the hearth in three pieces and two colors so that it looks like this but darker.
 The process will be interesting because I have some ideas on how I would like the pieces to look but the end result could be something far from what I am shooting for. I will elaborate more when I am ready to pour the concrete.
I will track my progress over the next few weeks so you can all see how simple this is to do. In the meantime, if you want to know more, go buy THIS BOOK.
Subscribe to:
Posts (Atom)