
First, you should consider stripping any molding smoothing any walls and at least getting the walls painted with primer BEFORE you sand the floors because it would be such a shame to ruin the floors after you spent so much time making them look good. Anything falling on the floor or paint spills will be sanded out so make the mess before sanding.
Pull out any nails or carpet tacks that you can and those that won't come out need to be sunk below the surface of the wood with a hammer and nail punch. Nails will rip through sand paper and can damage the pad of your sanding machine.
If your floors are painted or covered in glue or shellac you should consider trying to strip much of stuff off with a heat gun. This will take many hours to do. The other option is to sand the stuff off but it will gum up the sandpaper and you will spend as many hours stripping off more depth of wood than necessary and changing paper. Preparation is really the key to good looking wood floors.
There are three types of sanders. For refinishing an existing decent floor that has a few scratches you want one of those giant flat palm sanders they rent at Lowes or Home Depot. You can't do too much damage with one of these but you can't get a smooth level floor either if the boards are curved or warped.
There are rotary or disc sanders. I have never seen one but some of them double up as floor polishers. These sand with a circular motion and are a little more aggressive. Edgers are rotary sanders. I have never used a disc floor sander, only an edger and an angle grinder.
The most aggressive are drum sanders. This is a giant belt sander. You have to keep moving with one of these otherwise it will gauge your floor.
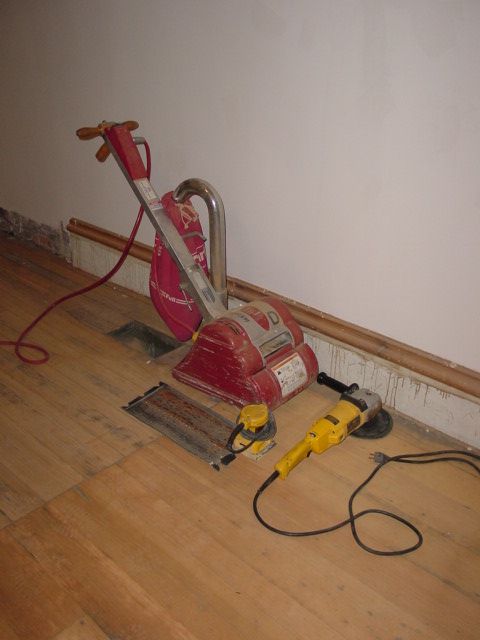
If you have more than one floor to sand and don't want to worry about pulling all-nighters to get the job done so you can return the rental equipment then you should seriously consider buying a used floor sander. We did that. The drum sander cost $650 from a rental shop. Paper for it can be bought online in packs of ten averaging around $1.50 a sheet for the coarse paper and $.95 for the fine papers. We can always sell the sander when we are done and get our money back. I also have a variable speed grinder/polisher that I bought to polish my concrete counters. I use it instead of an edger. I cut 7 inch discs from the spent drum sander paper to maximise my use of the paper and save money. I also use a palm sander for some of those hard to sand spots. Here is a picture of my arsenal.
Here is a floor that I am currently working on. The left side has had a single pass with 36 grit paper.

The grit size or # indicates how many "grits" there are per square inch. The higher the # the finer the paper. This floor is mostly unfinished and requires a #36, #60 and a #100 respectfully. You shouldn't need anything finer than a #100 or #120 grit for your final pass.
You should sand with the grain of the wood but you may want to make a couple of diagonal first passes if the floor is really rough or uneven. The diagonal passes cut the wood more and make levelling a much quicker process.
One end of this floor has shellac or some kind of lac paint on it. It was common to put shellac down arond the edges of area rugs. This makes sanding a messy process because it gums up the sandpaper. When this happens I get out the heat gun and start scraping. The stuff has to come off the floor and will either come off with the scraper or on the paper as a result of heat friction. Either way, the volume of goop is the same and the time taken to remove the stuff is about the same if you count the time it takes to change the sandpaper or scrape it off the sandpaper after it has cooled and hardened. In this particular case, I used the variable speed grinder to sand the remaining shellac after using the heat gun. The stuff is removed quicker if you actually allow the disc to gum up because the stuff on the floor is lifted off by sticking to the hot gooey stuff on the rotating disc. When most of the shellac was removed, I then went back to using the drum sander to do the job properly and thus reduced the amount of clogging on the drum sandpaper. Here is a picture of the problem area. The upper part is the shellac covered portion. The lower part has been sanded with both the grinder and then the drum sander with #36 grit paper.

If you are using rental equipment, this kind of unforeseen hang-up will slow you down and cause much stress. The frustration could add a day to your project or make you want to pack it in altogether and put down carpet.
Once you get passed the initial removal of crud and move on to the medium and fine sandpapers it gets much easier. When using a drum sander you can lift the handle, pushing the machine into the floor to apply pressure to hard to sand patches. You can also walk very slowly almost pulling back on the machine which wants to move forward. You must keep moving though and when you get to the edge of the floor you must push down on the handle to lift the drum off the floor otherwise you will get a ridge forming along the edges of the room that will have to be sanded out with the edger or grinder. I should have this floor done in a couple of hours on Thursday now that I have scraped up the shellac and have most of that portion finished with the grinder already.
Other tips;
If you have a window fan, use it. It will get much of the finest dust out of the air and stop it from settling in your house. If all else fails, there is always laminate flooring or wall to wall carpet....
After you have done a couple of floors this process won't phase you one bit. This is my 9th floor so I get quite bored with it any more. I figured it was time to divulge the information and "spread the love" so all you folks who haven't done this yet can get down and dirty and feel my pain!
9 comments:
Nice tutorial! This is why I'm (now) a fan of the pre-finished floors. Sanding is bitch. It's not something that I don't mind paying someone else to do. But I'm no girly man. My flooring nailer is manual. I'm old skool!
Thanks for the info--very timely!
We pulled all of our old flooring (so we could do some structural work, run plumbing, gas, insulation, etc.). We put down a subfloor and are about to put the old flooring back down. Some questions:
1. We had planned on "flipping" our flooring (putting the painted/gunked up side down--and putting the unpainted, but rough cut side up)...What do you think of this approach?
2. Assuming that you agree that the above apporach is workable, what type of sander would you recommend to smooth out the "rough sawn" wood?
3. We were planning on using Fabulon Crystal finish...any experience with this? Any recommendations?
Thanks for the tutorial!
1. We had planned on "flipping" our flooring (putting the painted/gunked up side down--and putting the unpainted, but rough cut side up)...What do you think of this approach?
2. Assuming that you agree that the above apporach is workable, what type of sander would you recommend to smooth out the "rough sawn" wood?
3. We were planning on using Fabulon Crystal finish...any experience with this? Any recommendations?
I have heard of boards being flipped before. I don't see why it wouldn't work.
You might want to try sanding the boards before you put them down. You would need a pair of saw horses, a belt sander and a palm sander. The palm sander alone may do the job if you start with #50 grit paper. I would certainly consider this approach for the edges of the room at least. I haven't used anything other than shellac and good old slow drying polyurethane on my floors. I use the shellac instead of stain now. It really makes the floor look right. On some floors I put down two coats of poly thinned with paint thinner over the shellac and I now rub the final coat with superfine steel wool and original Johnsons Wax, then buff. Again it makes a big difference.
Thanks for the info, Gary...Looks good. I'll do a post on my floor as it progresses...I pick up some milled old growth pieces this Saturday that will be used to fill for the inevitable waste...We'll let it "rest" in the house for awhile and then on to the floors!
I am currently in the process of refinishing two floors in my 1931 home. Like you mentioned above, the center of the floor was not finished at all and the edges were coated with shellac. I realized this only after renting the orbital disc sander from Lowe's and ending up with a gooey mess all over the paper...this machine with 36 grit paper simply will not remove shellac. I took the machine back for a full refund and spent my weekend using a heat gun and putty knife scraping up the shellac. After the scraping process, I went over the floor with denatured alcohol and steel wool which removed a bit more of the shellac residue. I will be getting a drum sander from the rental store tomorrow and continue sanding. After clean up, there will be a coat of stain and four coats of oil based semi gloss poly.
For the record, I would have rather paid someone to do this...
sounds like a few of the people commenting might need some professional help and some flooring guidance also. sanding boards on a 2x4 with a palm sander and 50 grit paper that is nuts it will use so much sand paper and time that it wont be worth it but the main problem it wont come out nice. most people aim for a good quality end result. flipping boards will work if you have the boards off the floor rent or invest in a planer. run the boards through and they will look like new and will be a consistent thickness.this means much less sanding once installed probably just have to rent a buffer with 100 or 120 then 150 grit paper .I only use oil poly it looks better and outlasts water poly by far and never use wax instead use a floor cleaner then sealer that can be mopped or wiped on periodically to fill minor scratches and restore the sheen. last comment im making is that a flooring edger can take old shelac off but dont use 36 grit go with 20 and change paper when needed. might go through 20 bucks worth of paper just around the edges of a 20x20 room but still saves time and cheaper then having a pro do the job. i hope this helps a few people
None of you have any idea what your talking about. Quit while your not to far behind and call a pro. It's allot less expensive to have them do the refinish right the first time rather than fix your horrible job. Trust me I'm a pro and your all crazy. You can't just flip t&g boards over by the way. Unless your looking for that real stupid I'm a fucking moron look. I'd like to see the pictures
Welcome to the conversation after 10 years! Seems that someone somewhere always thinks they are better than those of us who enjoy the thrill of doing our own work. Sorry but my personal experience with with those that boast about being professionals is that they never return to finish up the job.
great post
Post a Comment