There are so many choices today for floor coverings. So many housebloggers are restoring their wood floors and are being surprised by what they are finding. Todays blog report is dedicated to floors. I opened my 1909 copy of "Household Discoveries" and rather than transcribing pages of info, I took photos of the pages for you to read. The detail got lost in the upload but these images are quite large and still readable. Hope you all learn something or get some ideas! Enjoy!
pg1
pg2
pg3
pg4
pg5
pg6
pg7

From log house to farmhouse. Farmhouse to townhouse. Townhouse to apartment house. Apartment house to crack house. Crack house to our house. Our house to our home.
Thursday, August 04, 2005
Saturday, July 30, 2005
Daytons best kept secret
Real estate values here are Dayton's best kept secret. We aren't exactly the most desirable city to live in. The schools are pretty bad at the moment and our local government has become a huge social service for the poor and indigent, (that is my opinion only) but the upside of that is that the city provides a good assortment of free entertainment in the downtown area. The city is involved with taking the old warehouses and turning them into loft condominiums. Average price of these places is about $250,000 for 2000 sq. ft with a nice hefty $160 monthly condo fee attached. About half a mile out there are a few historic districts and house prices in these sections are above the average. A mile out and you hit some blighted neighborhoods. In Walnut Hills where I am, we are one of those transition neighborhoods. It is located about 1 1/2 miles from the city center. We have some problem properties but very few. You can buy a fixer upper at sheriff sale for around $40,000. These are generally mortgage forclosures that have been trashed by the previous owners. You can get a property that needs a little work for $70,000 or a decent home for $85,000 to $90,000. The average size house is about 1700 sq. ft. of living space. The average replacement cost of these homes is about $185,000.
To put things in perspective. The old "crackhouse" has 3970 sq. ft of living space (not including the 3rd floor or the 5 rooms in the basement) and cost us less than 6 figures to buy. In fact we paid considerably less for it than the PO did in 1988 (it was pretty bad). To replace this house would cost close to $500,000. If it were located anywhere in the suburbs it would cost close to that to buy it in a finished condition. Not within city limits though. There are turn of the century mansions in this city that sell for $225,000 that would carry a $1.5 million price tag anywhere else. Some of them are quite impressive!
If that real estate bubble that I have heard about pops it won't shake this place at all where prices are concerned (well, maybe those overpriced downtown condos). So houseblog readers out there should seriously think about packing up all your worldly belongings and hiking it over here to Dayton,Ohio. We have more old houses than we have people to live in them. I'm serious!
"This has been a public service announcement for the City of Dayton. Home of the Wright Brothers and the city that holds the record for the most patents issued."
Maybe tomorrow I will tell you how excited I am about stripping paint from woodwork this weekend.......... then again, maybe I won't. Oh, I'm sooo excited......
Friday, July 29, 2005
City tries intimidation!

Oh the humility!
Here is a picture of one of our neighborhood's problem properties. This is 55 Margaret Street Dayton, OH 45410. The owner of this property purchased it in 2003 for $14,100 at a sheriff sale and has done little to the property since. He has outstanding code violations on the property. At least 6 of them for the exterior. Some of the compliance dates are January 2004. He has not done anything to fix the problems other than secure the property by boarding it up and cut the grass. This morning at 11:30 AM the City of Dayton slapped this sign up in an effort to shame the owner into making repairs to the house.
Here is a picture of one of our neighborhood's problem properties. This is 55 Margaret Street Dayton, OH 45410. The owner of this property purchased it in 2003 for $14,100 at a sheriff sale and has done little to the property since. He has outstanding code violations on the property. At least 6 of them for the exterior. Some of the compliance dates are January 2004. He has not done anything to fix the problems other than secure the property by boarding it up and cut the grass. This morning at 11:30 AM the City of Dayton slapped this sign up in an effort to shame the owner into making repairs to the house.
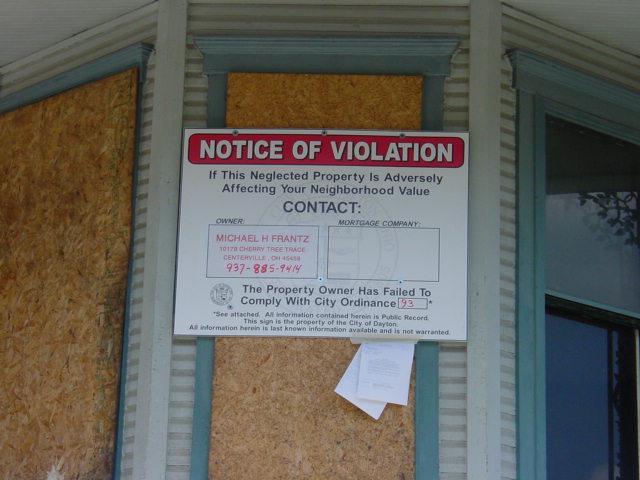
This reads
Michael H. Frantz
10179 Cherry Tree Trace
Centerville, OH 45458
937-885-9414
I was the first person to call him to congratulate him on achieving such an honor. Only three other properties in the entire city wear this merit badge! I was impressed that he returned my call so quickly. Mr. Frantz owns other property in the area but does not have the resources to fix this one up profitably. This one is completely gutted and will require a complete renovation. Hey, all the dirty work has already been done! All the plaster and lath is gone!
Mr. Frantz did mention that he got his last ticket from the city regarding this house while he was in Florida for a month. He obviously has the resources to take a trip to a vacation state but no resources to improve the property values of this neighborhood. Mr. Frantz is willing to entertain offers for the house. His address and phone number is on the sign so it is posted above. Of course you can call him and tell him how disgusted you are that he is willing to blight Margaret Street with this house. If you are interested in the house there is an outstanding real estate tax bill of approximately $3470.
Thursday, July 28, 2005
Here Is The Mantle Top Now.
I haven't had much opportunity to work on the house this week but I have managed to get some shellac on my mantle top. Now all I have to do is mount it to the base by putting nails in those pre-existing divits, filling the divits with colored putty and then dabbing some shellac over the spots. Oh, and the final rub with furniture wax and superfine steel wool. I guess I should go buy some stove black spray paint to paint the metal fire place frame before I mount this back on the wall. I wouldn't want to spray my newly finished mantle now, would I?
Here are the pictures.


You can see that I did a fairly decent job of covering up that large burn mark. We could always put a doily over it!
Here are the pictures.

You can see that I did a fairly decent job of covering up that large burn mark. We could always put a doily over it!
Monday, July 25, 2005
It's yucky out there!
Today I did another thing I haven't done in years. With a heat index of 110 degrees here in Ohio, I went up to the finished attic and dug out one of my three window air conditioners to put in the bedroom window. Ceiling fans ain't cutting it right now! If we don't get that cold front tomorrow I will go and get another one and put it in the TV room!
Friday, July 22, 2005
Refinishing wood with burn marks.
The bedroom mantle looked like this when we bought the "Old Crackhouse".

It was one of the first things that Deborah started to strip and for the next four years it looked like this.

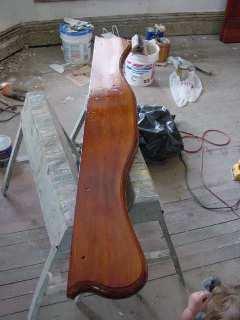
Well I finally got to start tackling this room. I pulled the mantle off the wall and finished stripping it using the technique described in my earlier post about stripping wood. I separated the top from the face because it had some nasty burn marks. Using the amber shellac that I am apparently addicted to, the facing looks like this now.


After stripping the paint from the mantle top I rubbed it with some Golden Oak stain (don't ask me why, I don't know). I then put a coat of thinned down shellac over the surface to seal the wood. I sanded with 220 grit sandpaper to make the surface smooth. The next thing I did was paint a thin layer of acrylic raw sienna paint over the charcoal black spots in an attempt to lighten the color. I then lightly brushed raw umber acrylic paint in the direction of the grain over the raw sienna to break up the edges of the burn marks. This actually took care of the cigarette burns quite well but not the big burn mark. I was going to have to resort to artist oil paints for that (which I quite expected). Oil paints dry slowly and allow you to work with them longer so blending color is much easier to do and if you don't like the result you can wipe it off with paint thinners. The key here is to break up the regularity of the outline of the burn mark and not necessarily remove the dark coloration altogether. I applied yellow ocher oil paint to the surface of the burn. (I don't have any raw sienna colored oil paint). I then blended in some burnt sienna to get the burn mark close to the orange color of the natural wood. I used the edge of a folded paper towel to wipe the surface so as to blend the color and reduce brush marks. I then streaked raw umber across the edges of the burn in the direction of the grain so as to break up the outline of the burn and then applied the ocher again across the edges to break up the outline even more. I continued to use the brush to apply the paint and stroke it in the direction of the wood grain but wiped the surface with the paper towel to blend the color better. The whole process took about 30 minutes and it didn't have to be perfect because 5 coats of shellac will obscure my paint job well. You won't notice that it had a burn. The dark part will appear dark brown and the ocher paint will become an amber orange color. Here is what the top looked like after the application of the oil paint.


This will take a couple of days for the paint to dry so this is how it looks right now. In a couple of days I will attach it to the lower part and fill the nail holes with wood putty mixed with raw umber oil paint (to darken the putty). I will then apply shellac to the surface and will post a picture of the finished work. Which reminds me of these lyrics by the way;
My name it is Van Gough, lend an ear, lend an ear My name it is Van Gough, lend an ear. My name it is Van Gough and one day I had a cough And my ear it did drop off, In my beer, in my beer! That is twice now that I have been able to mention beer in a Houseblog.....
Wednesday, July 20, 2005
Interesting Development
I took Elizabeth out yesterday for a drive and later stopped at a local park with a paddling pool. Before I went out I looked at a picture that I took a while back of an old map from 1895 (and one from 1875) to locate the original farm of Herman Volkenand in Beavercreek Ohio. He is the guy that bought and remodelled our house between 1887 and 1890. I figured out the exact location on a modern map and decided to go out and play history detective in the comfort of automobile air conditioning while Elizabeth dozed off for her afternoon nap in the car. Thus began "Farmquest 2005".
I was quite expecting to find an old farmhouse from the 1860s. The area is quite rural although Beavercreek is quite the place to live these days. There is a lot of development going on in that part of Greene County and the schools are quite attractive.
Well, HERE is what I found! It wasn't what I expected.
Tuesday, July 19, 2005
How I strip wood. (and why)
Since this is a hot topic right now and a call went out for Housebloggers to document this topic, AND since I am in the middle of this process all over AGAIN, I shall give some tips and a synopsis of why I do what I do. The first thing I ever stripped was a door in 1996. I used a belt sander but it wouldn't get into the panels so I used paint stripper. I rubbed the goop off with steel wool and paint thinners. Paint thinners does not raise the grain of the wood like water will. The next thing I stripped was my entire Kitchen. I started with paint stripper but it was messy and took way too long. Then I heard about using a heat gun! So I bought one with an adjustable heat dial. If I set the dial to #1 I could dry my hair and if I set it at #10 I could toast marshmallows! I generally set it a little above #8 so I don't burn the wood. After the kitchen came my dining room. Somewhere between the kitchen and dining room I started using furniture refinisher to remove the paint stripper before using thinners. This can get expensive and for some reason you don't find refinisher any more (what are those welts on my hand? Did my finger just fall into my coffee?)The heat gun was useful for stripping the glue and tar paper from the floor too before sanding. By the time I got to doing some more doors I had the routine down to heat gun, then paint stripper, then furniture refinisher and steel wool, then paint thinners and steel wool. Then stain and urethane. THEN WE BOUGHT THE "CRACKHOUSE" There was so much wood to strip at the crackhouse and the heat gun was relatively slow so we tried a "Speedheater" aka "The Silent Paint Remover" and this made stripping flat surfaces so much more pleasant and quicker however, a heat gun was still needed to deal with detailed moldings and situations where the SPR just isn't efficient. We tried a number of different scrapers over the years but I am down to these three as my favorites.

The flat scraper is a little flexible and yes that is a screwdriver with a sharpened head (since you can't find screws to use it with anymore) for fine flake removal. The next step after stripping paint was discovered after realizing that furniture refinisher was hard to find and reading everything I could find about shellac.The original wood finish will now determine my next step. If the original wood finish was shellac I will rub it down with steel wool and alcohol. The alcohol dissolves the shellac and will lift off most paint flakes. If you wipe up the goo as you go this is quite a time saver. I may have to zap some stubborn ones with the heat gun and use the screwdriver scraper. I won't use paint stripper if I can help it unless an item can be coated in the stuff and sealed in a plastic bag so the the stripper doesn't evaporate, or dropped in a can with a lid like "ye old coffee can o'paint stripper" that I keep in the basement and top up every time I strip hardware. I use coarse steel wool with the alcohol. When the wood surface is dry I sand with 80 grit then 100 or 120 grit sand paper to lift off any remaining paint. I then rub the surface with an alcohol soaked paper towel to remove and spread thin any remaining shellac. Any flecks of white paint are dabbed with raw umber colored paint or you could dab it wth a black marker. To finish the wood I recommend three coats of shellac purely for depth of color. You can apply urethane or spar varnish over the shellac if you want. You can tint shellac with aniline dye too. I did this for our dining room floor. This is what they used to put on old furniture. If you strip old furniture you often remove the color and can't really replace it with stain. Rub your final finish with wax and fine steel wool then buff it and you are done. I recommend waxing floors if you are going to be creating a lot of dust because it makes sweeping them with a brush so much easier, the dust slides off! It also makes the floors very slippery though. If the original wood finish was painted over fresh wood I say "SCREW IT" and sand and paint the wood again after stripping. It is way too much work to sand the surface clear of paint, especially if the molding is detailed. I am dealing with this right now in the bedroom. I say "Yay Less work for me!!" If you want to preserve the look of wood, color wash the wood with a wiping of tan or brown paint so that some grain shows through and apply 3 - 5 coats of shellac. Our entry hall was done this way to prevent it from looking blotchy because I couldn't get all the original paint off easily. I discovered while stripping the paint that this was in fact the way it was originally finished although it was colored with a red mahogany tinted shellac over a pale green base. You can also rub the wood using artist oil paints. These contain the same pigments that are in stains and can be thinned with paint thinner. They will take longer to dry than conventional stain. Colors to use are Raw Umber, Burnt Umber, Raw Sienna and Burnt Sienna. I will post a bit more about this subject soon because I am in the middle of dealing with this.

This is the top part of our mantle in the bedroom. The bottom has been finished this week and looks really good. I will post some before and after pictures with the next wood refinishing report. In the meantime I have to devise a way to mask the large burn mark and the numerous cigarette burns in this piece of wood. Since nobody could offer up any suggestions in my last post I shall follow the advice of "Old Blue Eyes" (Frank Sinatra to you young puppies out there) and "Do it myyyyyy wayyyyyy".
Saturday, July 16, 2005
I am stripping once again.
I have spent more time in the last two years being a stripper (of paint).
If I were big and manly I could have a subtle stripper name like Buster Hymen. However, my wrist hurts right now so it should be Limp Biscuit or something to that effect, or even "Petty Particles".
Anyway, that mantle in the bedroom that Deborah started to strip 4 years ago is now ready for the "All over alcohol body rub and scrub". Hopefully that will get done in the next few days.
Has anyone had experience getting cigarette burns out of wood? There are several on the mantle ledge as well as a huge burn from a candle. My plan is to rub the burns with artist oil paints in an effort to obscure them and then shellac the mantle with amber shellac to hide the paint. I was wondering if there was a more accepted method out there besides painting the thing.
Back to the subject of strippers. If you want to see a picture of a REALLY CUTE TOPLESS BABE wrapped around her 20 year old lusty "stallion" CLICK HERE!
Friday, July 15, 2005
Another use for Shellac
I knew this would work before I did it so I was only surprised about how well it worked. I have some aniline tinted shellac left over from when I "stained" the dining room floor. It is a walnut color. Rather than spray paint my rim locks black and wait a day for the paint to dry, I decided to experiment with painting on the tinted shellac. If you want a steel grey original look then a couple of coats of clear shellac will do the trick. I wanted my locks to look black so as to contrast with the shellac coated doors. I was able to paint about 6 - 8 coats in less than 2 hours because the shellac dries quickly as the alcohol evaporates. Here is a picture of the lock I stripped a couple of days back when I rambled on about pointless screws.

Here is a picture of one of the rim locks I bought on Ebay after the shellac treatment. I have to dab some black paint on those screw heads to obscure them.

Talking about screws. Have you noticed that you can't find traditional screws any more unless they are made of brass? Then they cost a small fortune. Everything you find is a Phillips head screw.
Geez, a guy can't even get a decent screw any more!
Here is a picture of one of the rim locks I bought on Ebay after the shellac treatment. I have to dab some black paint on those screw heads to obscure them.
Talking about screws. Have you noticed that you can't find traditional screws any more unless they are made of brass? Then they cost a small fortune. Everything you find is a Phillips head screw.
Geez, a guy can't even get a decent screw any more!
Subscribe to:
Comments (Atom)