Friday, January 12, 2007

A Nagging Question

"Gary, what do you use to fill holes, gouges, et al, since you refinish? Thanks! "

I use wood putty where I think it is needed. I use Bondo for large holes. For these doors I used wood putty from the container. After a couple of coats of amber shellac I painted over the light areas with a brown acrylic paint that was slightly darker than the wood was turning. Any paint that remained in dents got the paint treatment too. Basically I am trying to mask the light spots so that they don't draw the eye to them. I then applied another couple of coats of shellac and now the filled areas aren't that noticable.

Here are the finished doors;


Here is a close up of where the door knob hole was filled with Bondo. The hole was from a rim lock door knob and is above and right of the key hole which I am using for a thumb latch lock (which is what was used on this door in our house);


Here it is without the flash going off and how it looks in real light. The oxidation from the position of the rim lock looks worse than my repair. When the thumb latch lock is installed your eyes won't even notice the discoleration because the lock will draw the attention since it is unusual.


This is a close up of the two panel door to show how the finish is with a few dings and scrapes after shellac has been applied.


When you own a house that is this old you have to accept that the woodwork can never be perfect and will look some what distressed. My skill with a paint brush is the result of hobby related painting and so I am quite good at creating the illusion of a door that is in better condition than it really is! These doors are upstairs on the rustic side of the house and won't be seen by many people. Besides, I only know one person who will inspect doors and molding and notice the flaws on a room and that is me. I already know where the flaws are and I'm not talking!

Thursday, January 11, 2007

Use it Once. Wear it Twice!

That's my slogan for "Flax For Men". I washed last weeks work clothes and put some of them on again this week. You wouldn't know it by the smell. The dirt is gone but the smell still lingers. (Hey, that's another slogan!) We put the eew in Pee. (There's another!)

How about this one

"Flax For Men" the cologne for the celibate.

Or The perfect gift for a bachelor life!

Anyway, it makes a decent furniture polish and has saved me a ton of money on tack cloths this week!

"Flax For Men" for that polished look......
"Flax For Men" for the dusty guy......

And what does Elizabeth have to say about "Flax For Men"? In her own words;

"Daddy, pee-eew. You stink."

Novice Plumber?

Are you a Novice Plumber? Could plumbing be in your future? Do you need some practice?

If you answered yes to any of these questions then I have the appropriate site for you to practice on!

Don't let plumbing be the bane of your existence. Practice early and practice often. Let your kids practice too and I'll bet they will be better than you in less than 30 minutes!

I was not paid to promote this site. My wife told me I needed to practice and this would be a good place to start!

Tuesday, January 09, 2007

More Wazzup in the Hood....

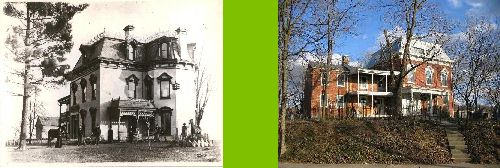
Hey, do you remember this post about the fancy italianate house in our neighborhood? Well the owners decided not to sell it. Instead they have opened a business there and have a web page. In fact, they are supposed to be doing some work on the landscaping this spring to make the place super appealing.

I am plugging this so they get a bunch of hits off this site which might prompt them to finish all the links on their site so you might get to see what the place looks like inside! When they have their page finished then maybe I'll add it to my list of Dayton links to the right of the main blog page and put it on my neighborhood web page.... hint, hint!

Sunday, January 07, 2007

The "New" Scent For Renovators!

Hey Dudes and Dudettes! Do you want to attract members of the opposite sex? Do you want to attract someone worth their weight in refinished wood? Would you like a scent that tells someone what YOU are all about? I have found it! The one thing that tells everybody that you are serious about your home renovation. Put a small amount of this on and you will turn heads at Lowes or Home Depot. Put a drop or two on your clothes and you can stink up a room for a week. It's the tell all musk for men or "perfume de maison" for women, the ultimate renovation scent for the androgynous. It just needs a catchy name for marketing something like "Flax for Men" or "Raw Linen" for women. I can make it for about $7.00 a gallon. With a little alcohol and some ambergis I could jack up the price to equal that of some designer scent! Wanna try some? Just mix a little boiled linseed oil with some paint thinner for the Eau de Toilet version. Skip the paint thinner for the perfume version. Just add garlic and you could have a bus seat all to yourself! Nothing says renovation junkie like the scent of linseed oil.

At the house you can see that I am getting those doors shellaked. After mixing up a batch of "Flax for Men" of course and brushing it over the doors and then managing to get it all over my hands when I flipped the doors over and all over my sweatshirt when I wiped my hands off!


Wednesday, January 03, 2007

Now I Am REALLY Confused

The north east wing of the house has always intrigued me. We affectionately call it the "Cottage". It wasn't always the two storey structure that it is today. We know that the right side of the building was built at the same time as the main house and was two storeys. The balcony is also an original feature. What has me confused is the left side. We have a description of it being the 4 walls of some pioneers brick home but this probably isn't accurate. The basement foundation is odd and the floor boards were very worn and of a different wood than the main house. The back door leading to the basement is very old and indicitive of the 1820s or 1830s cross pattern that was used at that time. I have speculated that this part of the house was Sam Edgar's bachelor home after his father "sold" him 40 acres of farmland plus another 80 acres a mile up the road on Christmas Eve in 1832 for $2000. I suspect the original house was a wood frame hut about 16' X 16' in dimension and the floor was about 18" lower than it is today. After the main house and adjoining room were built out of brick, I suspect they tore down the frame structure and built a brick one storey extension. The floor and foundation were raised to accomodate the extra dirt that was dug out when the foundation of the new house was excavated. I know it was one storey because you can see it when you look at the wall from outside.


The original paint was whitewash and has held to the brick very well. The upper part was added later and never got the whitewash treatment.

Here is the earliest image we have of the house.


In this image from 1874-1875 it appears that the upper level is present. If you extend the balconey floor back it hits the wall where the rooms separate and the chimney isn't visible in the picture and it would be if the second floor wasn't there otherwise the picture would depict the single storey extension. (This image is very accurate by the way. I was able to determine from it that the windows in the main house were extended downwards before actually stripping the paint off them and determining that that really was the case! The image also indicates two basement windows that are no longer visible from the outside but are very apparent from the basement itself.)

Then there is this brick we found on the main chimney dated November 1875.


I assumed that the house was painted red in 1875 or at least all the mortar lines were put on so that it appeared as unpainted brick. That was until this weekends stripping extravaganza!

I have stripped the two doors, the two windows, the baseboards and about two thirds of the floor in the smaller of the two rooms. I am working my way into the next room and removed some of the molding from around the door because I am going to run some electical wire for a 3-way switch behind the frame. Well, when you remove molding in this place it comes with a proportional chunk of wall plaster in it's wake.


Those red bricks with white mortar lines that you see are painted and the white area below is white wash. As you get closer to the floor the bricks are unfinished. If I remove more plaster I could easily reveal the original roof line but I don't think I want the extra work of plastering the wall. What would have been really cool is finding evidence that the door was originally a window. That would almost verify that this picture was of our house. At least now we know it was white at one time! There is never a dull moment here at the "Crack House."

Tuesday, January 02, 2007

Wednesday, December 27, 2006

A Strip Tease

Actually here is some advice if you are thinking about stripping paint. I received a comment last week assuming that I would use liquid stripper on my door after using a heat gun. I don't use liquid stripper any more. It is way too messy! So I was stripping my door and thought about what I do differently now that I didn't do way back before I became knowledgable in the ways to strip wood. Well the answer is simple. Besides being much more patient and aware of the true nature of the task at hand, I don't try to strip away long peels of paint in a continuous forward motion with the scraper any more. I used to try to remove a strip of paint as wide as the scraper blade and as long as I could get it before it would burn up on the scraper sending wads of smokey fumes up my nose. This tends to leave paint still attached to the wood surface that you are removing it from and requires the use of chemicals or a go-over with the heat gun. Now I tend to make numerous short swift scrapes with the edge of the scraper removing about a half inch wide by one inch long strip of paint accross the width of the wood being scraped and then I move forward and remove another inch. This method is much more thorough and produces a pattern that looks like this;


Now before you get too excited, it took about 6 hours to get this far:


It took another two hours to scrape what was left and then I got to flip over the door.


This side only has 4 layers of paint not 8 like on the reverse. If I can get the white and grey layers off then the original coats come off a lot easier. Removing the top two layers revealed the original two tone colors of this door. It also makes removing these green layers much easier.


To get this done took about 30 minutes. After 3 hours the door looks like this;


Once the paint is stripped I then use a palm sander. I start with a #60 grit paper to remove the flecks of remaining paint. I then fill the holes with wood putty before sanding with a #80 grit paper and then a #150 grit paper. Here is the door that I did last week after the #60 grit sanding;


I won't stain these doors either. I will probably use the boiled linseed oil and turpentine (or paint thinner) mix on them because the wood is quite dry and then shellac them. I expect they will turn out like this one in our bedroom;


So for all you potential strippers out there who want some advice on technique, here is what I have to offer. Not much, I know but every little bit helps. Now if you would like to slip dollar bills my way then feel free to do so! I just have to put my garter belt on....

Tuesday, December 26, 2006

The Obligatory Christmas Post

Since Elizabeth was acting up all week I put in my last minute order to Santa for a sack FULL of coal. I figured that if I get my chimneys lined I could use it to heat the house. Anyway, it turns out that my order went in too late or Santa has lost his contract with the anthracite supplier this year and he left her presents anyway. I noticed that the only thing in my stocking this year was a piece of chocolate that I put there myself (how pitiful is that?). Funny though, he left me a whole big pile of reindeer poo on the Crack House balcony. I could bury it in the basement and hope that in about 20 million years it turns into coal.....

As for the house, I was going to post some tips on stripping paint without losing your mind but Blogger won't let me upload pictures that I took on Sunday. So, you will all have to wait patiently for that post which is good practice for when you actually strip your own wood. In the meantime you can exalt in the fact that the days are getting longer once again.