The City water department installed our water meter and turned our water on today. You know what that means? I'll post a report later but just so you get in the mood, all I have to say is "Phuck it!"
"Phuck it, phuck it, phuck it, phuck it, phuck it, phuck it, phuck it, phuck it!"
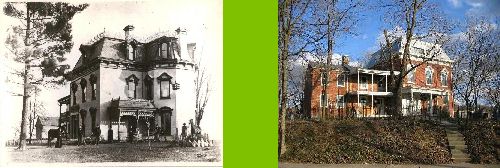
From log house to farmhouse. Farmhouse to townhouse. Townhouse to apartment house. Apartment house to crack house. Crack house to our house. Our house to our home.
Thursday, July 19, 2007

Monday, July 16, 2007
Another Gift That Keeps on Giving....
Crappity crap, crap, crap. This isn't a post about plumbing skills or my lack of them. No, this post is about the next bout of "Houseblogger Herpes" that is about to go around. I inoculated myself back in January but I guess the effect have worn off already. You see, I got tagged with an 8 Random Facts virus that requires me to list 8 random facts about me and then spread the love amongst other bloggers. I didn't even see this one coming, it was completely out of the blue and smacked me on the lips like a hooker with a cold sore!
The source of the infection is Tallulah House. (Blame them!) Now I guess I have to go and read her blog so that I can plot my revenge. Maybe we will invite ourselves down to Atlanta and they can buy the beer.
Anyway, things you never knew about me and now you will wish you didn't;
1) At age sixteen I pierced my ear with a safety pin. My brother grassed me out to my mom who made me remove it until I became a famous rock star and nobody would care about my pierced ear. I was 33 when a girlfriend pierced my ear with a needle and now I have a nickel allergy that means I can only wear gold or sterling silver or I get a rash where the metal rubs. After losing every earring I ever had I have worn this one for the last 5 years exclusively. It is a sabre. It is the only one that hasn't fallen out.

It is for the swashbuckler in me.
2) When I moved to Ohio in 1994 I cropped my hair. I didn't cut it again for 11 years by which time it was half way down my back. I used to have a moustache and goatee too but one day I was forking horse manure into my garden and wiped my mouth with a crap covered glove and decided it was time to shave.
3) Despite popular opinion, I don't go out of my way to seek publicity. It tends to find me. I guess I do things that other people find news worthy.
4) I used to ride around on this 1964 Lambretta that I restored in the 1980s until some little bastards stole it.

I never got the vehicle back but I tracked one of the little bastards down, sued him and his dad in small claims court and got to be on the Judge Mathis show as a result. I won. The little bastard is 22 now, a father and has a warrant out for his arrest. I often wonder where my scooter is.
5) I have worn antique wire rim glasses for 13 years. I do this for several reasons. One is they wrap around behind my ears so I don't have to keep pushing them up onto my nose because they fall down it like regular glasses do. They don't come off easily either. Two, I have always worn little round gold rimmed glasses since I was in college back in the late 70s and early 80s. Three, they are OK to wear in 17th century re-enactments. Four, the frames can be bought for less than $20.00. Designer frames of similar style would cost a ridiculous amount of money that I could find better things to spend it on. I'm thinking that I might get a pair of those big round black bakelite frames that were popular in the 1920s to wear for laughs and giggles. I will have to keep an eye out at the antique stores.
6) I worked for an auction company for 1.5 years during my "Mid-life crisis" when I was 32. (It was good to get it over with early.) I learned that what you would think was valuable really wasn't and what people paid for some stuff was crazy. Since then I rarely buy anything new unless it is socks , underwear or shoes. All of our furniture is old and most was bought at auctions. I reason that if we had to sell it we would get back what we paid for it. Which isn't a bad way to look at it.
7) I don't like sports, never have really. I do weight lifting though. 12 ounce bottles are my favorite!
8) If we never bought the "Old Crack House" I suspect that our resident house would have been finished about 5 years ago. Of course five years ago I didn't know what I know now so I'm sure I would have had to do the plumbing twice!
If you want to get tagged, post a comment otherwise I will crawl away back into my hole and wait until this strain of the dreaded pox goes away!
The source of the infection is Tallulah House. (Blame them!) Now I guess I have to go and read her blog so that I can plot my revenge. Maybe we will invite ourselves down to Atlanta and they can buy the beer.
Anyway, things you never knew about me and now you will wish you didn't;
1) At age sixteen I pierced my ear with a safety pin. My brother grassed me out to my mom who made me remove it until I became a famous rock star and nobody would care about my pierced ear. I was 33 when a girlfriend pierced my ear with a needle and now I have a nickel allergy that means I can only wear gold or sterling silver or I get a rash where the metal rubs. After losing every earring I ever had I have worn this one for the last 5 years exclusively. It is a sabre. It is the only one that hasn't fallen out.

It is for the swashbuckler in me.
2) When I moved to Ohio in 1994 I cropped my hair. I didn't cut it again for 11 years by which time it was half way down my back. I used to have a moustache and goatee too but one day I was forking horse manure into my garden and wiped my mouth with a crap covered glove and decided it was time to shave.
3) Despite popular opinion, I don't go out of my way to seek publicity. It tends to find me. I guess I do things that other people find news worthy.
4) I used to ride around on this 1964 Lambretta that I restored in the 1980s until some little bastards stole it.

I never got the vehicle back but I tracked one of the little bastards down, sued him and his dad in small claims court and got to be on the Judge Mathis show as a result. I won. The little bastard is 22 now, a father and has a warrant out for his arrest. I often wonder where my scooter is.
5) I have worn antique wire rim glasses for 13 years. I do this for several reasons. One is they wrap around behind my ears so I don't have to keep pushing them up onto my nose because they fall down it like regular glasses do. They don't come off easily either. Two, I have always worn little round gold rimmed glasses since I was in college back in the late 70s and early 80s. Three, they are OK to wear in 17th century re-enactments. Four, the frames can be bought for less than $20.00. Designer frames of similar style would cost a ridiculous amount of money that I could find better things to spend it on. I'm thinking that I might get a pair of those big round black bakelite frames that were popular in the 1920s to wear for laughs and giggles. I will have to keep an eye out at the antique stores.
6) I worked for an auction company for 1.5 years during my "Mid-life crisis" when I was 32. (It was good to get it over with early.) I learned that what you would think was valuable really wasn't and what people paid for some stuff was crazy. Since then I rarely buy anything new unless it is socks , underwear or shoes. All of our furniture is old and most was bought at auctions. I reason that if we had to sell it we would get back what we paid for it. Which isn't a bad way to look at it.
7) I don't like sports, never have really. I do weight lifting though. 12 ounce bottles are my favorite!
8) If we never bought the "Old Crack House" I suspect that our resident house would have been finished about 5 years ago. Of course five years ago I didn't know what I know now so I'm sure I would have had to do the plumbing twice!
If you want to get tagged, post a comment otherwise I will crawl away back into my hole and wait until this strain of the dreaded pox goes away!
Wednesday, July 11, 2007
Bugger It!
Remember how I was boasting back in May about knowing exactly which tile I needed to bust in order to fix the plumbing behind the shower? Well you had better not depend on me to find buried treasure using a treasure map.

I'll go bang my head against the wall now......
Next week we will get the water turned back on and I can find out where the rest of the leaks are!
Friday, July 06, 2007
Hypertufa For Your Garden
Years ago I read an article is some house related magazine and thought to myself "Self, one day you are going to try that." The article mentioned hypertufa garden planters. If you need to know what hypertufa is, you can check the link. If you don't believe any of this you can check this link and this link just so you know that I don't make this stuff up! Well, some day has arrived.
I decided to make a large planter and needed a mold. I looked around the house and settled on one of our lovely "City of Dayton" recycle waste containers for the basic shape with a kitty litter bucket for the inside impression.

Most people use cardboard boxes but I wanted to be able to make additional planters if I was happy with the result. I lined the recycle bin with a plastic construction grade garbage bag so as not to ruin my lovely blue bin with the city logo on it.
My recipe consists of 1 part Portland cement, 1.5 parts sifted peat moss (you need to get the big twig bits out), 1 part perlite and 0.5 parts sand and a pinch of polypropylene fibers. I used a shovel to measure the parts and mixed it all in a wheel barrow. This is masonry not rocket science. Here is what the mix looked like when I put it in the wheel barrow

and here is what it looked like after it was dry mixed.

I added enough water to make the mix malleable and not to dry or too wet and put an inch of the stuff in the bottom of the lined bin. I then placed the kitty litter bucket in place and added more of my cement mix around the edges. I had to mix up three batches in order to make enough for this project because I am lousy at guesstimating volumes. When done it looked like this

and then I pulled the bag over the top to allow the thing to cure and retain the moisture as it does so.

After a couple of days I removed the planter from the bin by lifting out the plastic bag. I did this because I needed the bin for trash collection on Thursday! While I was at it I removed the kitty litter bucket too and allowed the thing to cure for one more day before I took a wire brush to it to roughen up the surface and make it look like rock. I also gauged a hole in the bottom with a short handled dandelion plucker to allow for drainage. I would have used a screwdriver for this task if there was one sitting on the back porch. At 4 PM on Thursday it looked like this.

This puppy is about 9 inches tall by 16 inches or so long and isn't too heavy due to the fact that I used perlite as an aggregate. I stuck it back in the bag to cure and went around to the front of the house to look at a smaller one that I made about three weeks ago.

The Portland cement costs about $5.00, sand is $2.50, the peat moss was a little over $6.00 and a huge bag of perlite cost $12.00 from a florist. The perlite will be the hardest thing to find. I am guessing that I could make about 7 of these large planters for $25.00 which is good because the little ones sell for about $30.00 each at Meijer.
So go off and be good gardeners now and make some pots to plant your herbs in. In a few weeks when I make the sink for the small powder room you will realize why I am experimenting with this kind of stuff!
I decided to make a large planter and needed a mold. I looked around the house and settled on one of our lovely "City of Dayton" recycle waste containers for the basic shape with a kitty litter bucket for the inside impression.

Most people use cardboard boxes but I wanted to be able to make additional planters if I was happy with the result. I lined the recycle bin with a plastic construction grade garbage bag so as not to ruin my lovely blue bin with the city logo on it.
My recipe consists of 1 part Portland cement, 1.5 parts sifted peat moss (you need to get the big twig bits out), 1 part perlite and 0.5 parts sand and a pinch of polypropylene fibers. I used a shovel to measure the parts and mixed it all in a wheel barrow. This is masonry not rocket science. Here is what the mix looked like when I put it in the wheel barrow

and here is what it looked like after it was dry mixed.

I added enough water to make the mix malleable and not to dry or too wet and put an inch of the stuff in the bottom of the lined bin. I then placed the kitty litter bucket in place and added more of my cement mix around the edges. I had to mix up three batches in order to make enough for this project because I am lousy at guesstimating volumes. When done it looked like this

and then I pulled the bag over the top to allow the thing to cure and retain the moisture as it does so.

After a couple of days I removed the planter from the bin by lifting out the plastic bag. I did this because I needed the bin for trash collection on Thursday! While I was at it I removed the kitty litter bucket too and allowed the thing to cure for one more day before I took a wire brush to it to roughen up the surface and make it look like rock. I also gauged a hole in the bottom with a short handled dandelion plucker to allow for drainage. I would have used a screwdriver for this task if there was one sitting on the back porch. At 4 PM on Thursday it looked like this.

This puppy is about 9 inches tall by 16 inches or so long and isn't too heavy due to the fact that I used perlite as an aggregate. I stuck it back in the bag to cure and went around to the front of the house to look at a smaller one that I made about three weeks ago.

The Portland cement costs about $5.00, sand is $2.50, the peat moss was a little over $6.00 and a huge bag of perlite cost $12.00 from a florist. The perlite will be the hardest thing to find. I am guessing that I could make about 7 of these large planters for $25.00 which is good because the little ones sell for about $30.00 each at Meijer.
So go off and be good gardeners now and make some pots to plant your herbs in. In a few weeks when I make the sink for the small powder room you will realize why I am experimenting with this kind of stuff!
Wednesday, July 04, 2007
A week of Silence
I have been "off-the-blog" for a while. I had a festival to put together and had to spend a lot of time making some carnival game boards while other neighborhood volunteers cleaned out the rest rooms and shelter at the local park where the festival was to be held.
On Friday, one day before the festival, the city workers arrived to clean the shelter and the rest rooms! I guess they got to go home early that day! I also fixed a huge crack in the concrete slab that you step onto in order to enter the shelter. I tuck pointed some of the major cracks in the stone wall of the shelter. I mixed up some sand, lime and portland cement in a bucket and used up as much as I could on Friday evening since the festival was scheduled for Saturday from 10 AM til 8 PM.
On Monday the city workers were at the shelter caulking the cracks and fixing the roof! Nothing like being late.
Elizabeth and I also made front page news.

Our picture was on the front page of Wednesdays Dayton Daily News with a story, or actually two stories, that the reporter gleemed from our neighborhood newsletter that someone gave her.
The only work that has been done on the house involved a vacuum cleaner and a wet rag and I'm certain that every houseblogger has been there and doesn't need a detailed description of the process. I also took it upon myself to do a little experimenting with some portland cement, peat moss and perlite in the last couple of weeks and my next post will discuss the trials and tribulations of making hypertufa garden planters! Oooohhhh, bet you're getting excited about that!
On Friday, one day before the festival, the city workers arrived to clean the shelter and the rest rooms! I guess they got to go home early that day! I also fixed a huge crack in the concrete slab that you step onto in order to enter the shelter. I tuck pointed some of the major cracks in the stone wall of the shelter. I mixed up some sand, lime and portland cement in a bucket and used up as much as I could on Friday evening since the festival was scheduled for Saturday from 10 AM til 8 PM.
On Monday the city workers were at the shelter caulking the cracks and fixing the roof! Nothing like being late.
Elizabeth and I also made front page news.

Our picture was on the front page of Wednesdays Dayton Daily News with a story, or actually two stories, that the reporter gleemed from our neighborhood newsletter that someone gave her.
The only work that has been done on the house involved a vacuum cleaner and a wet rag and I'm certain that every houseblogger has been there and doesn't need a detailed description of the process. I also took it upon myself to do a little experimenting with some portland cement, peat moss and perlite in the last couple of weeks and my next post will discuss the trials and tribulations of making hypertufa garden planters! Oooohhhh, bet you're getting excited about that!
Tuesday, July 03, 2007
PSSSST!
PSSSST! See that "Vote for me" button under the baby with the hammer on the right side of this page? Go to their site and vote "YO" for "This Old Crack House". If we get the readers choice award it might just pay for the two chimney liners that I need to buy in the next month. Of course the sponsor is a Canadian company so the prize is probably in Canadian $$$ and will only pay for one of the liners!
Then if you're feeling REALLY bored, click on the cost estimator link further down the page and try to figure out how much money we saved by doing all this work ourselves!
Then if you're feeling REALLY bored, click on the cost estimator link further down the page and try to figure out how much money we saved by doing all this work ourselves!
Saturday, June 23, 2007
Some More of My Floor
The floor pictured in the previous post looks good but I want to say it is not perfect. Most people don't go around examining floors for flaws but many folks have indicated that they were inspired by how well they turned out and it gives them hope for their own floors. Some of the boards have deep divots due to the splintering dry wood and since this was obviously a problem for the owner of the property who painted the floors battleship grey back in the 1950s, in some of the grey painted areas the paint didn't sand out completely. Some of the deep red color didn't come out either. Here is a close up of one of the boards that illustrates this;

I made the decision to refinish the wood instead of paint the floors based on the fact that they had turned out satisfactory after sanding. They also look quite rustic and have old house character. I did not use stain on this floor. I used shellac for the color and then applied two coats of polyurethane over the shellac except on some of the divots I have had to apply 4 or 5 coats of poly in order to reduce the chance of some areas splintering. The build up of poly on the rough edges of the splinters reduces the roughness of the wood on these edges. Another thing that gives the floor character are the plugs I made for where the floor boxes were:
I couldn't match the wood since I don't have any scraps from this floor and you don't know what color they will turn out until you put shellac on them. I will be mounting external boxes onto the baseboards and the wires should be hidden by the shoe molding. I have to paint the baseboards first, though.
Here is how the adjacent room turned out after a coat of oil based KILLZ primer:

Now for the big clean up. There is a lot of dust in this house!
Monday, June 18, 2007
Never Thought It Would Look Like This!
In April I took this picture

Today I took this picture

Ahhhh, shellac!

Today I took this picture

Ahhhh, shellac!
Sunday, June 10, 2007
NEWS FLASH
Breaking news! After 6 years of being maneuvered around the second floor. the worlds heaviest bathtub has landed on the first floor! That deserves a beer or three! I figured out a way to lower it without leaving large dents in the stairs. Finally, 30 years after the fact, I got to put my physics education to work. Now I truly understand the value of education. Rigging these pulleys allowed me to be able to actually lift the tub off the floor single handed.

My neighbors used the guide ropes attached to the tub to steer it through the door at the foot of the stairwell so that it ended up on the floor below.
Don't believe me? Here is proof!

Last June I described this tub and couldn't find anyone to take it off my hands. Now it is at ground level does anybody want it? I sure would hate to have to use it in the garden for a kitty bath or some kind of raised bed......

My neighbors used the guide ropes attached to the tub to steer it through the door at the foot of the stairwell so that it ended up on the floor below.
Don't believe me? Here is proof!

Last June I described this tub and couldn't find anyone to take it off my hands. Now it is at ground level does anybody want it? I sure would hate to have to use it in the garden for a kitty bath or some kind of raised bed......
Saturday, June 09, 2007
Progress Report
I am almost ready to sand the last two floors. I hope that by Sunday they will be done and I can finish working on my plumbing leaks so we can get the water turned back on so that we can give this place a thorough cleaning because it is very dusty!
I put this door back in and the molding back on. It makes a big difference.


When we bought the place this door was hanging out in the basement and I stripped and refinished it last year. Here is a picture of that Eastlake latch lock that I found for $4.00 last year and mentioned in this blog way back when. I gave it a coat of aniline tinted shellac which is why it is dark and shiny. It fit the existing screw holes in the door perfectly.

As you can see, I still have the worlds heaviest bathtub sitting in the middle of the floor.

I have tied a rope around it and have oiled up these pulleys to see if I will be able to lower to the first floor.

The plan is to attach them to the exposed beam in my "Gary sized hole" in the ceiling that I made last week. I bought these pulleys for a $1.00 at the end of some auction about 10 years ago and they have been sitting on a shelf in my garage. Their time has finally come! If this works it will be the most fun I will have had for $1.00 in a long time! If it doesn't work, well it will be the most fun I have had for a $1.00 in a long time!

I got the landing shellacked and urethaned as well as those upper three steps replaced. You see those lower steps? Those were done back when all I knew about was stain and polyurethane. I used to think they looked good. I shall have to see how the floor turns out in this room after sanding. Maybe I won't paint it after all. I'm thinking shellac again....... must be an addiction.
I put this door back in and the molding back on. It makes a big difference.


When we bought the place this door was hanging out in the basement and I stripped and refinished it last year. Here is a picture of that Eastlake latch lock that I found for $4.00 last year and mentioned in this blog way back when. I gave it a coat of aniline tinted shellac which is why it is dark and shiny. It fit the existing screw holes in the door perfectly.

As you can see, I still have the worlds heaviest bathtub sitting in the middle of the floor.

I have tied a rope around it and have oiled up these pulleys to see if I will be able to lower to the first floor.

The plan is to attach them to the exposed beam in my "Gary sized hole" in the ceiling that I made last week. I bought these pulleys for a $1.00 at the end of some auction about 10 years ago and they have been sitting on a shelf in my garage. Their time has finally come! If this works it will be the most fun I will have had for $1.00 in a long time! If it doesn't work, well it will be the most fun I have had for a $1.00 in a long time!

I got the landing shellacked and urethaned as well as those upper three steps replaced. You see those lower steps? Those were done back when all I knew about was stain and polyurethane. I used to think they looked good. I shall have to see how the floor turns out in this room after sanding. Maybe I won't paint it after all. I'm thinking shellac again....... must be an addiction.
Subscribe to:
Posts (Atom)