When we went on that home tour in Southpark a while back I took a couple more photos that I didn't show you. No they aren't pictures that will make you say "wow" or "That is really special". They aren't pictures of designer rooms or exotic appliances, room colors or light fixtures. They were pictures of baseboard molding. Here they are
Of course now you may be saying "Why didn't I think of that?" or "That is so simple it is brilliant!" I may do this in our dining room. Sure makes doing corners a lot easier!
Wednesday, November 28, 2007
Sunday, November 25, 2007
Another (Drastic) Change in the Plan. With Update!
It is really great doing everything yourself because you can change your mind about stuff and it doesn't cost any money for extra labor! For example, our tiny powder room under the stairs. It turns out that I am not going to be able to attach a faucet to the wall because I only have 1 inch of space in the wall for the plumbing attachments and that won't do. Besides, the neck of claw foot tub faucet that I planned to use extends too far over the sink. So we are sort of back to the original plan but I am adding a twist. Why? Because I can.
Let me make it very clear that I had no intentions to do what I am going to do but I think I can pull it off and make this room look classy at the same time. Remember, it is just a bathroom.
The concrete sink is made, polished and installed. It still needs a topical sealer to give it a wet look but I have to wait a couple of weeks before I can do that because the concrete has to fully cure. I am very pleased with my sink. So much so that I poured a 4 inch high back splash Saturday and two 1/4 inch thick side tiles that I hope will survive the mold breaking and polishing process.
I trimmed out the alcove that the sink sits in after painting it a completely different color and will hopefully get the molding painted later this afternoon. I have made the plumbing apparatus and installed the mirror that I had hanging in the bathroom at our resident house. You read that correctly, I MADE the plumbing apparatus. It is in place but not installed because the back splash has to be installed over some of it.
Those lovely women at House Made eluded to this a couple of weeks back and I didn't pay any attention to it then but when we ran into the problem with the faucet all bets were off. In fact I became inspired after somehow winding up on this site and now I am going to make my own side lights for the mirror and a really cool ceiling fixture using some plumbing parts, some wood, antique style bulbs and some funky decorative wiring. When I make my lighting I will be sure to make an extra set and sell it on Ebay to see if there is a market for it. Anyway, as of today, THIS was the view from the toilet! (It is a composite made from two photographs in case you think my walls are bowed)
Can you see where this is going? All I need now is a few funky Victorian patent designs to hang on the wall and a couple of etched brass clockwork switch plates. I'll also need to make a toilet tank cover that looks like riveted iron and be sure to put a few Jules Verne novels on it!
*UPDATE*
Here is a close up picture of the sink for all those people who want to try this for themselves.
Here is a picture that may help you realize just how small this space is. You will notice that I did get the molding painted......
Saturday, November 17, 2007
A Little Goodwill....
You would think that by now EVERYONE has a George Foreman grill. If you don't then you certainly don't have to wait until the latest model is released. You don't have to wait for the infomercials to start up again either. Just go to Goodwill
where, for $3.00 each you can buy one or even a dozen, and if you like to collect things, you can buy one of every model and style made! I know you all need ANOTHER kitchen appliance on your limited counter top space. If these things were easy to clean then people might actually use them more than once.
Elizabeth likes these thrift stores because we can get 79 cent Barbies. They never come with clothes though. Can somebody tell me why that is?
We saw a book but I just couldn't justify spending the $1.00 to buy it. It was a "Better Homes and Gardens" publication about kitchen design. It was dated 1972. Lots of wood panelling, linoleum and formica. It was pretty scary. It was too early for the trend of carpet in the kitchen though. Urgh! I need to go wash my hands....
Thursday, November 15, 2007
A Sneak Peek at the Concrete Sink!
I broke open the mold today.
The basin knock-out was not co-operating the way I wanted it to but once I had removed the 4 rows of styrene
I was able to pull out the remaining pieces leaving the cardboard shell as planned.
Once that was removed I was left with this
and the really good news is that after minimal routing of a piece of framing wood, it fits perfectly!
So I will be grinding the top and front this weekend and doing a very small amount of slurry work to fill a minimum of voids. I opted to not do the agate and the lighting feature as it would have been overkill for such a small space. All will be revealed when everything is finished.
Yey me! This deserves a beer......
Tuesday, November 13, 2007
Of Wood Pellets, Rain and Beer!
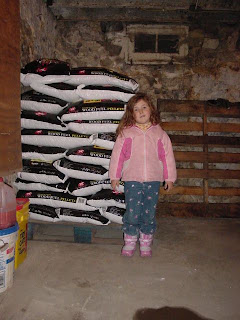
"Chad the lad" left a comment on the last post wanting me to post a picture of what a ton of wood pellets looks like. Well here you go (with your favorite little munchkin of course!)
What would have been more interesting would have been a picture of his 3/4 ton pick up loaded with a ton of pellets and how the two of us looked after hauling fifty 40# bags from his truck to our basement in the pouring rain on Sunday. What he doesn't want you to know is that he did this for a six pack of Guinness. He isn't free but he's relatively cheap! I'm not cheap but I am easy so together we're two wet slobs, one with a case of wood pellets and the other with a case of beer!
Monday, November 12, 2007
Friday, November 09, 2007
Wallpaper Going Up!
Wow! This has been a long time coming. We bought this wallpaper at least three years ago. I must admit, it is certainly easier to put it on BEFORE the molding is put in! I don't have to worry about perfect placement horizontally. What I have learned is that all inside corners are plumb until you wallpaper them. It becomes particularly noticable when you use striped wallpaper! I was fortunate to catch this early and devise a suitable solution. Here is the dining room from the kitchen;
The main living room;
The parlor;
and the hall;
That's right, you can't view it from the hall right now because I have a sheet of insulation over the doorway to keep the heat from the pellet stove contained to the first floor! Yes there are five doorways to our dining room.
Wednesday, November 07, 2007
More Concrete Sink Mold Making Madness!
The concrete sink project got delayed due to my having to come up with a better solution to making a form for the sink portion of the mold. If you recall from the previous post, I used rigid materials for this the first time round and had extreme difficulty removing it from the final result. So instead of using wood, I used polystyrene. I had some pieces of pink and blue house insulation lying around, so that is what I used.
If I were super smart, I would have cut these pieces as 4 or 5 large rectangles to be stacked vertically instead of some 12 pieces horizontally as I did. When you cut as many pieces as I had to you don't get all the pieces to line up properly so there is additional work involved to make the form smooth and even. The good news is that styrene cuts really easily on a table saw. The bad news is I used joint compound to smooth out the surface and fill the voids. This worked great but it took several coats and a day to dry between coats. Hence the delay.
I like delays. They allow me to think about how I want to do something. This delay allowed me to figure a way to add another dimension to the sink bowl. Sloping sides. It also made me look at another site where I got a really cool idea that incorporates lighting features into this sink. If you search enough you will find a process named illumicrete and an example that incorporates fiber optics into the surface of a concrete bar top. This sink isn't big enough to incorporate anything that fancy but I thought I would mention the idea here in case anyone reading this would like to try it for themselves. Then there was another sample that involved inlays of painted glass that would look plain in daylight but produced bright colors and patterns under black lights. This would be really cool but I think a black light in the smallest room in the house would be overkill. Besides, it enhances things that are white and my hair would light up enough that the reflection from the mirror would give me sunburn! If you are considering doing anything with concrete you need to check out the galleries at this site. There are some really cool ideas. We do plan to incorporate a light under the sink to reflect out of the openings in the fireplace cover. We thought it would be cool to give the illusion of a glowing fire. I may use the same light to add a light feature to the sink. Here are two pictures to give you an idea of what I am thinking about. These are two of many pieces of agate that I have sitting in a drawer.
Anyway, I used caulk to "glue" styrene segments together in twos and fours. I left some partitions between sections un-caulked so that I can remove these from the poured end result if I need to. I pressed the entire piece in a clamp and smoothed the surface with the joint compound. When dry the entire thing was sanded smooth and sealed with....... wait for it......... shellac! I then put a few strips of packing tape over the thing to hold it together. My mind then ran off in another direction. Instead of struggling with getting this out of a poured concrete sink in segments, it would be easier to lift it out of a collapsible sheathing in one piece. So, I built a cardboard skin for this form and bound it all with some Mylar plastic to round off the edges and packing tape. I marked where the drain will go and this is the thing before attaching the drain knock-out.
To get this removed from the final piece, all I have to do is cut the packing tape around the edge of the form in the second picture, lift out the styrene insert and collapse the cardboard sheath. Of course that is the plan but we all know that something will go wrong, right?
The drain can be tricky if you try to incorporate an overflow. I decided on a non plugging strainer drain so an overflow won't be needed. The hard part is figuring out how to get the drain to sit slightly below the base level of the sink floor so that water drains and doesn't pool. If you look at your bathroom sink you will see a dip where the drain rests. I made a drain knock-out using PVC pipe with a slit cut in the side so that it can be compressed slightly and removed from the finished piece. This has wood dowel in the center where a screw attaches it to the base of the sink form. The PVC is wrapped with two layers of thin packing styrene and packing tape. This gives me extra space to wiggle the PVC out of the drain hole if I need it. To get that dip, I used the two washers that came with the drain attachment. The one adjacent to the bottom of the sink form will be the one that is mounted under the sink and prevents water from coming out of the overflow chamber in a normal sink. The one on top of it is the one that seals the drain in the sink itself where one would normally apply plumbers putty at the lip of the drain where it sits in that dip.
Here is a picture.
I then put a bead of modelling clay around the washers to bevel the edge for better drainage.
This is the status of the sink mold as of today. I noticed tonight that I am out of beer. Now I have that sinking feeling.....
If I were super smart, I would have cut these pieces as 4 or 5 large rectangles to be stacked vertically instead of some 12 pieces horizontally as I did. When you cut as many pieces as I had to you don't get all the pieces to line up properly so there is additional work involved to make the form smooth and even. The good news is that styrene cuts really easily on a table saw. The bad news is I used joint compound to smooth out the surface and fill the voids. This worked great but it took several coats and a day to dry between coats. Hence the delay.
I like delays. They allow me to think about how I want to do something. This delay allowed me to figure a way to add another dimension to the sink bowl. Sloping sides. It also made me look at another site where I got a really cool idea that incorporates lighting features into this sink. If you search enough you will find a process named illumicrete and an example that incorporates fiber optics into the surface of a concrete bar top. This sink isn't big enough to incorporate anything that fancy but I thought I would mention the idea here in case anyone reading this would like to try it for themselves. Then there was another sample that involved inlays of painted glass that would look plain in daylight but produced bright colors and patterns under black lights. This would be really cool but I think a black light in the smallest room in the house would be overkill. Besides, it enhances things that are white and my hair would light up enough that the reflection from the mirror would give me sunburn! If you are considering doing anything with concrete you need to check out the galleries at this site. There are some really cool ideas. We do plan to incorporate a light under the sink to reflect out of the openings in the fireplace cover. We thought it would be cool to give the illusion of a glowing fire. I may use the same light to add a light feature to the sink. Here are two pictures to give you an idea of what I am thinking about. These are two of many pieces of agate that I have sitting in a drawer.
Anyway, I used caulk to "glue" styrene segments together in twos and fours. I left some partitions between sections un-caulked so that I can remove these from the poured end result if I need to. I pressed the entire piece in a clamp and smoothed the surface with the joint compound. When dry the entire thing was sanded smooth and sealed with....... wait for it......... shellac! I then put a few strips of packing tape over the thing to hold it together. My mind then ran off in another direction. Instead of struggling with getting this out of a poured concrete sink in segments, it would be easier to lift it out of a collapsible sheathing in one piece. So, I built a cardboard skin for this form and bound it all with some Mylar plastic to round off the edges and packing tape. I marked where the drain will go and this is the thing before attaching the drain knock-out.
To get this removed from the final piece, all I have to do is cut the packing tape around the edge of the form in the second picture, lift out the styrene insert and collapse the cardboard sheath. Of course that is the plan but we all know that something will go wrong, right?
The drain can be tricky if you try to incorporate an overflow. I decided on a non plugging strainer drain so an overflow won't be needed. The hard part is figuring out how to get the drain to sit slightly below the base level of the sink floor so that water drains and doesn't pool. If you look at your bathroom sink you will see a dip where the drain rests. I made a drain knock-out using PVC pipe with a slit cut in the side so that it can be compressed slightly and removed from the finished piece. This has wood dowel in the center where a screw attaches it to the base of the sink form. The PVC is wrapped with two layers of thin packing styrene and packing tape. This gives me extra space to wiggle the PVC out of the drain hole if I need it. To get that dip, I used the two washers that came with the drain attachment. The one adjacent to the bottom of the sink form will be the one that is mounted under the sink and prevents water from coming out of the overflow chamber in a normal sink. The one on top of it is the one that seals the drain in the sink itself where one would normally apply plumbers putty at the lip of the drain where it sits in that dip.
Here is a picture.
I then put a bead of modelling clay around the washers to bevel the edge for better drainage.
This is the status of the sink mold as of today. I noticed tonight that I am out of beer. Now I have that sinking feeling.....
Monday, November 05, 2007
The Dining Room Fire Place
Years ago we bought a fireplace front and over mantle for the dining room. It was a long time ago, I've got a picture from February 2004 showing how I used to have to prop it against the wall with some planks of wood.
Well. I finally got the polished concrete hearth set in place with mortar and have laid in the floor of the fire box so that I am now ready to build the sides and back. I finished the floor and grouted the hearth today. I decided to put the fireplace front in place to see if I could build up the firebox with the mantle in place. After determining that I can, I attached the marblized steel opening to the wall with some twisted picture hanging wire that wraps around the iron lintel that is embedded into the brick.
Tonight the room looked like this
The marblized face of the fireplace determined the colors for this room. Since we used a walnut color for the windows and floor we had to use earthtones for the wall and this olive drab green worked well with a burgundy ceiling. The next step is to get the black and gold striped floral wallpaper hung on the lower part of the wall and then we decide what color to paint the chair and picture rails as well as the ceiling molding. the current plan is to paint the molding gold and then finish with a turmeric tinted shellac.
Here is a close up of the fireplace mantle.
The finish on this thing looks great when it is wet so I am considering applying some "Mop-and Glo" to the marblized front so that it has an acrylic gloss finish. My concern would be if the finish should peel if we use the fireplace. At least with "Mop-and-Glo" it could be stripped and re-applied at minimum cost and effort. That concrete hearth looks good with a wet finish also. I see a gloss finish in its future too!
Saturday, November 03, 2007
We have ignition!
We went out today and found a source of wood pellets. Tractor Supply Company sells them for $199 a ton and Lowes has them for $241 a ton. We don't anticipate needing more than one ton this winter since we just have to keep the place warm enough to stop the water pipes from freezing and make it comfortable for me to work on cold days. Then we have to figure out a reliable way to get them to the house. So we bought a couple of 40 lb. bags so we could finally test the pellet stove insert. We also have a source for corn but have to find something to store it in so the mice don't get to it. I sure wish the neighbor across the alley would stop feeding the stray cats. I guess we could always feed it to the sacrificial Easter kitties!
Subscribe to:
Posts (Atom)