It has been over two weeks since the house next door flooded. There has been no sign of the owner or any of his minions! The "For Rent" sign is still up as is the "For Sale" sign. I would love to see someone's face when they see the kitchen!
There is a window to the basement in the back of the house with a broken pane. I stuck my head in with a flash light to see if there was still any water in there. It has all gone! If it wasn't for the smell or the water bill, you would never know that there was 3 feet of water in there. Now here is absolute proof that if you ignore your problem long enough it WILL go away on its own......

From log house to farmhouse. Farmhouse to townhouse. Townhouse to apartment house. Apartment house to crack house. Crack house to our house. Our house to our home.
Friday, December 30, 2005
Thursday, December 29, 2005
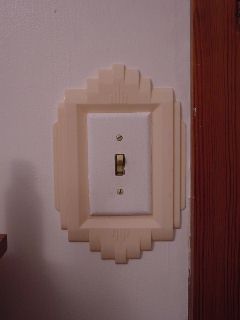
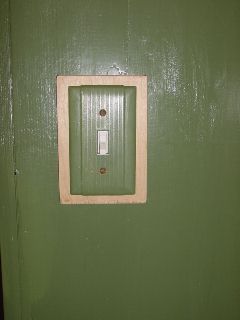
The problem with switch plates!
Have you ever had a switch plate that won't lay flat?
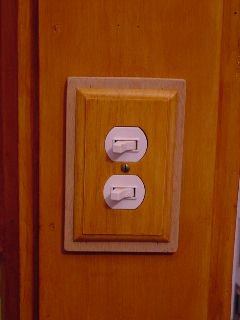
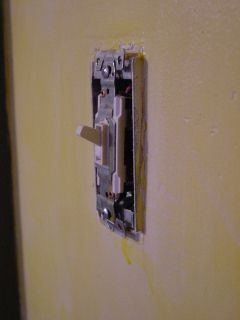
When you rewire an old house and have to install electrical boxes where they are awkward to install, well, they don't always lay flat. I had to put some really skinny boxes in our breakfast room because one of the walls was brick and the other one was 1" planking. Add some 3-way switches and the skinny box doesn't have much room left for wires. The end result is that the switch plates won't screw on flush with the wall. There is a gap that shows up in the form of an ugly shadow. I also have a problem in the hall where a switch was put into the wood molding near the door and in order for the plate to sit flush with the wood I would have to chisel a recess into the wood where the box is screwed on.
Here is the one in the brick wall.

You can see that the metal on one side of the box isn't flush with the wall. I have the option of removing it and chisling more brick and then replastering the wall to get to to sit flush or I can find a way to fill the gap.
You can go and try to find some of these
but that could take several years if you need a few (and we do!).
I have a simpler solution. I have some very thin plywood that I cut to sit around the electrical box and under the switch plate.
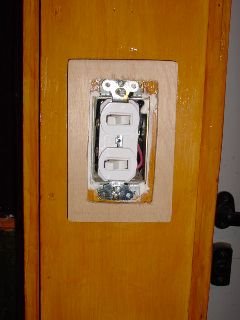
I plan on painting two of them green and putting shellac on the third but I guess you could really do some fancy stencil or rubber stamping on one of these if you wanted to. Call it a creative solution to a simple problem.... it works for me!

I had to do something today, the temperature outside was 52 degrees! Inside it was 44 degrees and after 5 hours with the windows open it got up to a whopping 46!
When you rewire an old house and have to install electrical boxes where they are awkward to install, well, they don't always lay flat. I had to put some really skinny boxes in our breakfast room because one of the walls was brick and the other one was 1" planking. Add some 3-way switches and the skinny box doesn't have much room left for wires. The end result is that the switch plates won't screw on flush with the wall. There is a gap that shows up in the form of an ugly shadow. I also have a problem in the hall where a switch was put into the wood molding near the door and in order for the plate to sit flush with the wood I would have to chisel a recess into the wood where the box is screwed on.
Here is the one in the brick wall.
You can see that the metal on one side of the box isn't flush with the wall. I have the option of removing it and chisling more brick and then replastering the wall to get to to sit flush or I can find a way to fill the gap.
You can go and try to find some of these

but that could take several years if you need a few (and we do!).
I have a simpler solution. I have some very thin plywood that I cut to sit around the electrical box and under the switch plate.

I plan on painting two of them green and putting shellac on the third but I guess you could really do some fancy stencil or rubber stamping on one of these if you wanted to. Call it a creative solution to a simple problem.... it works for me!

I had to do something today, the temperature outside was 52 degrees! Inside it was 44 degrees and after 5 hours with the windows open it got up to a whopping 46!
Thursday, December 22, 2005
Is winter over yet?
Hey! Yesterday was the first day of winter! (Well officially, anyway.) You know what that means? Only some 90 days before it's spring! I had better go find my shadow and get it ready. I lent it to a groundhog last week. If I don't get it back now he'll keep it until February!
Wednesday, December 21, 2005
Doing a Happy Dance!
Happy, Happy, Joy, Joy, Happy, Happy, Joy, Joy, Happy, Happy, Joy, Joy, Happy, Happy, Joy, Joy, Happy, Happy, Joy, Joy, Happy, Happy, Joy, Joy, Happy, Happy, Joy, Joy, Happy, Happy, Joy, Joy!
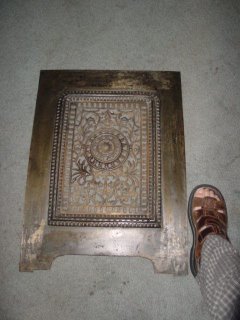
Look what I was able to buy!
Look what I was able to buy!
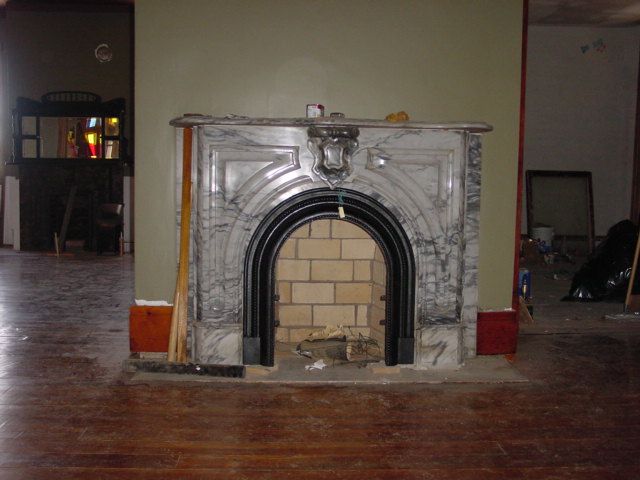
A cast iron fireplace horse shoe!
I found it at an antique mall of all places. It cost $22.50! You read that correctly, twenty two dollars and fifty cents!It is about 1" too wide to rest flush with the marble due to the 'molding" near the base of the marble sides. I will have to cut and file some small notches on each side of the horse shoe to get it to lay flush, but hey, what a find! I will just have to find a cover now... you wait and see, that will cost $225....
Happy, Happy, Joy, Joy, Happy, Happy, Joy, Joy, Happy, Happy, Joy, Joy, Happy, Happy, Joy, Joy, Happy, Happy, Joy, Joy, Happy, Happy, Joy, Joy, Happy, Happy, Joy, Joy, Happy, Happy, Joy, Joy!
Sunday, December 18, 2005
It's 36 degrees inside. What should I do?
Things to do while waiting for the gas man (woman) when the indoor temperature is 36 degrees.
I was able to put my Rejuvenation light fixtures up on Saturday in the freezing temperatures that engulf this house. They look good in the hall, the larger of the two needs lower wattage bulbs because your eyes are drawn to the glare as you walk down the stairs and the bulbs are exposed on the upper side of the light. Either 40 watts are in order or I need a 3-way dimmer or both!
Since I was over there I made this
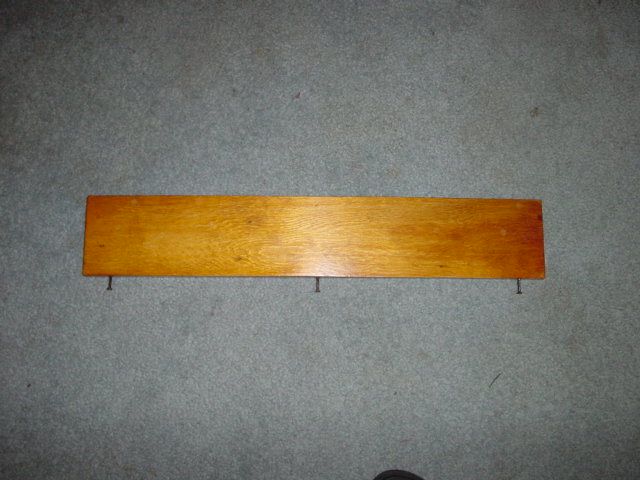
"WTF is that?" you ask.
Well, since you asked. It is a plank of wood that has been given 3 coats of shellac and has three old iron square head nails protruding from one edge.
"What is it for?"
This:
Those Sneaky Utility Companies!
Sometime in 2003 we stopped using the gas at this place. This decision was made because I had re-run the existing lines inside the place so that I wouldn't get a bump on the head fumbling around in the basement. The main line from one of the two gas meters ran across one of the rooms in the basement at head height requiring me to duck as I passed through the room. I moved some lines and ran lines to areas of the house that had never seen a gas line in case I would need to install a furnace or a gas dryer at a later date. I tidied up the lines in the basement quite a bit and made one of the meters obsolete. At that time I had the meter removed leaving me with just one.
Well, after this I never ran a furnace again and we have yet to use the stove. I still have to buy a water heater and we have decided to get one of the "on demand" type that mounts to the basement wall. I don't need to get one until we are actually ready to live here so we have no need for the gas service.
For the longest time our monthly gas bill was $4.00 until this year when Vectren jacked up the billing to $7.00. So, we pay $7.00 a month for something we don't use but have the option to use if we want to or install the correct equipment.
Every so often for the last two years, Vectren would leave us notes saying that they need inside the house to test for gas leaks before the meter. Since our meter was inside the house, they needed access to check for leaks. Their note indicated that this was a federal requirement but I question its integrety because I have NEVER received a note at the house where we actually live and pay for the actual use of gas. This house is a mere 3 blocks away.
I never called Vectren for an appointment because I couldn't ever guarantee that I could be at the house at any particular time. Besides, I was suspicious of their real desire to get in the house. I suspected that they wanted to see if I had tampered with the meter. Whenever I saw the so called "sniffer" person they were leaving notes on the doors of houses that were vacant and never actually trying to get into occupied houses where people paid more than $7.00 a month for gas.
They finally called us on the phone. The "boy" who called asked for Deborah. The conversation went something like this;
Boy; "This is Vectren. We need to get inside your house to test for gas leaks."
Me; "You've never done this before."
Boy; "It's a new law that has only been around for the last two years. We need to go into your house and we have a device that detects gas. It will take us about 20 seconds."
Me; "I have lived here since 1994 and have NEVER had you contact me about this." (Now, you have to understand, I am at the residence thinking that they want into this house.)
Boy; "You are where, 114? Where are you?"
Me; " I'm not telling you where I am. This sounds like a suspicious phone call. Thank you. Good Bye!"
Five minutes later I'm sitting on the porcelain throne when the light bulb in my head goes off and I realize that they want into the "Crackhouse". Two days later we get a letter in the mail with an ultimate threat to discontinue service if we fail to comply.
We set up an appointment for Saturday afternoon. Even though it is up to 36 degrees on the first floor I was sure that there was some work that I could do while I wait for the gas "sniffer" to show up. Since it was Saturday, I was sure they would be there early so that they could get home early.
I was right, they showed up by 12:45. The woman came in with a flash light, went down to the room in the basement. Shined the light on the meter and gave the gas lines a good look over then said "I'm done. My sniffer didn't go off in your yard." Then she left. She didn't have a "sniffer" in her hands. Things that make you go "Hmmmm".
Speaking of gas. I wonder if my neighbor with the flooded basement (still no sign of him) has his gas turned off?
Thursday, December 15, 2005
Everything is Coming to a Grinding Halt
Nothing is being done at the house due to below freezing temperatures outside and at freezing temperatures inside. I can't cap my third floor plumbing lines until it is above 40 degrees since the cpvc cement won't cure properly. Besides, that will only take five minutes to do. The smoothing of the parlor walls requires the joint compound being able to dry and not freeze onto the walls. I can't do any mortar or cement work. I can strip paint from wood though! How exciting!
Besides what does anyone care about what is happening at this place? It seems that more people are interested in what's going on with my neighbors house than mine. I had over 250 visits to this blog yesterday. On any normal day when I talk about my place I'm lucky if I get 120 hits and until yesterday my all time high was 160. Maybe I should blog about other peoples houses!
Still no sign of the owner of the house next door. I thought about calling the real estate agent to let them know about the problem but then I started thinking even more. I have already made three phone calls to the owner. The first at 10PM when I noticed water in MY basement. The second at 10:15 PM after I called the water department emergency # to inform him that I am getting his water shut off and the third at 12:10 AM to say that the water was finally turned off after some difficulty and that at one point I had to enter the house to see if I could shut the water off from inside but there was 3 feet of water in his basement. If the owner is on vacation and hasn't got my messages then whos problem is it? Not mine. If he can't be bothered to get over here, whos problem is that? Not mine.
Now, if they do get over here, pump out the water and use fans to dry out the house I know the guy won't put any money into fixing the place properly so I have to deal with the uncertainty of the quality of neighbor that I get. If I sit back, let his furnace and water heater rust and allow toxic mold to infest the walls and hope that the foundation cracks making the place uninhabitable then maybe it will be condemned and have to be removed at which point I offer to buy the place.
Hmmm, decisions, decisions. What would Jesus do? What would Flying Spaghetti Monster do? More importantly, what would YOU do?
Wednesday, December 14, 2005
My math skills suck!
In the previous post about the volume of water in my neighbors basement, I am wayyyyyy off!
The dimensions of the house are 25' X 25'. The water was approx. 3 feet deep. That makes my volume calculation accurate at 1875 cubic feet. In order to figure out the volume of water though, I have to convert this to inches because there are 231 cu. in in a gallon. Since there are 1728 cu. in. in a cubic foot then there are 1728/231 or 7.48 gallons in a cubic foot.
7.48 gallons X 1875 cubic feet = 14025 gallons of water!!!!!!!!!
Holy Crap! Can you say "water bill" boys and girls?
If the owner doesn't show soon and the weather stays cold we'll have indoor ice skating for the kids!
My Neighbor is a Moron Part 2.
The rest of the story.....
Do you remember me telling you about the house next door to my residence? How the owner paid some morons to put vinyl siding on it? Well, about three weeks after that was done, the tenants moved out. The house has been empty since and has a "For Sale" and a "For Rent" sign in the front yard.
Tonight I noticed something strange as I was cleaning out the litter boxes at 10:00PM. There was water in my basement filling up the north west corner. I filled two buckets with water and was looking for a source of the leak when it became apparent that the water was seeping in on the entire north side. This is unusual. There is snow on the ground and it hasn't rained in a while. I thought for a moment and then went outside and looked between the property line to see if the snow had melted away. Then I heard the waterfall. The house next door had obvious problems with their plumbing. Having had similar problems at the "Old Crackhouse" I knew the sound of burst pipes!
I left a message on the owners answering machine, then, realizing that my basement was still oozing water I called the water department. They came out and tried to shut off the water. This isn't easy with 3 inches of snow on the ground. The first time they tried, it was my water that got shut off. The second attempt was a gas line. At this point we thought that if we could get permission to go in the house via a lock box key then the water could be turned off inside. I called the owner again. No answer. I decided to take a bold step. Noticing a 4 inch gap at the top of the plexiglass sash window on the porch, I stuck my hand in, unlocked the sash lock, lifted the window and went in. The water department employee could not follow me since this could be construed as "property damaging" but he was willing to lend me his flash light. The lights would not come on in the house so, using the flash light I found the door to the basement avoiding the torrent of water pouring from the kitchen ceiling. I went down two steps and then stopped. The water level was up to the 4th step. That means it was almost 3 feet deep! By my estimation, that is 1875 cubic feet of water and that equates to about 1200 gallons! In order to shut the water off I would have to go into this cesspool and look under water for the shut off valve. Screw that! I don't even know if the electric is shut off! Can you say frazzle dazzle?
See, there is never a dull moment around here. Plumbing continues to be the bane of my existence. If not mine, then the nearest immediate neighbors! I think when I see the owner later today, I will offer him $6000 for the place which is the lot value. He wants something like $48,000. It used to have nice oak floors, not any more. The panelling in the kitchen is now warped and the ceiling is gone. I could demolish the place and have a double lot or sell the two properties as a package deal and let the new buyer demo it or rehab it. Unless of course, any of you want to be my neighbor! For a short while at least, until we move three blocks away into the "Old Crackhouse".
Look at it this way. The house has an indoor swimming pool.........
Tuesday, December 13, 2005
Nothing to do with a house blog but...
I see that one of the pop idols of my childhood may be spending some time in the "Big House". Thats right, Gary Glitter has gotten himself in trouble again. This time with Vietnamese authorities. I have no sympathy. If it looks like a duck and walks like a duck, well, you know how that goes.
Well Gary Glitter, it looks like you will be singing less "Do you want to touch (me there)" and more of "Leader of the Gang (I am)". Start practicing.
"Do you wanna be in my gang? My gang, my gang? Do you wanna be in my gang? Oh yeah!"
Well Gary Glitter, it looks like you will be singing less "Do you want to touch (me there)" and more of "Leader of the Gang (I am)". Start practicing.
"Do you wanna be in my gang? My gang, my gang? Do you wanna be in my gang? Oh yeah!"
Sunday, December 11, 2005
The Ugly Truth about Brick Houses
It is nice to own a solid house made of brick but it is certainly wrought with problems.
For starters, where insulation is concerned, brick has an R value of 0.2. This means that our 8 inch thick walls with 1 inch of plaster has an R value of 1.8. The recommended insulation in walls is R-11. This means that the resistance to heat flow is pretty piss poor! In fact heat transfer is quite slow but it still occurs. The advantages in the summer are that our first floor stays relatively cool as long as the shutters are closed on the windows. Also, if it gets cold outside, it will be warmer inside for a few days. If you get a warm day or two though after a cold spell, well, the reverse is true. If you open the windows to warm the place up then you get condensation on the interior brick walls that are colder than the air that hits them. The outside temperatures this week have been as low as 10 degrees. The inside temperature on the first floor hit 32 degrees on Friday this week. If temperatures rise above this, it will take several days for the inside to catch up. It could be 60 degrees outside but will be 40 inside for several days and if I open the windows to let the warm air in then my walls will sweat and the acrylic paint will blister.
Another disadvantage is that if your gutters get clogged and water drips on the brick, the brick will suck up the water and transfer it to the inside plaster. This causes paint to peel. We have noticed that since we have bought the house and are slowly sealing it up that old paint is peeling where walls used to be continuously damp and wood molding is shrinking from drying out. This causes gaps between it and the plaster. Another thing to note is that houses built prior to 1920 or so had a high lime content in the mortar. Old brick is quite soft and mortar is supposed to be softer than the brick. Old recipes for mortar were varied and many had no Portland cement. I suspect ours was something like one part lime to 3 parts sand. Often the lime leaches out leaving just sand between bricks. New mortars are harder than old brick and should not be used unless you add lime to them. For my tuck pointing I have added about 1 part hydrated lime to one part masons mortar. It seems to be holding quite well. It is something people should be aware of though because using modern mortars will cause your old bricks to crack eventually. Many contractors who call themselves "masons" don't even know about adding lime to mortar so beware if you need to get a chimney fixed. They will coat it in a Portland cement mortar and ten years from now your bricks will be crumbling. I know because this was done at this place! Any way, whether or not you have a brick house, now you know the ugly truth!
Thursday, December 08, 2005
You know Christmas is coming when.....
You see an increasing number of ads for these;

AND the words keep ringing in your head. Chi chi chi Chia!
Interesting web site. They also sell the OV- Glove and Chimney Sweeping Logs that are increasingly advertised every December. Oh, and let's not forget the (Clap on(clap,clap), clap off (clap, clap)) The Clapper!
Please Santa, please! Do NOT give me any of these things this or any other year! Especially the Chia Pet or head!
Wednesday, December 07, 2005
Sunday at the Auction
We went to another one of Woods Auctions on Sunday. We were interested in these two pieces of furniture.


We had an idea of what we were willing to pay for them. $600 for the couch and $1000 for the display case. Well, we didn't get either. The couch sold for $850 or something like that. Which was fine because it really wasn't a practical piece and we would have to decorate the room around it. The display case sold for over $1300. we'll find another one some day.
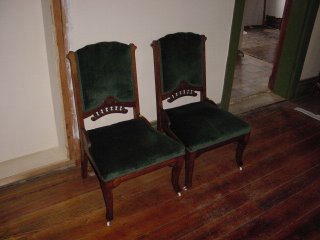
We didn't get off scott free though. Deborah got these for $45 a piece. There is always room for an Eastlake parlor chair.
Then she bought this for $65. Now this is going to be a fun plaything for Elizabeth when I rig it up but I doubt that the neighbors will agree. My trusty 4' level is there for scale. The thing weighs close to 100 lbs. Elizabeth will certainly know when dinner is ready!
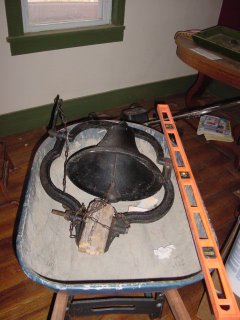
I bid on this.

It is a folk painted sausage stuffer. I will probably strip it of paint and hang it in the kitchen along with the assortment of old knives, slaw cutters and implements that we are accumulating. Hey, for the $5 it cost, I can throw it at the squirrel on my third floor or fill it with play-doh and start my own shape factory!


We had an idea of what we were willing to pay for them. $600 for the couch and $1000 for the display case. Well, we didn't get either. The couch sold for $850 or something like that. Which was fine because it really wasn't a practical piece and we would have to decorate the room around it. The display case sold for over $1300. we'll find another one some day.
We didn't get off scott free though. Deborah got these for $45 a piece. There is always room for an Eastlake parlor chair.

Then she bought this for $65. Now this is going to be a fun plaything for Elizabeth when I rig it up but I doubt that the neighbors will agree. My trusty 4' level is there for scale. The thing weighs close to 100 lbs. Elizabeth will certainly know when dinner is ready!

I bid on this.

It is a folk painted sausage stuffer. I will probably strip it of paint and hang it in the kitchen along with the assortment of old knives, slaw cutters and implements that we are accumulating. Hey, for the $5 it cost, I can throw it at the squirrel on my third floor or fill it with play-doh and start my own shape factory!
Monday, December 05, 2005
Installed and working!
By Saturday night these lights were in place. I know they don't look as good as the Rejuvenation fixtures but they certainly are period pieces.

Now, a word of advice for anyone deciding to buy one of these downward pointing bulb type fixtures. When you re-wire it, you need to put a socket on the top portion and leave it "loose" so that a candle type bulb lays flat on the top making it less visible to anyone looking at the fixture. The purpose of this bulb is to reduce the shadow that will be cast on the ceiling if you don't install it! The other trick is to install low wattage bulbs so you aren't fixated on the glare produced by bare light bulbs. I used 40 watt bulbs and they are too bright but I have a dimmer switch on this light so I can dim them to around what 25 watt bulbs would generate. The light emitted from 25 watt bulbs today is about equivalent to a 50 watt bulb from the 1930s. The other solution is to make glass bead shades to hang over the bulbs and dangle down like the headress of the woman in the poster. That would break up the glare. General Electric used to make art deco bulbs for these fixtures called GA bulbs. Once in a while you will run across them. They have a flared yellow tip to diffuse and direct light downwards but the top of the flare and the neck are white to cast light up to the ceiling. They are shaped like a long necked wide bottom vase. They look kind of neat but are actually a product of the 1950s.
Now all I have to do is install the Rejuvenation fixtures in the "Crackhouse" BUT the temperature here is below freezing. The basement of the "Crackhouse" is at 43 degrees, the first floor is 38 degrees, second floor is 33 degrees and the third floor is close to whatever the temperature is outside. It may be a few days, or weeks before I put them in. Let's put this into context. I don't know about the rest of you but I hate working in the cold. It does strange things to my body. My fingers shrink, my feet lose all feeling, my nose runs and my balls shrivel up. That is not a pretty site. You know what prunes look like? Well, my balls look like the stones in those prunes!
Saturday, December 03, 2005
Replacement Lighting
Several years ago, about 2 or 3 years B.C. ("before Crackhouse") I acquired some lights from Rejuvenation. Some were purchased and some were gifts. We decided a long time ago that we would transplant them to the "New" house if we could find some replacements that wouldn't come close to the $1000 replacement cost of the Rejuvenation lighting.
Two years ago we found some sconce lights at Home Depot or Lowes for $15.00 a piece so I transplanted the $97.00 each ones and stored them in the basement until this year when I put them in the dining room of the "Crackhouse" after painting the upper portion of the wall. I see that the replacement cost on these (Lafayette #w466) is now $132.00 each! The other two lights we have are the "Vincent" and the "Fremont".
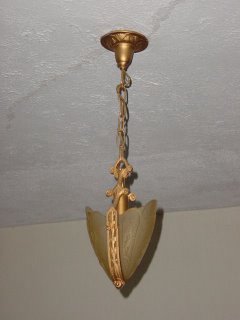

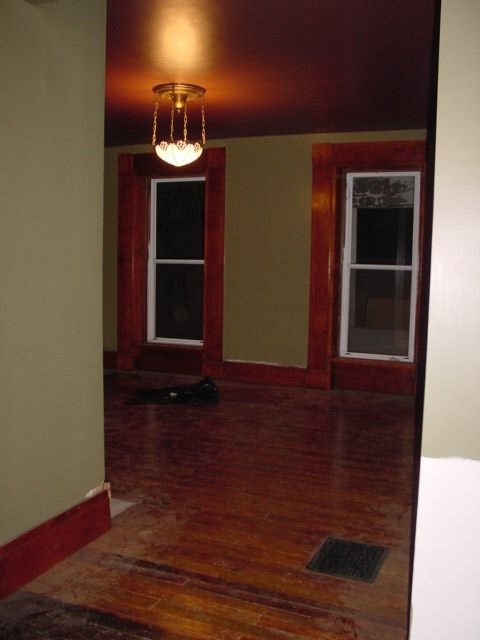
These two lights are going to go in the entrance hall of the "New" house. The larger fixture going downstairs and the pendant will be located at the top of the stairs on the landing.
Well, we were out and about Thursday this week at a nearby antique mall and found replacements for both lights for the princely sum of..... wait for it.......ahem...... I said wait for it...... drum roll please....... ahem again..... cough, cough....... are you ready?
$52.00!
Here are the lights dismantled. (Yes, I have already pulled them apart!)
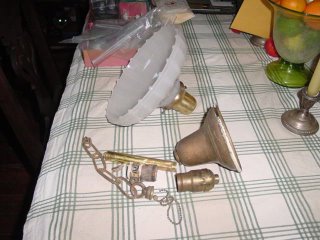

I have even rewired them already and replaced one socket in the single light fixture and got any pieces so that I can install them. I also bought light bulbs so the additional expense was another $20.00 but...... hey, I will feel no remorse leaving these fixtures in the house when we sell it!
Since the house already looks "Period" we wanted period lighting left with the house but didn't want to spend a fortune on it. Hopefully these will be installed this weekend!
In the meantime, I noticed this at the apex of my costly reproduction pendant light.
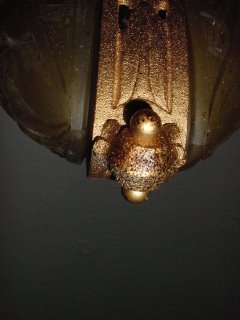
Do you see that splattering of black dots? Do you know what that is? It is fly poo-poo! It would appear that my light fixture has been an outhouse for flies for several years. Even our flies have class!
Two years ago we found some sconce lights at Home Depot or Lowes for $15.00 a piece so I transplanted the $97.00 each ones and stored them in the basement until this year when I put them in the dining room of the "Crackhouse" after painting the upper portion of the wall. I see that the replacement cost on these (Lafayette #w466) is now $132.00 each! The other two lights we have are the "Vincent" and the "Fremont".


These two lights are going to go in the entrance hall of the "New" house. The larger fixture going downstairs and the pendant will be located at the top of the stairs on the landing.
Well, we were out and about Thursday this week at a nearby antique mall and found replacements for both lights for the princely sum of..... wait for it.......ahem...... I said wait for it...... drum roll please....... ahem again..... cough, cough....... are you ready?
$52.00!
Here are the lights dismantled. (Yes, I have already pulled them apart!)


I have even rewired them already and replaced one socket in the single light fixture and got any pieces so that I can install them. I also bought light bulbs so the additional expense was another $20.00 but...... hey, I will feel no remorse leaving these fixtures in the house when we sell it!
Since the house already looks "Period" we wanted period lighting left with the house but didn't want to spend a fortune on it. Hopefully these will be installed this weekend!
In the meantime, I noticed this at the apex of my costly reproduction pendant light.

Do you see that splattering of black dots? Do you know what that is? It is fly poo-poo! It would appear that my light fixture has been an outhouse for flies for several years. Even our flies have class!
Wednesday, November 30, 2005
It's Like "The Shining"
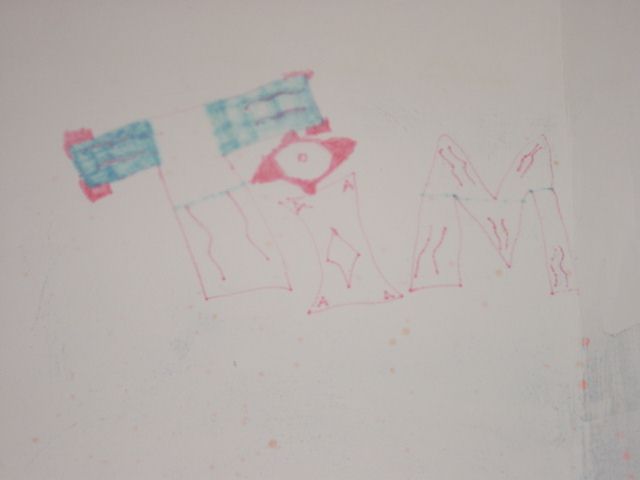
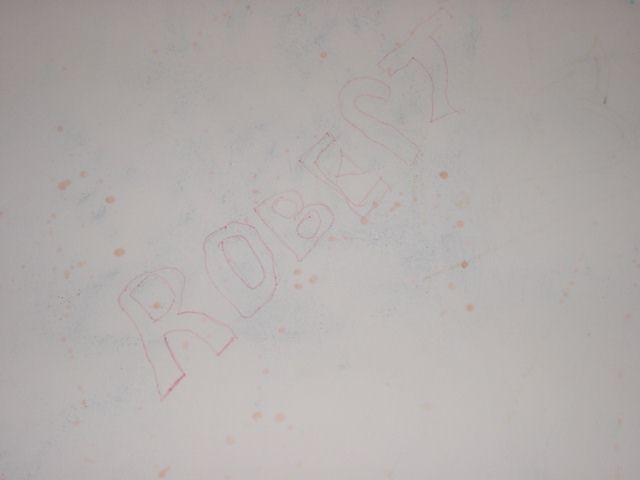
Have you ever seen "The Shining"? You know, where the words "Redrum" keep appearing on the walls? Well, it's happening at the "Crackhouse". No, we aren't getting the words "Redrum" nor are we seeing "Murder" or "You will die" but there is definitely bleedthrough occurring.
I have applied three coats of joint compound to the parlor walls in an effort to smooth them out and it appears that the writings of the previous crackhead tenant just won't go away! See for yourself


I am haunted by these guys almost 5 years later. If I close my eyes and cover my ears and sing "La la la la la la la la" it still won't make him go away. Maybe 3 coats of KillZ primer will do the trick. If that doesn't work I'll seal it with my old friend "Shellac". If that doesn't work I'll use duct tape to cover it.
Wait, maybe I can scare it away!
"Here's Gary!"

(This was how I looked AFTER the hair cut!)
I have applied three coats of joint compound to the parlor walls in an effort to smooth them out and it appears that the writings of the previous crackhead tenant just won't go away! See for yourself
I am haunted by these guys almost 5 years later. If I close my eyes and cover my ears and sing "La la la la la la la la" it still won't make him go away. Maybe 3 coats of KillZ primer will do the trick. If that doesn't work I'll seal it with my old friend "Shellac". If that doesn't work I'll use duct tape to cover it.
Wait, maybe I can scare it away!
"Here's Gary!"

(This was how I looked AFTER the hair cut!)
Sunday, November 27, 2005
Disaster Thwarted!
The temperature dropped below freezing on Friday. I stopped by the house to check the condition of the third floor plumbing and found it had frozen. I made the decision to shut off the water. Good job I did! Everything was unfrozen today. When I turned on the faucet I heard the "Glug, glug, splash" of water leaking out of the line. Upon further investigation I found the copper pipe had popped at one of the joints. Now the line is drained so once again I have no water. Time to cut and cap the lines to the third floor. Now I have a toilet and sink on the second floor I don't need water on the third floor but I do need a utility sink in the basement. Where's that extra 10% off coupon from Home Depot? Damn it! It expired today....
Plumbing, STILL the bane of my existence!
Plumbing, STILL the bane of my existence!
Thursday, November 24, 2005
Todays mistake
I made a mistake this morning. I asked Deborah to trim my hair. I mean, how hard could it be? I handed her the clippers and said "short back and sides please" the top is fine. Now I should have realized that this could be a bad move. I mean, she has NEVER cut hair before AND I have NEVER seen her carve a roast. Her attempts to slice a loaf of bread are pitiful to say the least and she always cuts herself when slicing vegetables.
As for my hair? Well, she butchered it. I knew it was a mistake when she took the attachment off the clippers and I could feel the warm buzzing blade running up my neck behind my right ear, then I heard the "Whoops!"
Being Thanksgiving Day it was most improbable that a barber would be open. I doubt one could have obscurred the damage. I had to resort to giving myself a winter buzz cut. I learned my lesson...
That's OK. In 4 months when I mention a haircut she will say "How do you want it cut?"
My reply will be "Well, I thought that I could get it short here, long here, a bald patch here and a piece sticking out over here. Oh, and a little bit of blood running down my neck will do nicely."
She will say "You can't do that!" and my comeback will be "Why not? That is how you cut it the last time!"
Having seen "Toy Story" for the 300th time and with my new found skills at remodelling I think I will change my name to "Buzz Leitzell, Space Arranger."
Wednesday, November 23, 2005
The Partinization of my window.
The renter who lived here in 2001 when we bought this place had the surname of "Partin". His first name is grafittied (is that a word?) all over our walls since he managed to live in every single one of the apartments this place was divided into, destroying each one as he migrated down to the first floor making the unit uninhabitable as he moved along. His sister rented the adjacent unit. Mr. Partin was a drug addict. I believe crack was his drug of choice.
Anyway, Mr. Partin often did work on the house in lieu of rent. Now there are two types of work done on this place. The first is the kind of work done to make do. This would involve such things as duct taping a thingymajig to a whatchamacallit. No thought goes into aesthetics, the job is done to solve a problem using the most readily available tools or products to complete the job. We call this type of job a Weils job. This was the surname of the property owner from 1954 to 1988. He is the guy that turned this place into apartments. He left drywall tape showing on seams. Cut holes in the middle of floors to put in electrical boxes. Ran plumbing up the sides of fireplaces. Well, you get the idea, it's a half-ass job with the wrong materials or just a half-ass job.
Then there is the other type of job. This involves some forethought and a tiny bit of skill. This is when you use the correct materials the wrong way. Mr. Partin was a graduate of this school. He had been the one to add a 4th layer of shingle to a part of the roof but placed the nails too high on the tab allowing much of the shingle to blow off over time. He used screws where finishing nails would have been adequate. He repaired broken windows with plexiglass and then used used caulk to seal it in. He used poison bait traps inside the house to kill the mice causing their carcasses to rot inside the walls and floors thus stinking up the house.
I put in the last exterior storm window this week while the weather held out. Before I could do this I had to strip the paint from the frame and remove the sash windows so they can be stripped and re-glazed. It is always bad enough when the top sash is painted shut. You have to strip the paint around the seam to break the seal and wiggle the window in the hope that it will move down so that you can pull out the blind stop that keeps it in its groove. Well, this window was not only painted shut, it was caulked on the inside to seal draughts out. Mr. Partin used silicon caulk to do the job too! Needless to say this added an hour or two to the time it took to strip the window and free it from being stuck.
With Thanksgiving just a few days away I say "Thank you Mr. Partin for making me more resolute every day I happen to work on this place." It is because of you that I have learned that there is a wrong way and a really wrong way to use many home repair products. I am still amazed to this day that there were in fact fuses in the third floor fuse box. I certainly expected a person with your ingenuity and Pennsyltuckian heritage to have replaced at least one of them with a quarter!
Friday, November 18, 2005
Giving Thanks this week
Did you know that had the South won the Civil War we would not have a Thanksgiving Holiday?
Lincoln declared a national Thanksgiving holiday in 1863 and after that all we hear about is the Pilgrims in New England who arrived there in 1620 while on their way to Virginia. An earlier attempt to settle in Maine in 1607 by the Popham Colony had failed as had the Lost Colony of Roanoak Island in North Carolina (1587). However, the first successful colony to settle was in fact Jamestown in 1603. The problem is, Jamestown is in Virginia which was a Rebellion State during the "War of Northern Aggression" (as the South saw it) or the "War to Preserve Union" (from the Northern perspective). Had the Confederacy won they would have pissed all over Lincolns holiday and founded their own based on Jamestown and we would know very little about the New England settlers of Plymouth Plantation.
Since we do have Thanksgiving on Thursday, here are some things I am thankful for;
1) The amazing cooking skills of my mother AND father-in-law. (Can you guess who is making dinner on Thursday?)
2) That the slate portion of my roof didn't get any new leaks this year.
3) That the sink hole in my back yard that was once a well hasn't got any bigger.
4) That there were no new stray cats that adopted the wife. (Three is enough!)
5) We didn't have to buy ANY new power tools this year, whether I wanted to or not.
6) I didn't strike any more fingers with a hammer - yet.
7) My plumbing has held up for the last 6 months.
8) I haven't electricuted myself despite several close calls.
9) I haven't fallen off the roof.
10) My squatter pigeons only number 6.
11) There is only one squirrel in my 3rd floor "attic" (alas it may be no longer. That's another story.)
12) That only a 5' section of my alley retaining wall collapsed this week.
13) That the new neighbors renting across the public alley from us may not actually be assholes.
14) Most importantly - this (she went to see Santa today)

Without which I may have packed this ambitious project in several years ago! It sure is nice knowing you have someone to leave it all to....
Now, in your best Elvis impersonator voice, repeat after me
"Thank you. Thank you very much."
Monday, November 14, 2005
One last look.
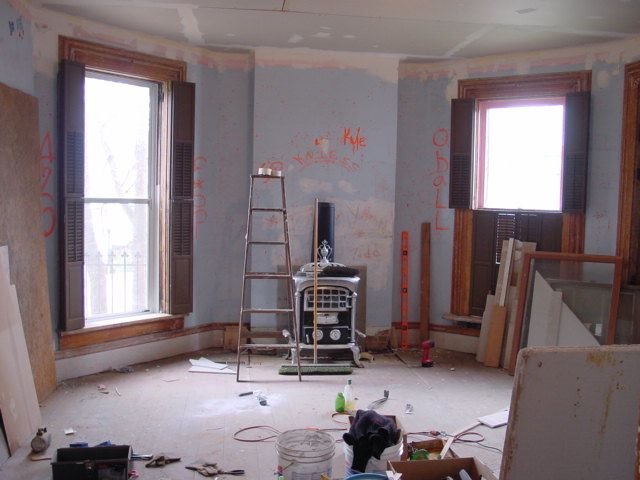
Take one last look at the parlor before I cover the walls with joint compound. I wouldn't want to deprive the world of one last opportunity to view this magnificant art work!


Saturday, November 12, 2005
Messing with your minds.
A couple of weeks ago I installed a tracking counter on this blog. Since then I have noticed that when I post to the blog I get between 120 and 160 hits in a day. When I don't post this drops to around 30 and the lowest counts are on Saturdays. Today was unusual with 35 at 11.00 PM. Most of the viewers link through Houseblogs.net. A few link to the blog from my house web page that I set up in 2001 which shows a month by month progress report since we acquired this place. If you are new to this site then you may want to check it out if you have a spare couple of hours because it is quite extensive. The most interesting visits are those that locate this site via keyword searches. These have included the following;
Pictures of crack
Pictures of crack houses
What does crack smell like
Found list of crack house rules
Bain of my existence
Farmhouse sex
Civil War sex
Intrigue sex
Rib cage showers
The first two are quite common. I guess that I need to be careful what I write in this blog. Nah!
Now for the fun part. This is a picture that graces my dining room wall. It is actually called "Solitaire".

I call it "Topless deco babe with a tight pussy".
Well, this should send the counter spinning!
Pictures of crack
Pictures of crack houses
What does crack smell like
Found list of crack house rules
Bain of my existence
Farmhouse sex
Civil War sex
Intrigue sex
Rib cage showers
The first two are quite common. I guess that I need to be careful what I write in this blog. Nah!
Now for the fun part. This is a picture that graces my dining room wall. It is actually called "Solitaire".
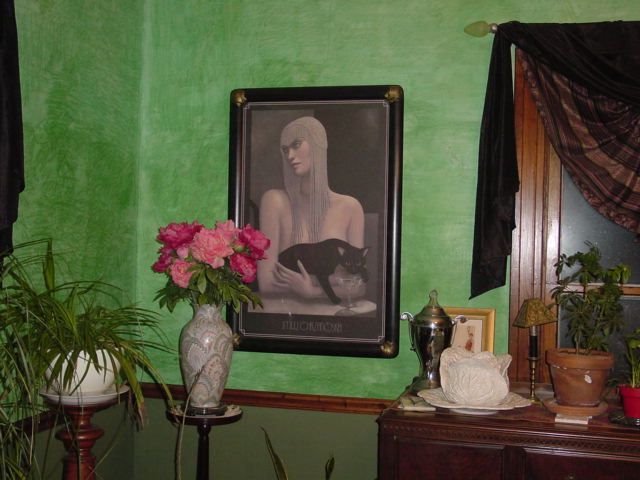
I call it "Topless deco babe with a tight pussy".
Well, this should send the counter spinning!
Tuesday, November 08, 2005
Stripping Paint from Metal
We all know how to strip paint from wood. (Well, if you have been reading these houseblogs for a while you would know.) Have you ever tried to strip paint from metal? There are several ways to do this. You can try burning the paint off (doesn't always work), you can try boiling the paint off (the wife would kill me if I used a decent pan for this), you can get it sand blasted off (I'm really too lazy and to cheap to do this if I don't have to) or you can use some sort of paint stripper. Being the cheap bastard that I am, I always go for the paint stripper. The problem with paint stripper is that it can evaporate before it has time to work properly. So the trick is to cover the metal item with the chemical stripper, then stick it in a plastic bag and let it sit for a while. Small items can be put in an old coffee can and covered with the stripper.Next, you wash off the chemicals and peeling paint. Take a wire brush and scrape all the paint flakes off. Then you may need to rub down with some steel wool. You may also need to break out that extra large can of "elbow grease" to get off that original layer of black paint that must have been made with hoof or rabbit skin glue because it is so stubborn to remove.
After all the hard work, you are left with this
or this. My foot is in the picture for scale.
And now you can spray them with varnish/shellac or you can paint them black all over again!
Oh no! It's time to strip the jam off of Elizabeth's face before evaporation makes the job more difficult.....

After all the hard work, you are left with this

or this. My foot is in the picture for scale.

And now you can spray them with varnish/shellac or you can paint them black all over again!
Oh no! It's time to strip the jam off of Elizabeth's face before evaporation makes the job more difficult.....

Sunday, November 06, 2005
ROTFL
This morning we had a brief conversation. Deborah shouts down the stairs
"Would you like to make a quick trip to Home Depot?"
Me; "Ha, ha, ha, ha!"
Deborah; "What's so funny?"
Me; "A quick trip? Ha, ha, ha, ha, ha, ha, ha, ha, ha, ha, ha, ha, ha, ha, ha, ha, ha, ha, ha, ha, ha, ha, ha, ha, ha, ha, ha, ha, ha, ha, ha, ha, ha, ha, ha, ha, ha, ha, ha, ha, ha, ha, ha, ha, ha, ha, ha, ha, ha, ha, ha, ha!"
Saturday, November 05, 2005
Never under estimate old time ingenuity.
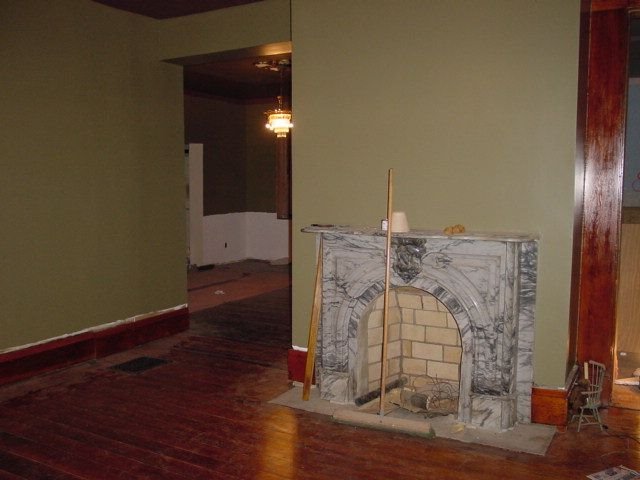
I have the daunting task of lining 7 chimneys. None will get done until spring at this point because of the likely chance of it freezing in the next few weeks and the mortar not being fully cured, but I am planning how I am going to do three of them already. Some will be lined with flexible stainless steel liners. Especially those that service fireplaces on the ground floor. I may attempt to line two of them with clay tile liners though because it would be cheaper and I have the room in the flue to lower them down from the roof. Today I removed the one and only damper that existed. It was installed in the large fireplace in the "cottage" side of the house. This fireplace was the original means of cooking back in 1845 when the house was built. The two metal hinges for the crane are still embedded in the wall of the fireplace. I used to think that the 36" long cast iron damper unit was original but now I know it wasn't. When I cleaned up the damper door two weeks ago a large hole appeared as the rust got scraped away, so it wasn't going to be much use. The 6" wide opening it presented was going to be a problem for me when it came to positioning and sealing a clay tile liner and was definitely an obstacle for the stove pipe that would have to go through it if we wanted to use the old stove we bought. In order to remove the damper I had to remove the mortar around the edge as well as the four heavily painted metal supports that held it in place that had been embedded into the side walls of the fireplace. I cannot make out what one of the metal pieces was but the other three consist of two 7" screwdriver shafts and the entire blade of a one and a half inch wide chisel! There was another screwdriver shaft bent in a curve at the back for extra support. I guess that with the widespread use of the Phillips head screw someone had no use for these three flathead screwdrivers any more and hammered them a good 6" into the mortar joints so the damper unit could be held in place.
Well, now I can actually stand up inside the fireplace and when the time comes, position the bottom liner tile and seal it in place with refractory cement. I may even use the screwdrivers to support it in place so that I can dump a slushy mortar down the chimney from above to seal it in place. Though some angle iron might be more practical. Now I can get one of those cap mounted flue dampers and run my stove pipe straight up the chimney about 4 feet so that it goes up to the lining tile. In the meantime I have wedged an old foam cushion in the flue to stop the cold air from wooshing into the house.
What can I do with the chisel shaft though? Hmmmmmm.........
Thursday, November 03, 2005
Advice for Newbees
Deborah and I had a discussion about what advice we would give people who choose to do work on their homes. We came up with several good tips that we sure wish we had followed. If you want someone to talk you out of a project I'm your man!!!!!! (Been there. Done that. Blogged about it and have the scars to prove it...)
Anyway, here they are;
The right tools are crucial. They save you time, never be afraid to buy tools, you will always have them.
Whatever you estimate a project is going to cost, DOUBLE IT!
However long you think a project will take, DOUBLE IT! If you have small children in your family, DOUBLE IT AGAIN!
NEVER gut the place if you plan to live in it any time soon. Although it is fun to remove the bad stuff you will be overwhelmed when you look at how much you have to put back together. Work one room (or maybe two) at a time.
Don't EVER lose focus on the end result.
Fix the roof leaks or isolate them before you paint any rooms below where the water falls. There is no point in doing a job twice.
Don't pay someone after they have done the job. Pay them after they have done the job right.
Black wire to gold screw, white wire to silver screw.
And finally, if at first you don't succeed, use a BIGGER hammer!
Tuesday, November 01, 2005
A major psychological milestone.
The living room is now painted. This is a real milestone because for years I have had to look at fugly walls and textured ceilings and for the last few months the house has been very white due to primed walls and ceilings. Here are the money shots. Excuse he dusty floors.


We used the same colors that have been used in the dining room but kept the format plain and simple. The ceiling is solid color and the walls are solid color. Once again there is some molding to install in this room and I still have to put the window sashes back but this really makes a big difference because now there is only one room left on the first floor to finish, well two really because I have to install a powder room under the stairs but that space is so small I don't consider it a room. The parlor is next and should be completed by February. The current plan is to paint the walls in that room a metallic gold and use a gold based wallpaper below a chair rail BUT we shall see if THAT plan gets nixxed before it comes to fruition!
Soon we will actually be able to move in! Then I get to install the two furnaces, the water heater, insulation, replace the front and side porches, replace the slate part of the roof, add two more bathrooms, add one more kitchen, redo the remaining two rooms on the 2nd floor, completely rehab the 3rd floor, line the 7 chimneys, re-build the fireplaces and install the woodstoves. After that, well there is the garage I have to build and the yard. I think I will be blogging for a while longer. Just think, if I had a new house, I wouldn't have to do any of this. Well, not for 3 or 4 years anyway....
Monday, October 31, 2005
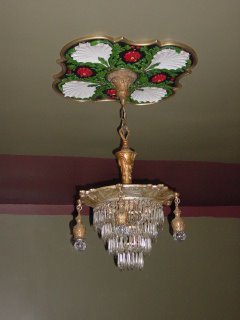
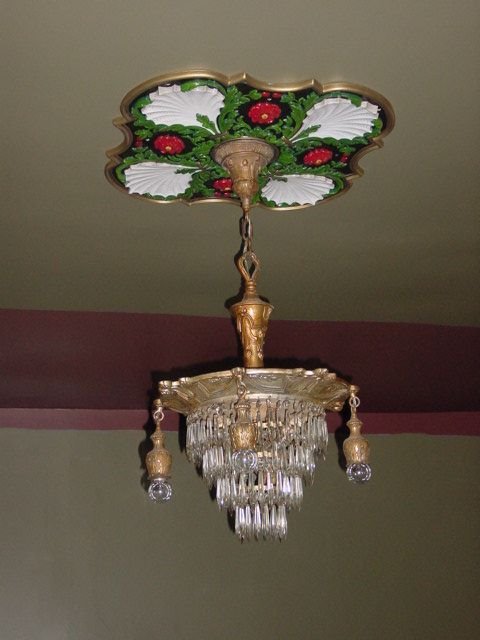
The Chandelier in All its Glory!
I spent an hour putting all the crystals on the chandelier on Friday night and putting the right wattage bulbs in. Only fitting that I should show you how it looks. One day soon I will make glass bead "shades" that rest over the bulb stem and hang down over the bulbs around the outside of the shade.
If the Truth be Told.
This comment was left on Sunday morning;
The amount of work you're willing to undertake is absolutely amazing. I just have to ask why???? It just seems there's so much work to be done on an old home why not buy a "nicer, newer" home that you don't have to do so much work to? I personally can't afford to move to a nicer, newer neighborhood so if/when I buy I'd have to do the work myself. Why choose to do it when you really don't have to?
My reply is this;
We are not wealthy people. In fact we are a one income family getting by with two mortgage payments. We do not have car payments or extensive credit card debt though, so we get by. We live in a city where housing is very affordable. The city of Dayton continues to subsidize "low income" households by building them "affordable housing" at around $160,000 a pop and giving incentives and low interest or zero interest mortgages to those who "qualify". We however can not afford to buy a $160,000 home. We don't qualify because we net a couple $1000 more than the poor people with their big screen TV's and cable. We can't afford cable TV.
I bought a nice old house before we were married in an average neighborhood and put a lot of money down and assumed a mortgage. I knew that this was not going to be a house that I would live the rest of my life in though. I did it to build equity in a property. Houses sell for between $70,000 and $90,000 on average in this neighborhood.
One day in February 2001, before we were married, Deborah and I took a walk around the neighborhood and spotted the "Crack House" just 3 blocks away from our residence. It had a "for sale" sign on the fence and Deborah called about it and was surprised to learn that the owner wanted less than $100,000 for it. Within 3 weeks it was ours. We knew that this particular house could be a "keeper" and it could be turned into a showplace. The size on the tax rolls was 3970 sq. ft. If you add the third floor and the basement which could be converted into living space we have 6900 sq. ft. The yard is 2 X the size of adjoining lots. We estimated that the material cost to fix the place up would be about $20,000 over 5 years, maybe even as high as $30,000 depending on what we did. If we had to pay contractors to do work it would be about $150,000. The resale value of the renovated house, based on the other ones in our neighborhood would be almost $250,000. Not that we would ever sell it. So the math was simple. We could have a house that would cost us $500,000 if it was located outside of the City limits for about one fifth the cost if I was willing to addy up, kick in and do the work. The experience that I now have, people pay for by going to trade school. I could start my own home remodeling business if I wanted to at this point.
You are absolutely right. I don't have to do the "amazing" amount of work that I am doing. In fact, I don't have to do any work since I have the other house and it is almost in finished condition. I could do nothing and have nothing more than I already have. I could waste my money on a new car and cable TV with a surround sound system and become a master of movie trivia like those people who qualify for those $160,000 HUD built homes. I won't do that because I have to stay busy. I have said it before on this Blog. I have what I have because I do what I do. We don't make the kind of money that would purchase a home like this already finished, but I can still have the home, I just have to finish it myself. Most people aren't like me. Most people aren't willing to do the work that I am willing to do to get what I want. This house was just about the last of the Victorian "Mansions" needing to be renovated on the East side of Dayton. We saw an opportunity and jumped on it. There are going to be a few people who looked at this place when it was for sale, kicking themselves for not buying it when they had the chance because it will be off the market for at least the next 30 years. In a few years I will be able to say that I have this house because I was willing to pay the price for it. Not in $$$ but in toil and sweat and a few drops of blood. Oh and the odd fingernail or two....
Thursday, October 27, 2005
The Dining Room Now
The paint is on the walls and ceiling of the dining room. The sconce lights are on the wall and the chandelier is hung with some "make-do" 60 Watt bulbs that are way too bright! I have a gazillion little glass prisms to hang in 4 tiers on the chandelier but will wait until I have the right bulbs in place at the center because I would have to remove some of the things to replace the bulbs. I still have ceiling molding, picture rail, chair rail and baseboards to acquire and install. The ceiling and picture rail will now be sprayed metallic gold. The chair rail and baseboards will be done to look like walnut. Here are some pictures
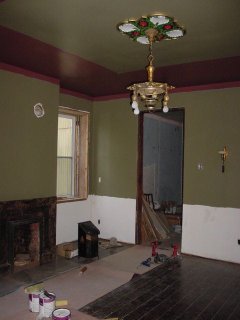
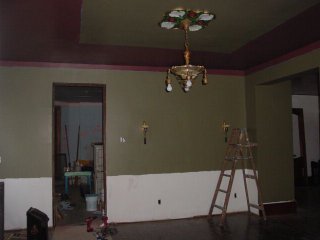
The white area will be covered by wallpaper which arrived in the mail yesterday. Hopefully this will be on sometime in the next 10 days.

In the meantime, the living room ceiling is painted the same brick red and three of the walls have the first coat of "spanish Galleon" green. Like all good house blog renovators, I ran out of paint and have to go buy another gallon of the stuff! I get to take Elizabeth to her favorite store tomorrow, Home Depot! What do you think of that, Elizabeth? You're ready to leave now?

Murphy's Law of Home Renovation
OK. Let all see what we can come up with here! I've got a few to start. Feel free to add your own in the comments section! Number 1 is the reason I came up with this....
1) One coat paint - isn't
2) The time taken to complete a project is inversly proportional to the time taken to prepare for the project.
3) You will always find your problem in the least likely location.
4) If your plumbing leaks in one spot, it will leak in an entirely different spot after you have fixed it.
5) User friendly tools - aren't.
Wednesday, October 26, 2005
Change in plans AGAIN!
I got to spend a couple of hours working on the house on Tuesday. I was able to draw a line around the dining room at 36" above the floor for a chair rail. I then pencilled continuous line around the room at 4" below the ceiling for a picture rail and was only off by 1/4 inch at the end after drawing a level line around 62 feet of wall! I then snapped chalk lines on the ceiling where I thought I wanted the colors to change.
A few days ago I thought that a 6' X 6' square at the center of the ceiling laid in a diamond orientation and bordered by molding would look k-k-kewl! However, after chalking it out I changed my mind. The room is quite large. 16' 3" X 16' 6" in fact. The light is not centrally located in the room due to a fireplace and that is not symmetrical with the centerline of the room either. Standing on the floor looking at the ceiling you notice that the square does not appear to be square due to the way the borders farthest away from you converge. An actual diamond shape would appear better but I think I will end up with an 8' X 8' square with sides parallel to the walls. The other problem is this. Here is the medallion that I painted last year for this ceiling. I want the shells to "point" towards the corners of the room and this thing is around 2' wide.
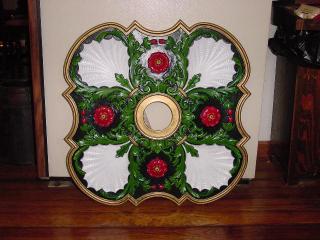
I will start painting the ceiling and walls today. Here are the colors.

The real color is slightly different than this photo of the color card but you get the idea. The red brown is for the ceiling edge (about 4 feet wide) and the 4" part above the picture rail (this hides the uneveness of the ceiling edges). The drab green is for the upper 6' of the walls and the 8' square ceiling center. These same colors will be used in the living room but the walls and the ceiling will be solid color.
Sorry, the wallpaper isn't here yet so I can't show that just yet.
Stay tuned for "CrackHouse" updates. I'm not just blowing smoke!
Sunday, October 23, 2005
ANOTHER change in plans!
Well, the bedroom floors are finished! I spent Saturday on my knees waxing and polishing the boards so they too say "Whoooa" like the rest of the finished flooring, but as I type there are changes afoot! Let me explain;
When we painted the bedroom we decided that the purple shade that we used on three of the walls could be used on the ceilings in the living room and dining room. Dark color on the ceilings would make the rooms more cozy and make the ceilings appear lower. The shade of purple went well with the shade of olive drab we wanted for the walls in the living room. It also complimented the antique light fixtures that we bought for these two rooms. It would look quite "regal".The woodwork in the living room is massive and very tall around the windows and doors. It is also very amber in color from the shellac. The fireplace mantle is dark grey variegated marble. This limits our choice of wall color to earth tones that will compliment the woodwork and the fireplace and look good on 10 foot high walls with almost 10 foot high wood moldings. Whatever color was used in the living room would also be used in the dining room due to the way the rooms join together but only needs to be on the upper part of the walls. Based on the colors of the fireplace mantel, the curtains, the dark floors and the ceiling medallion that I painted for the dining room, we chose olive drab.
Well I have already put one coat of purple on the ceiling in the dining room but haven't put up the medallion yet. Good job too because we have decided to paint the ceilings a different color now. We spent several hours at Home Depot on Thursday afternoon looking at wallpaper for the lower part of the dining room walls below the chair rail that I have to install. We found one that we liked and ordered it. The purple would not compliment the wallpaper though so we picked a color to match the dark burgundy stripe in the wallpaper and bought two gallons. Not so bad, we were going to have to buy two gallons of purple if we were to proceed with that ceiling color. We also bought the olive drab color which will also be used to paint a 7 ft square at the center of the ceiling laid in a diamond and not parallel to the walls. We will use the cheap pre-primed molding to form the border of the square which will be painted a tan color and coated with aniline tinted shellac so that it appears to be walnut. Since this is the "formal dining room" it should look "formal". When it is done it should look quite "classy".
We didn't stop at wallpaper and 4 gallons of paint. Ohhhh noooo, I had to get 6 hardwire smoke alarms, one hardwire CO2 detector, 3 tubes of caulk, 2 door mats and some small marble tiles to use as coasters as well! You know, to exceed the $299 minimum. I love 6 months "same as cash!"
Pictures will follow shortly....
Wednesday, October 19, 2005
Our Primitive Alarm System.
Can you imagine our shock when we first pulled up carpet and masonite panelling that was stapled to the floor to reveal a hardwood floor with long gauges running across the boards? Our first thought was that someone had dragged a refridgerator across the living room where we first saw the gauges. Then we noticed the grooves in the flooring in the dining room, the parlor, the upstairs hall, the bathroom and both bedrooms. At first we figured it was some kind of low voltage lighting system but it didn't make any sense. The picture below shows these grooves if you click on it to enlarge the image. This is in fact the bedroom floor which was sanded over the weekend. The side channels run to the windows. That ball of wire in the foreground is some of the wire removed from this floor. I have many scattered about the house!

When I stripped the paint from the exterior doors I found brass closet switches inserted at the base of the frames below the lowest hinge and noticed that the grooves in each room lead to the doors and windows. Unfortunately there are no patent #s on these things so I can't get any manufacturing information.

When I stripped the paint from the exterior doors I found brass closet switches inserted at the base of the frames below the lowest hinge and noticed that the grooves in each room lead to the doors and windows. Unfortunately there are no patent #s on these things so I can't get any manufacturing information.

When the windows were restored I noticed a pair of brass plates on the left side of each sash that would touch any time a window was opened. (See picture below.) There were also channels leading to them with cloth covered copper wire embedded into the grooves that ran down through a small hole in the wood at the sill.
A hole would appear in the baseboard below this or in the floor and grooves would emerge leading off in the direction of the nearest window or door. A little poking around when stripping the floors and soon I was pulling up copper wire out of the grooves. Some sections were aleady missing, so the system must have failed long ago.
I have no clue WHEN this was installed. The evidence suggests that it is OLD. As in 1887-1890 when the house was modified. The molding over the channels in the window frames was held up with old square head nails and some of it had never been removed. Some research indicates that the first alarm systems were put in buildings in the 1850s. The wires of our system most likely terminated at a box that would light up if a window or door was left open. We know that the Volkenand family was having trouble with the neighbors "breaking in" during a time when the house was vacant and while it was being remodelled. They were looking for "treasure". The neighbors were in fact the benefactors of the former occupants estate (his daughters) and rumor has it that some stocks and cash was never recovered.
No one I have spoken to has ever seen anything like it before. The only hassle with it is that after sanding the floors some of the copper wire shines through (like in the picture above) and I have to pull the wire up and fill the groove with colored putty so that it doesn't appear as a distinct black line across the floor when it is finished. Most of the grooves will be covered by rugs, just like they were originally.
I am tempted to rig up some of the door swtches to a low voltage light or even a bell but I will do the modern thing and run the wires under the floor. Ooooh, I could have some fun with this at Halloween in a couple of years when Elizabeth is older! Every time the door opens I could have one of those haunting laughs or screams go off. Ooooh, ooooh oooooh, I can start planning now!
Monday, October 17, 2005
The Bedroom Now.
The bedroom has been painted and the floors have been sanded. I just have some putty work to do on some divits in the floor and I have some channels to fill from the antiquated alarm system (which I will describe in a later post) before I apply clear shellac. This floor is unique in that one half of the room is a dark wood (the 1845 part) and the bay section addition is pine from 1887. I am not going to try to stain this floor since any attempt to color the wood would be obvious. The best solution is to make the floor look as natural as possible. Did you know that the cost for a gallon of shellac has gone up $10.00 in the last 12 months!
Here is a before photo from 2001 when we bought the house. Note the wood-look vinyl on the floor and if I recall, this room had no light fixtures or wiring for any.
Here is a before photo from 2001 when we bought the house. Note the wood-look vinyl on the floor and if I recall, this room had no light fixtures or wiring for any.

And here is the room today! Do you notice any change?

That's right! The floor no longer smells like cat piss!
Wednesday, October 12, 2005
"To pee or Not to pee"
I was delivering something to one of my neighbors this week and noticed that their porch was littered with moth balls. The smell was quite obvious and smacks you in the face when you step on the porch. There were moth balls to the left of me, moth balls to the right of me and moth balls in front of me as into the shade of the porch I stepped (lines lifted from Tennyson's "Charge of the Light Brigade" in case they sound familiar.)
Turns out that they are supposed to keep the stray cats from pee-ing on their porch. I don't know which smell is worse......
Turns out that they are supposed to keep the stray cats from pee-ing on their porch. I don't know which smell is worse......
Friday, October 07, 2005
Primed and Ready!
The bedroom is primed and ready to be painted! Then I can sand the floors!
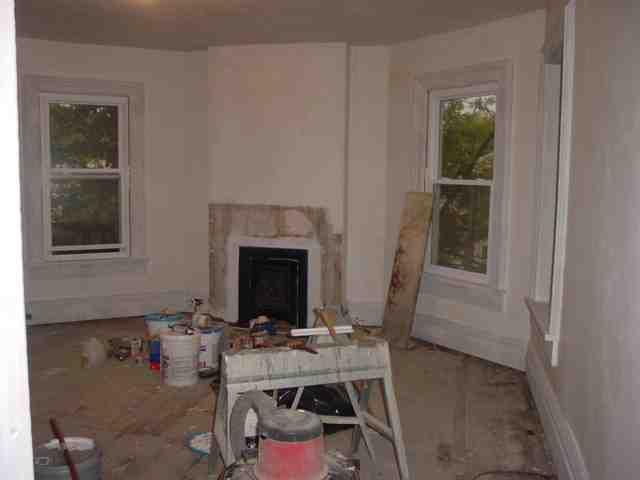
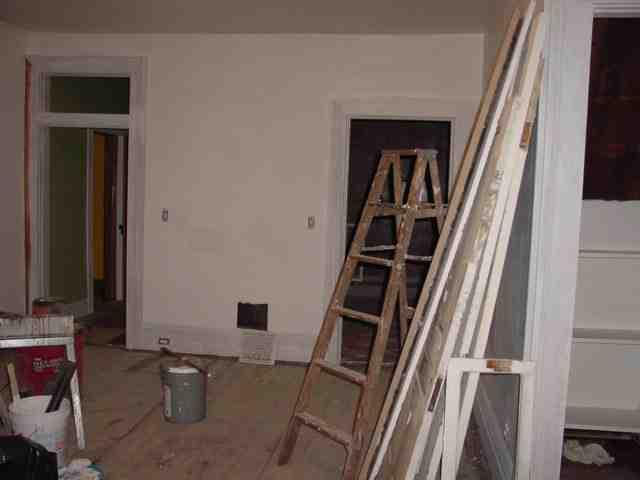
We already bought the paint! It is slightly darker than this picture due to the flash going off.
Paint is American Tradition National Trust, colors are from left to right, "Cliveden Sandstone" for the ceiling, "La Fonda Cactus" for the bay wall section and "Outlands Velvet Night" for the remaining walls. All I can say is it makes a bold statement. Oh, the woodwork will be gloss white of course.
The "Outlands Velvet Night" will also be used on the ceiling of the living room and dining room. I have already painted around the light fixtures to get an idea of how it will look!
Subscribe to:
Posts (Atom)