Wednesday, December 27, 2006

A Strip Tease

Actually here is some advice if you are thinking about stripping paint. I received a comment last week assuming that I would use liquid stripper on my door after using a heat gun. I don't use liquid stripper any more. It is way too messy! So I was stripping my door and thought about what I do differently now that I didn't do way back before I became knowledgable in the ways to strip wood. Well the answer is simple. Besides being much more patient and aware of the true nature of the task at hand, I don't try to strip away long peels of paint in a continuous forward motion with the scraper any more. I used to try to remove a strip of paint as wide as the scraper blade and as long as I could get it before it would burn up on the scraper sending wads of smokey fumes up my nose. This tends to leave paint still attached to the wood surface that you are removing it from and requires the use of chemicals or a go-over with the heat gun. Now I tend to make numerous short swift scrapes with the edge of the scraper removing about a half inch wide by one inch long strip of paint accross the width of the wood being scraped and then I move forward and remove another inch. This method is much more thorough and produces a pattern that looks like this;


Now before you get too excited, it took about 6 hours to get this far:


It took another two hours to scrape what was left and then I got to flip over the door.


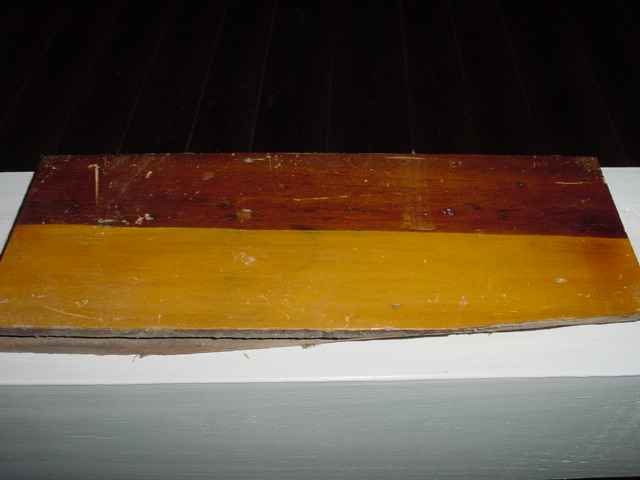
This side only has 4 layers of paint not 8 like on the reverse. If I can get the white and grey layers off then the original coats come off a lot easier. Removing the top two layers revealed the original two tone colors of this door. It also makes removing these green layers much easier.


To get this done took about 30 minutes. After 3 hours the door looks like this;


Once the paint is stripped I then use a palm sander. I start with a #60 grit paper to remove the flecks of remaining paint. I then fill the holes with wood putty before sanding with a #80 grit paper and then a #150 grit paper. Here is the door that I did last week after the #60 grit sanding;


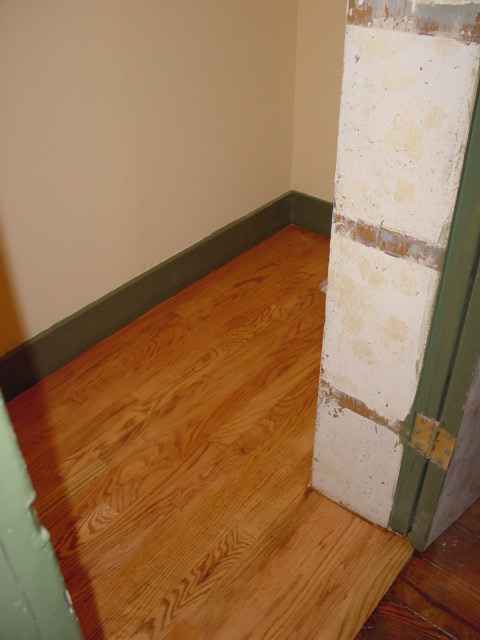
I won't stain these doors either. I will probably use the boiled linseed oil and turpentine (or paint thinner) mix on them because the wood is quite dry and then shellac them. I expect they will turn out like this one in our bedroom;


So for all you potential strippers out there who want some advice on technique, here is what I have to offer. Not much, I know but every little bit helps. Now if you would like to slip dollar bills my way then feel free to do so! I just have to put my garter belt on....

Tuesday, December 26, 2006

The Obligatory Christmas Post

Since Elizabeth was acting up all week I put in my last minute order to Santa for a sack FULL of coal. I figured that if I get my chimneys lined I could use it to heat the house. Anyway, it turns out that my order went in too late or Santa has lost his contract with the anthracite supplier this year and he left her presents anyway. I noticed that the only thing in my stocking this year was a piece of chocolate that I put there myself (how pitiful is that?). Funny though, he left me a whole big pile of reindeer poo on the Crack House balcony. I could bury it in the basement and hope that in about 20 million years it turns into coal.....

As for the house, I was going to post some tips on stripping paint without losing your mind but Blogger won't let me upload pictures that I took on Sunday. So, you will all have to wait patiently for that post which is good practice for when you actually strip your own wood. In the meantime you can exalt in the fact that the days are getting longer once again.

Friday, December 15, 2006

Let There Be Light!

Now here is a first! This room has never had a ceiling light, ever! Years ago, when I replaced the roof, I ran a length of BMX cable across the brick wall that divides these rooms on the 2nd floor since the attic above this room has no access to it and dropped it into a hole that I made in the center of the ceiling. I hooked up the wire but capped the ends so I wouldn't get shocked if I decided to hold a screwdriver above my head as I walked through this room. Since I am working in the room next door and it gets dark early, I need a light in this room in order that I can find the stairs without walking into the worlds heaviest bath tub which has migrated into this room now and is that much closer to going down the stairs. So I rigged this up;


No switch yet. This is one of those lights that you turn on with a twist of the bulb. Turning it off requires that you own a pair of heat resistant gloves!

So, this weeks quiz is "How many of you readers have one just like it in YOUR house?"

Monday, December 11, 2006

Kitchen Cleaning?

More good advice from the 1909 book of Household Discoveries.

A recipe for stove polish but first some advice;

Before polishing the stove rub lard under the finger nails

Stove Blacking.- Dissolve 1/2 ounce of alum in 1 gill of soft water. Add 6 1/2 pounds of plumbago mixed with 12 ounces of lampblack. Stir vigourously. Stir in 1 1/2 gills of molasses, next 1/2 bar of white soap dissolved in 3 pints of water, and lastly 1 ounce of glycerine. This is a commercial article which has a great reputation.

Or beat up the whites of 3 eggs and mix in 1/2 pound of black lead. Dilute with sour beer or ale to the consistency of cream and boil gently for 15 or 20 minutes.

Or mix 8 ounces of copperas, 4 ounces of bone black and 4 ounces of black lead with water to the consistency of cream.

Or melt 1 pound of hard yellow soap with a little water and while hot stir in 1 pound of powdered soft coal. Cool, and preserve in tight fruit jars or wide mouthed bottles for use.

Or mix 4 ounces of black lead with 2 tablespoons of vinegar, 1 teaspoonful of sugar, and a piece of yellow soap the size of a butternut. Melt the soap with gentle heat and reduce while hot to the consistency of cream with coffee strained through a cheese cloth. Stir in 1/2 teaspoonful of alum.

Or use vinegar instead of water for mixing any of the above. The work of polishing will not be so hard and the polish will last longer.

Or mix with oil of turpentine. This prevents and removes rust.

Or add a little sugar or alum to any of the above; or a little benzine or naptha to help cut the grease. If these are added the stove must be polished cold.

Failure to observe that last bit of advice could result in some interesting consequences.

Now that you are completely confused, plumbago is graphite. A gill is 1/4 of a pint. There is no such thing as sour beer in this house and who in their right mind has EVER strained coffee and cream through a cheese cloth?

Friday, December 08, 2006

I'm Sellin' Out!

It's true. I've finally decided to sell out and capitalize on this blog.

I have toyed with the idea for several years and even got the solicitations from some suppliers to advertise on this blog but have held all contenders at bay.

My reasonining was simple. Most people reading my blog would be reading other house blogs where they chose to advertise. This seemed to be the case about one year ago. We would all be advertising the same things to each other and nobody would be generating the click-throughs needed to generate income. I wasn't comfortable promoting a company that I hadn't done business with either. I felt it wasn't a worthwhile venture. Lately though I have noticed a surge in hits from Google searches. It seems that people aren't just wanting to know what "crack smells like" or what "raccoon poop looks like" any more. They have legitimate searches regarding plaster, shellac, wood stripping and concrete counter tops.

Yesterday it was cold outside and I wasn't able to work on the "Crackhouse" so I got bored and started thinking. I am dangerous when I start thinking, real dangerous! Within a couple of hours I came up with a bunch of amusing sayings that could be marketed to the growing home improvement market. As far as I know these are all original because I actually thought them all up! So I have sold out in the name of capitalism, but the products are truely "This Old Crack House" related and original. Here are two of them. There is even PINK for the ladies!

If you click on either picture you can see my gallery of items and just in time for Christmas too!


You might want to check back a few times in the next week because I have more "Garyisms" to add. I seem to be on a roll!

Monday, December 04, 2006

Getting on my knees and squealing like a pig!

I've been stripping slop off this floor for DAYS!


See that area marked by a black line? 8 hours it took to get it stripped to a sandable surface.


8 hours bent over on my knees alternating between the silent paint remover and heat gun. Heating the floor to remove the remaining linoleum, mastic, tar paper, shellac and paint. That coupled with 8 hours of Blue Grass music on NPR (National Public Radio) makes me want to take a canoe trip in West Virginia and learn to play the banjo!

"OOOOOOOH-EEEEEEEEEE!"

Friday, December 01, 2006

The Fungus Amungus!

Enquiring minds wanted to know! Proof that we do have a mushroom growing out of our ceiling.


There is an ancient Chinese proverb that goes;

Confucius, he say, "Man who live in big house with small family have mushroom to grow."

Wednesday, November 29, 2006

What Are Two Bats and a Ceiling Mushroom?

That would be the answer to the question "What is new at the 'Crackhouse'?" That's right. I stopped by to put out the garbage can this evening and since it had been raining, to check the status of one of my roof leaks. Upon entering the third floor I see two bats flying around above me. There were no dead mice in the traps and my system of water collection seems to be working. I turned off the light and proceeded to the second floor. I figure the bats let themselves in, they can find their way out. So upon entering the bathroom on the floor below and checking the wall that my leak has discolored I see a mushroom growing out of the ceiling in the corner where the leak is. This only seems to occur when the wall starts to dry out. I have seen it in the same spot on two previous occassions over the last 5 years. Good job we haven't painted that room yet!

Our lives, it appears are controlled by the forces of nature. Just a few days ago we were awakened by Elizabeth with whom I had the following discussion on Sunday morning;

"Dad? Dad? Daaaaaad!"

"What?"

"There's cat puke under the bed."

"Under the bed?"

"Yeah."

"That's good. At least I won't step in it then."

"Hmmmm. Wait a minute!"

"What is it now, Elizabeth?"

"That's not cat puke! That's my toy!"

Monday, November 27, 2006

The Butchering of Our Woodwork

Here is one reason why we choose to paint the molding in this room.


This side of the house has been rented out since around 1915. I mean, how many curtain rods have been installed here? You would think that the things would be left between tenants. It's not like these things are made of copper and have a high scrap value if you just happen to be a drug addict or something! When I'm done stripping the floor I will show you why we are painting that too!

I'm Stripping Again

Once again I find myself stripping paint from woodwork and a combination of tar, glue, paint and shellac from the floor. I no longer get frustrated doing this because I know and accept that it will take "forever" to complete. I spent 6 hours Saturday on the floor with heat gun and Silent Paint Remover switching between the two and got maybe 15 square feet of floor done. At this rate it will be a while before the floor and molding is ready for sanding. The good news is that I will be painting the woodwork and the floor in this room so I don't have to do a perfect job at stripping. The other good news is that it is one of only two rooms left in the entire house where I have to strip floors or molding. (There are still at least six doors though.) It seems to me that I always end up stripping paint in the winter Actually, it seems to me that I am stripping all year. It is just that I only remember doing it in the winter! Maybe it's a hot and cold thing. Maybe I've inhaled too many fumes.......

Wednesday, November 22, 2006

Recipes For Milk Paint

I promised this for John over at the Devil Queen who is having an orgy with the stuff this week. If you buy this pre-mixed it is quite expensive but to make yourself would be quite cheap unless you choose to use a cobolt, chromium or cadmium based color pigment! Let me just add that the only reason I know this stuff is because we found that Household Discoveries Book from 1909. It has been most useful in helping me understand exactly what people had available to use and why. Since I was painting my basement walls with slaked lime I have come to realize that this 4000 year old technique has become obsolete in this country in the last 50 years. When I tell people that I have been whitewashing my walls they look at me with a puzzled expression or make a comment like "I didn't think people did that anymore." The truth is that they don't and that is why basements look like crap in old houses. So what does this have to do with milk paint? Here are two recipes from the 1909 book as they are written;

Lime Paint.- A mixture combining the qualities of paint with those of whitewash may be made with slaked lime as a basis by the addition of various materials, as milk, whiting, salt, alum, copperas, potash, ashes, sand and pitch. with or without a small portion of white lead and linseed oil. These mixtures are more durable than whitewash, but have less finish than white lead and oil. The cost is intermediate between the two.
To prepare a lime paint, slake lime with water and let dry to the consistency of paste. Thin with skimmed milk to the proper thickness to lay on with a brush. Add color matter as desired.
Or slake 4 ounces of lime with water to the consistency of cream and stir into it 4 quarts of skimmed milk. Sprinkle the surface through a sieve 5 pounds of whiting. Let this gradually sink, then stir and rub together thouroughly and add coloring matter as desired. The casein or curd of milk, by the action of caustic lime becomes insoluble and produces a paint of great tenacity suitable for farm buildings, cellars, walls, and all rough outdoor purposes. Apply with a paint brush. Two or three coats will be necessary. The above quantity is sufficient for 100 square yards.

There are three more recipes involving such items as white pitch, potash, copperas, ashes, white lead and linseed oil in various amounts. The book also has recipes for fireproof paint, blackboard paint, acid proof paint, barrel paint and glue paint for kitchen floors! You could always go to Home Depot of course but you won't find bags of masons lime there. You will need to find a brick supplier for that and it will cost between $5 and $7 for a 50 lb. bag

While knowing the basic ingredients is useful, this opens oneself up to other questions like "What the phuck is copperas?" So you better have a dictionary handy!

Monday, November 20, 2006

That Southern Style

Has Come to Dayton!

Once again, minding my own business trying to reduce the amount of water that gets to the 2nd floor when it rains, I took a look out of one of our windows on the 3rd floor. One of the nearby houses was in foreclosure recently and has been acquired by someone who has been doing some work to it. I think they have been reading the "Devil Queen" blog about roofing. Either that or they have the same supplier of shingle! I counted 7 colors, Red, blue, green, grey, black, tan and brown. Some ridges are grey, some are black. I'm sure they didn't pay a lot of money for this roof! The multi-colored concept is fine but no thought went into placement of color or pattern. The ridges look really bad and the place looks worse than this picture shows because you can't make out all the variations in color. Unfortunately there are no penalties for having an ugly house here!

More Basement Archaeology

There I was putzing around in the basement of the "Crackhouse" once again. Actually I was doing some more plaster repair work when I got myself distracted as usual. I have a spot where we get water entering in one of the rooms when it rains, I decided to pack mortar into the gaps between some of the stones to see if that would reduce or eliminate the leakage. Some old plaster and flaking whitewash was falling off the wall so I took a scraper and then a brush to it then I had to sweep up the mess it made. Where is all this leading? Well, I'm getting there.

There is a door placed between two of the rooms with a 10 inch wide wooden threshold that had been embedded in concrete. I decided to pull this up to discover that it was rotten and that the wood had converted into soil which in turn had roots and assorted bugs growing in it! So I cut the roots (ripped them out really) and took a brush to the inch of soil and what did I find? Bricks! All nicely packed and laid out as a floor. I suspected that my basement had a brick floor under the concrete and now I have found it. So now I know that I can readily lower my floor down there by several inches should I want to. It's not something I'm chomping at the bit to do....

Thursday, November 16, 2006

Another One Bites The Dust!


Another one bites the dust
And another one gone, and another one gone
Another one bites the dust
Hey, Im gonna get you too
Another one bites the dust

Wednesday, November 15, 2006

Who Ya Gonna Call?

The scenario this very evening: There I was standing in the basement minding my own business among the cat litter boxes, the aniline dye stains and the boxes full of crapola that have been there for years. I was actually attacking an old gas fire appliance that we have absolutely no use for with a wire brush (coz that's the kind of guy I am. I always have to be doing something worthless!) The wife is giving your favorite little munchkin a bath and world is our oyster!

Then I hear "gurgle, gurgle" and water is rising out of the basement drain. This tells me two things. The obvious one being that Elizabeth is finished with her bath. The second thing it tells me is that I should really lay off the high fiber foods! Within a minute the water subsides and I go back to scraping with my wire brush figuring that I will have to deal with the situation within the hour or else I will be dealing with a worse situation in the morning!

Then one minute goes by and I see water rising out of the drain again only faster and it is pouring all over the floor! This tells me two more things. The obvious one being that the wife is in the shower and that I REALLY need to lay off the high fiber foods. So I run up the stairs shouting "Stop running the water! Turn off the taps and whatever you do, DON'T FLUSH!"

Now anyone with an old house that has an 80 year old maple tree in their front yard knows what the problem is here. In fact, it is one of those recurring ones that comes back every year like clockwork. The bad part is, when it happens at 9 PM you know you are screwed until the morning unless you know the secret to temporarily cleaning your sewer line quickly 95% of the time. This fix won't work forever because mother nature ultimately wins. Tree roots have a thing for real, bonafide, genuine crap and when the two become entwined, the sh*t has really hit the fan! At that point you have only two options and you may as well eat fiber until a bush grows out of your *ss because it doesn't matter one bit any more! The two options are A) Rent a ginormous drain snake and hope you know what you are doing or B) Pay someone else to snake your drain at $100 a pop and hope they know what they are doing! If you elect option A) make sure you wear leather gloves that you can afford to throw away unless like us you have another house where you can stash them until they dry out and the smell won't get to you every day!

So. Who wants to know what the quick fix was that allowed my dear wife to finish her shower within 5 minutes and not have to stand around drip drying until morning? I've divulged this secret in a previous post and it is answered within this post for those of you who absolutely must know this little trick. For a clue, let me add that the trick didn't work for me LAST YEAR.

No, I didn't go out and cut down the tree.......

Saturday, November 11, 2006

The Mice are Scared!


I ventured up to the third floor today and noticed a great reduction in the quantity of mouse poop around the center of the floor near the traps. The traps haven't caught anything in a while. The mice must have been scared off! They must have heard about the mummified remains of their great ancester that I found. Maybe it was the sight of the mummified head mounted on a toothpick and posted near the entrance to their nest as a warning!

Monday, November 06, 2006

The Shellac Chronicles Part 4 (Coloring Shellac)

Shellac can be colored with anything that dissolves in alcohol. Aniline dye is the most likely candidate. These are the dyes that are used to make inks. They are often used in permanent markers and come in all colors. They can be purchased from THESE PEOPLE. You really don't need a lot of dye. I bought an 8 oz. can of Walnut Dye and after using it on my floor, stairs, metal locks and fixtures and sending about 2 oz. to Greg I still have half of it left and a jar full of dark alcohol still to use up.

Before you add it to shellac you are supposed to dissolve some in alcohol. Then you filter it to remove the undissolved bits so they don't end up as specks on your finished wood work. I tried this once. Fortunatly it was in the basement. I had some old PVC plumbing left over from the "Placebo" incedent and made a makeshift funnel and used a coffee filter slapped over the end attached with a rubber band. I poured the walnut colored alcohol/dye solution into the pipe and waited for it to trickle into an old jam jar. I waited and waited and waited and waited as it slowly drip, drip, dripped into the jar. "There has to be a quicker way" I thought! I know what to do, I'll blow down the tube. So, I removed the reducing coupling "funnel" and clasped my hands around the piece of 1 1/2 inch PVC pipe which had the filter attached to it. I stood directly over the jar and I blew slowly and the solution began to flow faster. So I blew harder. The solution flowed a little faster than before. So I blew harder and PLOP! The filter had blown off into the jar with considerable force followed by the remaining solution in the pipe. Well, in that split second I remembered my physics classes about force and how energy is not lost but converted, just as the solution was rising out of the top of the jar heading straight for my face! So I did the only thing I could. I closed my eyes and thought of England.

Now I was covered in dark walnut aniline dye solution. It was all over my hands, face and the floor. I tried to get it off the floor but it wasn't happening. Then I thought "CRAP! I have to filter this stuff AGAIN because now it was all in the same jar" and decided to go upstairs to look in the mirror. Standing in front of the mirror looking at my face I started singing minstrel tunes which alerted Deborah to my plight who's reaction was simply "OH!"

Since this is the stuff they put in permanent markers you may have guessed that the shower taken to remove the stuff was a long one, but I do a lot of thinking in the shower. This time I remembered why we used "funnel filters" in chemistry class and that we folded the filter papers into cones. Afterwards I applied my memory to the task at hand and it seemed to work just fine. Blow jobs are definately not in my future! I mean, look at the mess it made and I can't get rid of the stain......


Friday, November 03, 2006

Remembering That Special Moment

Well folks, I didn't spill the shellac over the floor. I'm sure some of you were hoping that I would so you could enjoy the moment. It's OK. You can admit it. As of tonight the floor has 5 coats of shellac and one very thin one of semi-gloss polyurethane. One more thin coat of poly and I can finish painting the door frame and inside trim. Here is a picture of the floor before the polyurethane went on.


Once done I will wax the floor and after a few months the poly will yellow and it will be incredibly dusty so it will look like it has been there forever.

In case you already forgot, here is how it looked on Monday.

The Shellac Chronicles Part 3 (Experiments with shellac)

I've been struggling with "Blogger" for two days trying to upload pictures! Let's hope these ones post....

Well, lets see, where was I? Oh, I bought some shellac from Home Depot and was eager to see what it did. So, I applied it to some wood display bases that I had. You all knew I painted these miniatures, right?


Then I dipped some miniatures in the stuff.


I applied it to some paper and then used it on these two model buildings that I had laying unmade in a drawer.


I used it on this "Gumball Machine".


I coated some ceramic tiles with the stuff.


I tried adding alcohol to it to thin it down. I tried some on glass. I even experimented with scraps of wood which had been painted with various colors. Here is one sample I still have laying around the place.


So now I was READY to do some real damage!
I actually recall using it on some window sashes first. I figured that if I didn't like them I could always paint them. Of course they came out fine. I think the next thing I did was restore these stairs.


In this case I rubbed down the original finish with coarse steel wool and denatured alcohol. Wiped up the slop and allowed to dry. Sanded with a palm sander and 150 grit paper then applied some new shellac.

The rest folks is history! If you want to see the stuff I have done with shellac at the house then use the search feature from the home page of this blog and type the word shellac. There are some 45 entries that will come up where I have mentioned the word. The search scans 250 of my pages but since I have actually produced nearly 400 between the web page and the blog you won't necessarily find all the shellac posts.

So, unless you folks have more questions that need to be answered, my final post on the subject will cover aniline dye, tinting and why you shouldn't blow down a tube of the stuff in an effort to speed up the filtering process!

Monday, October 30, 2006

WARNING: We Interrupt This Blog for an Upcoming Shellac Moment.

On Sunday I got the new oak floor laid in the 1st floor powder room and put the stain on it (Minwax Golden Oak). The stain has been sitting around the place for two years and was quite lumpy. It needed a good stir before putting globs onto the wood and rubbing them around with a cloth. Any lumps of pigment got thrown back into the can in the hope that they will be smaller lumps in another couple of years. There is nothing like recycling! I tell you this because I see some people are very particular about the stain they use. Stain is basically pigment suspended in solution. Some solutions are supposed to penetrate the wood while others rest on the surface for a layer of translucent color. The latter are called topical stains. Most people are happy staining their wood and then putting polyurethane over it. Not me. This house is old. The floors should look like they belong here. Right now, this one doesn't! Take a look for yourself....


If I put polyurethane over it it will look like this only more glossy. This floor looks good but not in this house. It looks too new. This is the floor you would expect to see in a new home or a rehabbed one in a historic district where they advertise "beautiful" hardwood floors. I could do what many people do, buy another stain color or two and mix it until the wood is the proper color and then cover it with the "plastic" layer of poly. That doesn't solve the problem though. The floor would still look new and I want it to look like it has always been there. How will I do that? Amber shellac! I will still use polyurethane as the final coat because this is a bathroom but I am going to use the poly to protect the shellac. I am using the shellac like it is a topical stain.

I am posting this now because the timing is appropriate and because I haven't done the work yet so there is no "after" picture to show off. I can't tell you how great my floor looks after messing with it a gazillion times until it came out right. You see, I already know how the floor will turn out. I did one just like it last year in the hallway upstairs. I will be applying three or four coats of shellac and two coats of semi-gloss polyurethane. Then I do the super fine steel wool and beeswax treatment. When done, I predict this floor will look like it has been here 50 years, without the dings of course. So, unless I spill the can of shellac, I will post a picture of this floor again within a week when it is done. If I spill the shellac I will post a picture sooner and post about how not to refinish a floor and put in a paragraph about how to remove shellac stains from your clothes!

Friday, October 27, 2006

The Shellac Chronicles Part 2 (What you can do with the stuff)

OK, so you know how I discovered shellac, now I can tell you what it is and where it can be used. It seems that most shellac comes from NE India where lac bugs live. They eat sap from trees and then secrete a resinous substance that is soluble in alcohol. You use denatured alcohol or methylated spirits if you live in Europe though I am sure Vodka or Everclear would work fine. The alcohol is "denatured" so you won't drink it! If you are that interested you can read what Wikepedia has to say about shellac HERE.

I looked in every decorator book that I had and then my 1909 copy of Household Discoveries to see what shellac was used for. Here is what I found.

Besides being used as a varnish for wood, shellac is the main ingredient in sealing wax. Shellac is also used in certain types of paint and as a sealer for wood to prevent discoloration when painted. If you mix it with turmeric it can be used as a gold finish on brass. It can be used as a glue for china and is used to stiffen stencil card. It is edible and used to coat pills and apples. It used to be used to make records before vinyl was invented. You can seal plaster walls with it prior to painting, you can seal the knots in pine boards to prevent them from bleeding.

Shellac ranges in color from clear (which is bleached) through yellow to dark brown and the color is determined by the type of sap coming out of the trees that the bugs feed on. The color determination is seasonal also. The common colors are yellow, orange, garnet and brown. The darker colors are traditionally used on woods like cherry and walnut or for antiques. Shellac can be colored with any type of dye that dissolves in alcohol and the discovery of aniline dyes (coal tar) in the mid 19th century allowed furniture to appear to be made of different wood than it was. It also made colored shellac useful for painting on stained glass windows. (Think church windows here)

Shellac is "cut" with alcohol. A mix of 1 lb. of shellac in 1 gallon of alcohol is a 1# cut and is good for sealing wood. A 2# cut is 2 lbs. of shellac in one gallon of alcohol. This is good for novice shellackers to use on wood floors or trim. The cans of pre-mixed shellac are 3# cut and are easy to use after you know what to expect. You can actually buy cans of 5# cut which can be used on floors but I've never tried it.

Now that I knew all this there was one thing left to do, buy some, but where? I found THESE PEOPLE and ordered some in various colors. I bought a gallon of denatured alcohol at Home Depot and at the same time saw that they sold quarts of Zinsser amber shellac which cost $6.50 at that time (now its $10 in a post Katrina/tsunami/Florida hurricanes world) so I bought a quart and decided to play with it!

In the next post I will show you some of the things I did during my experimental stage. I wasn't prepared to ruin my woodwork unless I knew what I was ruining it with!

Thursday, October 26, 2006

The Shellac Chronicles Part 1 (The Prologue)

I used to be a stain and polyurethane man. Not necessarily by choice, more the result of limited knowledge. Most people and places promote stain and urethane because it is relatively easy to comprehend and polyurethane is the wonder finish of the last 30 years. Durable and long lasting. Now I'm a shellac kind of guy, warm and glowing, not partial to standing water and more vulnerable to daily wear and tear. However, with just a little alcohol I'm easy to restore to my glowing self!

If you asked me about shellac three years ago I couldn't tell you much. I grew interested in the stuff after reading books on decorative finishes. Shellac was mentioned a few times as a wood sealer and was used to give objects an aged plaster look which interested me since we planned on using ceiling medallions in the "Crackhouse". My first encounter with shellac was actually around 1997 when I stripped some woodwork and a floor. I couldn't figure out what the gooey brown stuff was that was clinging to my scraper, why there was so much of it and why it smelled so bad when it burned. After it was all removed and the woodwork and floor refinished with stain and polyurethane I didn't think about it any more. Then we bought the "Crackhouse" which we affectionately refer to as "House II" or "The Mansion".

We had no plans to restore the painted woodwork in the place. There was too much of it and we didn't know what it looked like originally. We did plan on sanding the floors though. Then I was able to acquire a copy of a journal written in 1936 about the family that lived here and it contained some descriptions of the house. As we tore out the masonite panelling and removed partitions that were built to render the building useful as apartments we began to expose woodwork and wallpaper that had been concealed for 50 years.

This is when I started to discover what shellac actually was. My first encounter with the stuff where I knew what I was dealing with was when I cleaned a slate fireplace mantle with alcohol and the red finish came off. Shellac on slate? Hmmm, there something I wouldn't have thought of. Someone gave me a red colored porcelain door knob and I cleaned it with alcohol. The red came off and it was in fact a white door knob. Hmmm, shellac on a door knob? I used alcohol on some original dark woodwork and the dark finish came off leaving unstained wood. Hmmm, the shellac is tinted, not the wood? The real clincher came when I started to strip some wood of paint. In some areas the top layers of paint came off revealing the "original" wood finish. The only problem was the "original" finish was painted on. There was a red colored translucent glossy finish over a pale green paint that was on top of a beige. When rubbed with alcohol the red finish came off. Whodathunkit? Shellac over paint? So now I was intrigued and soaked up every tidbit of information that I could about shellac. I will tell you what I found out in the next exciting episode. Stay tuned to this blog!

Wednesday, October 25, 2006

Alterior motives!

There was a real reason that I started repairing walls in the basement. Actually there are several. One being that I bought 3 bags of lime a few weeks back and need to slake them or use them up within 6 months. I have now used up one bag and slaked another leaving just one bag to occupy space on the kitchen floor. The second reason was to see if the walls were easily repaired because I need to install the tankless water heater and it would be easier to repair the wall BEFORE installing the heater than after. So here are two more basement pictures. The previously repaired long wall section after a coat of whitewash. Drum roll please.........


And the wall that the water heater gets mounted to.


This is a limestone exterior wall and it doesn't suck the moisture out of the plaster like the brick. So drying time is much longer on this wall. Especially with cold temperatures. It has a large opening on the upper left side where a window was inserted to make effective use of a hole made in the wall for the chimney of a coal furnace. This hole is why the water heater will go here, so that it can be readily vented. Ultimately I will have to move the water heater to another location about 15 feet further down the same wall. I can't do this until after the fire escape in the back of the property is removed though and an old window opening becomes accessable for venting. It currently has a slab of concrete in front of it making the ground surface too high for the vent to achieve 12 inches of clearance from the ground. If I leave the water heater in the initial location it won't pass inspection due to the fact that the vent opening is within 4 feet of one of the dining room windows that we will probably never open. If any building inspectors are reading this, my compromise is to put blocks or wedges on the sash channels so the window can't be opened. We also plan to build a deck off the back of the house so the water heater will have to be moved because we can't vent it in that location with a deck. It seems like many things around here, I have to do a job to have the necessities then re-do the job after removing the object that prevents me from doing the job right the first time.

As you can see in the photo there were two holes in this wall. I suspect they were used for hiding the "stash" when druggies lived here. I have kept the holes but tidied them up considerably. The round hole has a piece of pipe in it and I suspect it was a water line to the back yard or the old outdoor laundry. I have kept the opening in case we need to run a new line to the well area outside. The larger hole may have been made to run a water or gas line but no pipe is present. My arm extends about 2 feet into this void. I don't know what to do with it. My thought was to make a lockable door behind which I can stash my jester hats and that very small cask of Amontillado that you readers feel that I should buy!

Sunday, October 22, 2006

I fixed the search feature!

The title says it all. Now you don't have to use Google to find my posts about raccoon poop!

Speaking of little poops....


Saturday, October 21, 2006

Trying Something New

I'm adding a search feature to this site in an effort to assist with the "Great Shellac Narrative" that will be posted soon. At this very moment, it doesn't seem to be working properly but if you click the word HELP and enter your search word(s) it will do its magic for you. I may have to set up its own page to get it to work properly but it is almost 2 AM and I turned into a pumpkin 2 hours ago! I hope I get it to work because it will save me alot of aggravation. I've also corrected my links to Fixer Upper and Old Man and the Street in the side bar and added a new Dayton site for all you folks wanting to visit our great town!

I checked my plaster today and it hasn't cracked. The trick was using the polypropelene fibers in the mix! The fibers are left over from my concrete countertop extravaganza and were bought at a concrete supplier here in Dayton. So you don't HAVE to use animal hair people! I whitewashed that long wall too while I was at it and now all I have to do is install the 100 plus hamster wheels and purchase the hamsters and we can have heat this winter!

Thursday, October 19, 2006

COMING SOON!

Everything you ever wanted to know about shellac and possibly a few things you didn't! How to use it, how not to use it, how to get it off your hands when you spill it, how to get it off the floor when you spill it, why you shouldn't blow down a tube of aniline dye in an effort to filter it faster (now that IS a funny story) so you can add it to your shellac and of course the thing you all want to know, does shellac improve your sex life?

John over at the Devil Queen has requested a post about shellac before he embarks on that journey into the downward spiral of alcohol use. Who am I not to play the role of "Candyman"? Anyway, when I get all my info together and stop rambling about how great my basement is going to look when my daughter is a teenager, I will post a thing or three about something I have come to learn so much about. Despite what they say about denatured alcohol, I'm with Bill Clinton on this one "I did not inhale".

I haven't done this in a while, so if you haven't read my posts from April 2005 and want to know how you keep a houseblog reader in suspense CLICK HERE.

Wednesday, October 18, 2006

The Basement Money Shots!

So far the plaster hasn't cracked much, but it is still drying. I'm sure it will crack, especially if it is anything like my plumbing! Anyway, here is the basement in disarray. You can see my piles of organized chaos everywhere.


Here are the walls that I have been putzing over. The long section of repaired plaster.


The corner that has been repaired and whitewashed.


When the lower section drys out it should be as white as the top section. One day I will repair all the basement walls and whitewash them. It will look like some medieval dungeon or an old wine cellar down there when done. Should be great for Halloween parties for Elizabeth. I'm looking forward to it already!

Tuesday, October 17, 2006

More Plaster Stories

If you Google "Chunk of plaster" then this blog appears as one of the links on page 1 of the search. This knowledge has prompted me to describe a little of what I did this week during a putzing moment at the "Crackhouse". A moment that lasted 8 hours but really has a positive psychological effect in my efforts to obtain plastering nirvana and complete oneness with my basement....

My basement looks like CRAP! It consists of 5 rooms and every single one is full of stuff that needs to be organized or thrown out. It also contains my stockpile of wood dating from present to Pre-Cambrian Era which is stacked in two rooms in over-flowing piles of disarray. The outside walls are limestone blocks and most of the plaster has crumbled into a a line of sand and chalk dust on the floor. The inside walls are brick and the lower 2 feet of plaster is missing around every room as a result of either sewage backup in the past or someones dog rubbing along the walls while exiled to the dark, damp recesses of this house.

I decided to "test" my plastering skills for continued credits for my license in Crackhouse Remodelling which is recognized in 30 different countries (in the southern hemeshpere) and one municipality within Ohio that includes a town called Figmentofmyimagination. I mixed up a batch of plaster from one of my tubs of slaked lime and a bucket of sand. I applied this to a section of wetted down exposed brick and it looked 10 times better. After it dried and cracked I applied a thin coat of lime putty and the wall looked 20 times better. After that dried and cracked I applied lime putty to the entire wall with a paint brush and besides being very white, it looked 50 times better. This was done over the course of a few days.

So I decided to fix another wall, but this time I added polypropelene fibers to the plaster batches (in lieu of animal hair) to see if it reduces cracking and plastered a whole stretch of wall in one room. It was at least 15 feet in length. The plaster is just a thin layer over the brick. In some areas it is maybe an eighth of an inch thick. The wall looks 10 times better. Then I went home and read my 1909 book about whitewashing cellar walls. That was yesterday.

I am about to go over there now to do some work. Now that the plaster has dried a bit, I wonder how much better it will look! If it is badly cracked I can always drink a couple of beers. Things always look better with beer!

Sunday, October 15, 2006

A View From the Toilet.

I can honestly say that the first floor powder room is now officially the SMALLEST room in the house! At 6' X 2.5' totalling a whopping 15 sq. ft of floor space I am limited when it comes to sink space and options. I will probably end up making this sink out of concrete since the painted one we have from Mexico can't be used in this room as originally planned due to limited drainage space and faucet space or lack of.

At some time, probably around 1920, the proper door to this room was wallpapered over and a doorway was knocked out of the brick wall separating this room from the dining room and I'm sure the stairs to the basement were added at the same time because the "cottage" side of the house became a rental. It is this doorway that provides me with any room for a sink. The 8 inch thick brick wall has been framed with wood and recycled Masonite panelling which will all get painted some day. The sink will sit in this alcove and extend a few inches into the room. When I am ready to make it then I will post about the process.

I was going to make a pair of cabinet doors to hide the plumbing under the sink but we came up with another idea. Several years ago we bought an iron fireplace cover with the idea that we would use it to cover a fireplace. When I restored the openings to their original size though, the iron cover was too small and its use became obsolete. It was also designed for a gas fire place and ash cleaning would be awkward if we used it since the bottom panel doesn't come off. We paid around $50 for it so the plan was to utilize somewhere else in the house rather than sell it but exactly what to use it for wasn't certain. One suggestion was as a mirror frame. I was getting tired of moving it around from room to room. At least it doesn't weigh as much as the world's heaviest bathtub!

Well we found a use for it now. It will be the cover for the space under this sink and fits quite nicely in the space. The design on it is quite Gothic so the theme for the room has been determined by its use. The middle panel lifts out gaining access to the plumbing under the sink. Of course I also have to find another light fixture to go with this new theme since the old one was art deco and doesn't go with gothic revival at all! I do believe we actually have more light fixtures now than can be used in the house. So, if you could sit on the toilet with the tank removed and lean into the wall behind with your head sideways on your shoulder so it doesn't hit the angled ceiling and take a photograph, this is what you would see.

Friday, October 13, 2006

Dealing with Rats and Mice - 1909 Style

It has been a while since I looked in my 1909 book of Household Discoveries. I thought I would see how people dealt with rats and mice back then. There are five pages dedicated to the subject! Mostly dealing with rats. Here they are below. Makes for some interesting reading.


Almost makes you want to have rats just so you can get rid of them!

Tuesday, October 10, 2006

Finishing Some Details

Two years ago I got the floor finished in the cottage side living room.


Since then the only change in this room was putting slate tile in the fireplace. In fact the room is currently used for storage and I hope to get it cleaned out in a few days. Well, during a boredom moment while waiting for joint compound to dry in the powder room, I decided it was time to frame in that pass through from the kitchen and the underlying cabinet. As of yesterday it looked like this.


Then today it looks like this.


Hopefully the final coat of green paint will go on by Thursday night and the doors will be attached. If I'm still bored then I'll add some shelves. The idea all along was to make this a place to stash CDs and cassette tapes. In case you wondered, in the 1840s house this was a window looking onto a back porch. Sometime between 1920 and 1954 it was a doorway. The original doorway was boarded up. After 1954 it was boarded up and the original doorway was used as a book case. I'm sure Elizabeth will think it is a great place to store her collection of horse figures! I should get bored more often......