
Todays mission was to get them ready for painting but there is some work involved when you are dealing with wood that looks like this;
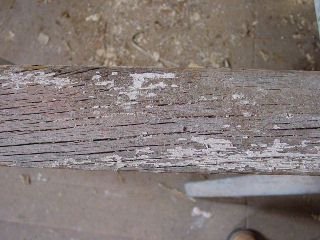
and you have big chunks missing like this.

These are bad, but they are also fixable. First you have to get the wood stripped of paint. I won't go into this process because it has been covered many times on this and other house blogs but if you don't already have one, go and buy a heat gun. Preferably one with a variable temperature dial because wood this bad will catch fire!
Once the paint has been stripped and the glazing putty removed you need to sand the wood. For this project I used a palm sander with 60 grit and then 100 grit paper. One of the windows will have a shellac finish on the inside and so, after sanding, the inward facing surface was rubbed with coarse steel wool and alcohol to loosen any flakes of paint left after the sanding and re-amalgamate any original shellac on the wood (what little remained in this case).
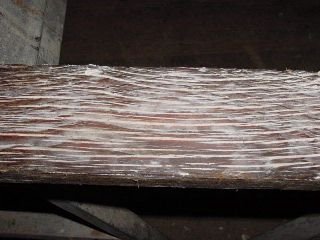
The next stage is the important one. It is also quite simple. Mix some boiled linseed oil with an equal amount of turpentine or paint thinner and brush it over the wood. Where the wood is dry it will suck up the linseed oil like a sponge and may take two or three more applications. When done, let the wood dry over night and repeat the process until no more linseed oil is being absorbed by the wood.
Linseed oil is a hardening oil that leaves a resinous hard coating when it drys. This helps seal the wood and renders it water resistant. It leaves the dull grey colored wood looking like this;

Next you need to fill those shrinkage cracks on the exterior of the window and you don't want to use something that will shrink or crack as the wood expands and contracts with heat or cold. Splits or cracks on the interior will be filled with colored wood putty at a later date when the wood has cured but in the meantime I have filled the the exterior splits and cracks with window glazing putty which will never fully harden and will allow the wood to expand. Since the putty is linseed oil based I went ahead and did this today after the first application of linseed oil to the wood.
I hope this helps some of you out there reading this. It may even save you a ton of money!
This ends todays lesson, except that linseed oil comes from flax seed. Flax is used to make linen. Make sense now, eh?
13 comments:
Great tip on the linseed bath to waterproof the wood and glazing to fill in the cracks. I'll try it on the next window.
Thanks for sharing your how to progress. This spring/summer will be my first step into window repair. Because of my fear of dealing with windows and all of their parts I Initially was planning on replacing all of them with vinyl but many repsonded and told me to do all I can to save my wood ones so I'm gathering all of the information I can on the subject.
Never knew about the linseed application - great idea. Have you any tips on getting the windows to fit tighter in the frame? I have stripped (heat gun) and reglazed but when I put them back in they dont fit real tight - I guess the wood shrinks over time.
Thanks for the tips. I've done a few window repairs over the last three years, and I'm sure I'll do many more in the years to come. It was some very useful info to be sure.
Regarding 1922's comment, perhaps the shrinkage was do to humidity? I'm always amazed at how much a differece humidity can make. I've never used a heat gun, but could it dry the wood out enough to effect the fit?
All I can say about shrinking windows is "Don't they make weather stripping for that?"
Some insulating felt should do the trick. I know that for sticking sashes you rub the sides with soap or paraffin wax.
A heat gun won't dry out the wood any. In fact, using a heat gun will expose you to smells that haven't been sensed by a human nose in a hundred years! Some are bad, like the smell of old dog or cat, most are the smell of 100 year old wood resin. Our built in cupboard yielded the odor of soap powder and still smells like soap making me suspect the room was used as a utility and laundry room after the 1930s.
I realise the trail has gone cold but can you help with a formula for making trowelling mastic to seal the space between a sash window frame and the stonework including under the sill? I recall the main ingredients are (sharp?) sand and linseed oil (boiled?) but don`t know the proportions or if any other ingredient is involved. The shops here only want to sell silicone cartridges and suchlike so your help would be appreciated.
Are you satisfied with the use of the linseed oil? Is there a particular brand or type you would recommend now that you've done quite a few windows? I'm considering using it to treat the windows on my 1925 house. Is there anything you wish you had known about using linseed oil before you started?
Mary Ann,
I buy the gallon cans of boiled linseed oil at Lowes or Home Depot. The only thing about linseed oil besides the fact that it smells is that if you place rags with linseed oil on them in a bag, they may ignite spontaneously. Don't try sanding the wood after applying linseed oil either. It will gum up the sandpaper.
That sure looks like a tough job, but nothing a professional window contractor can't do.
Clearly, thanks for the help in this question.
Oh man, this is why I never dared going DIY when it comes to window restoration - especially for old classics like these. Won't the glazing just make the wood crack even more? How about using wood fillers instead?
Hit hanks for the advice ! Do I stain the interior and exterior before or after the linseed oil process? Did you stain yours? I'm new to all this , I'll be waiting with hopes you respond
Linseed oil is a hardening oil and acts as a sealer. On these windows, the outside was painted and the inside was painted beige, then nshellacked with a tinted shellac containing a dark walnut analine dye that is soluble in alcohol.
Post a Comment