
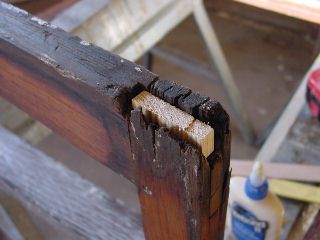
Remember this?
And This?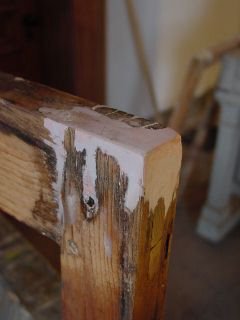
Well, now it looks like this...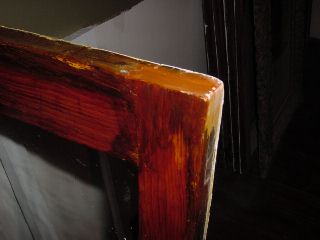
The bondo was painted to match the water stained part of the wood using acrylic paint and then the inside of the window was given 4 coats of shellac. I didn't bother trying to mask the repair on the edges of the window since they won't be visible. The outside of the window was painted white. I don't need to waste a picture on that I'm sure we all know what white paint over "bondo" will look like!
Next, glazing! Ooooh, so exciting.....
I've finally gotten really good at this after doing some 20+ windows over the last 5 years. Besides a can of glazing putty, you need one of these;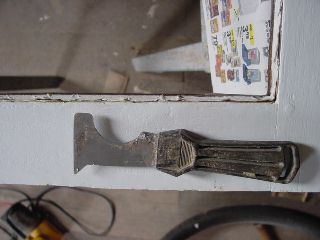
a glaziers putty knife.
This is very important. If you try to use a regular scraper or your fingers then you will get less than quality results based on your own talent and ability. With one of these you should be able to re-glaze a large single frame window in about 30 minutes. A six paner will take longer. Of course you can cheat and buy a tube of window caulk but the stuff isn't the same as good old linseed oil based putty. Firstly, you don't get to know what it is like to have gooey putty all over your fingers. Secondly, linseed putty allows you to screw up over and over again. You just roll the stuff up and start over with no waste (except the stuff that stays on your hands). Besides rolling the putty in your hands to get it warm and loose, the key to getting a good seal is putting a small amount of putty on the wood ridge that supports the glass to provide a bed that the glass can sit on. If you look at the picture above you will see a continuous smudge of putty around this ridge. After you place the glass in the frame, you need to lock it in place with glaziers points. I prefer the modern ones with the two side "risers" that allow you to use a putty knife to push the point into the wood. If you use the old style triangle flakes then there is a very thin edge to push your blade against and a risk that you will break the glass. (I know, I have done it!) To finish off you need to place a roll of putty along the edge of the pane of glass and the frame and press it in place with your fingers or the long flat edge of the putty knife. To finish and get a good smooth bead of putty you need to draw the short flat edge across the length of the putty bead using your forefinger to apply pressure on the short edge of the putty knife. This blade needs to be at a sharp angle because you only need adequate putty to hide the glaziers points. As you draw the blade back you can use the back edge to cut the excess putty on the glass and with pressure you can utilize the inside edge of the frame to cut away the excess putty on the upper side of the original bead. The edge of the blade should be resting on this as a guide. If you draw back about 8 inches at a time and remove the excess it will be a lot easier than trying to complete a whole edge in one go. It may take two passes to get the final bead right and you can smooth out any rough spots using your finger. If you want to you can dip your finger in some paint thinner. I tend to just rub mine quickly up and down in short strokes along the putty to get a smooth edge against the glass. The sharp edge of the putty knife is useful to get perfect corners and when it comes to cleaning off the excess putty on the inside of the window as a result of pressing the glass into the putty "bed". When you are done it is also useful when removing putty from your fingers and for cleaning your finger nails....
4 comments:
Thank you for the update. I've taken a rest from my window step-by-step but hope to start it up again soon and will use your expertise to help me. Thanks for taking the time to show and explain fully how you accomplish this. :)
Have you ever used any of the glazing putty they have in the caulk gun tubes with a 45 degree, square tip? I'm curious to know if it is one of those time saving inventions which isn't.
Thanks for the glazing tutorial, I'll be doing some of that pretty soon.
Oh, yeah. The upstairs bathroom we are working on has a window that looks like that with the added bonus of a hideous storm window on the outside. We were going to restore it but we decided to replace the window with a nice wood double hung/double pane Anderson window and remove the ugly storm window.
-chris
It's amazing how a rotten window such as that can be salvaged with a bit of restoration and repair. Those broken edges look like they're new again. You made good use of the paint to cover up the signs of wear and tear.
Post a Comment