Let me also state that I am not going to document how to do a complete historic replication of plaster walls. All that I am trying to achieve is a decent patch job so that I can smooth my walls with joint compound. My walls have been painted with several layers of textured paint. They have been poorly patched in the past and one wall was severely bulged. I hate textured walls. Textured walls are a simple solution for cracked walls. If I wanted to live in a cave I would have bought a cave.
For smoothing walls I use joint compound. Why? Because it sticks to anything, is easy to apply, dries overnight and is easy to repair any dings. Plus, acrylic paint sticks to it. If I were doing a historical renovation then I would use lime putty and calcimine paint.
There are two types of plaster. Gypsum plaster, also known as plaster of Paris and a slower curing patching plaster. This sets relatively quickly, in less than one hour. The trick to extending the cure time is to NOT stir it but rather to "sift" the plaster into water and allow it to absorb the water.Unfortunately, this is what most people use to fix cracks and dents and it ends up appearing as a ridge running across the wall or ceiling following the crack line because it cures too soon. It usually has a crack reappear down the center. Most old houses I have been in have them!
Then there is Lime plaster. Lime plaster is what has been used for centuries to cover walls and is most likely to be the culprit needing repairs in most old houses. Lime plaster can take many days to cure depending on humidity and temperature. If you want to speed up the cure time, add some plaster of Paris or patching plaster to the lime plaster mix.
I am going to use a combination of lime plaster and lime plaster with some plaster of Paris added in my patch jobs. There are two rules that you need to follow when doing plaster repair. Don't try to finish on the first application and don't try to make the patch flush with the rest of the wall until you apply the finish coat (which in my case is joint compound).
Mixing plaster is easy. I am NOT adding animal hair or string fibers to my plaster though I now fully understand why it is added. (More on that in a later entry). I haven't gone through the process of mixing up a bucket of lime putty either though I may do this for the "Hell of it" later this week when I buy another bag of lime since I have many other uses for it around this place. Plaster is hydrated lime and sand. A good basic mix is two parts sand to one part lime. More lime makes the mix more pliable. A scratch coat that needs to key to a surface needs to be pliable and you may even want to do a 1:1 ratio. A finish coat is just lime. A filler coat or "brown" coat is 4 or 5 parts sand. If you use gypsum in your mix, substitute it for lime.
Hydrated lime costs about $5.00 for a 50 lb. bag. It is called masons lime and can be purchased at a brick supplier. There is also a finer product known as finishing lime and even a pre-mixed lime putty but these are more costly. A bag of multi-purpose sand is less than $4.00 for a 70 lb. bag. A 25 lb bag of plaster is about $8.00 I think. I will know later this week when I buy one.
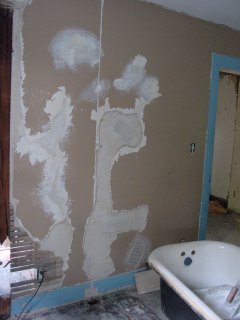
I started my repairs on Saturday using up some hydrated lime that I had left over and some sand. I did some of the easier repairs and let the plaster dry overnight. It took about 12 hours for the first coat to solidify enough to apply a second coat. I started with the repair of the chimney. At some time there was a woodstove in the room and the repair left a bulge in the wall. I removed the bulge with a chisle and had to remove the brick plug and replace the bricks and mortar. As soon as I did this I applied a base coat of plaster since I had soaked the bricks for the repair in water so they wouldn't suck the moisture out of the mortar or the plaster. After applying plaster to the brick surface and allowing it to set up for an hour while I plugged a few more areas with plaster I came back and scored the surface so that the second coat could "key" to it more readily.

By the time I left the wall looked like this

and I had done some repairs on the other side of this wall too with a hastily mixed up lime putty which was exhibiting some shrinkage cracks as it cured. The cracks can be smoothed out with a wet finger. Mine are going to get covered with joint compound so I don't mind the fine cracks. It is important to wet the area to be patched before applying plaster to reduce cracking due to the moisture being drawn out of the plaster.
On Sunday I did some more plastering in between scraping ancient wallpaper from walls and ceilings. I'll show you those pictures later because they apply to the next post when I will answer the question about plaster repairs over exposed wood lath.
Maybe one day I'll show you all the types of wallpaper I have uncovered in this place.

6 comments:
So if all of the POs kind of glopped more stuff (either joint compound or plaster) over the walls to fill in the cracks, and the walls are horribly uneven and bulged in spots, should we chip out the buldged areas? Will you be posting any pictures of your application of plaster to bricks technique? We have plaster directly over brick on all exterior walls and the shared wall. (Only the partion walls have lath).
Hi Gary,
The Brockton Bungalowers will be doing some stuccoing in the early fall and since the house was built in 1920 I am guessing that the stucco I'll be "marrying up to" is lime based. What do you recomend for this? Do you think I should use a lime based stucco or forego it? The 'net info avail on this just confuses me even more. Is there a way to test my stucco for lime?
Derek canavan
we had the bulgy extremely wavy look too- I am curious how to fix that other than cutting it out.
Hi! I'm also in the Dayton area - where did you buy your hydrated lime? I'm about to whitewash the exterior of our house and can't seem to find the stuff.
THANKS!
In the Dayton area, masons lime can be bought at Snyder Brick and Block on Dorothy Lane near Walmart for around $13 a bag. The bags weigh 50lbs.
Thanks so much! That's right by me. :)
Post a Comment